Securing fuel tank breather pipe to roof.
31 posts
• Page 2 of 3 • 1, 2, 3
Again, no reason to go across the roof, it works fine just over the c pillar vent, and everything remains easy to access if any maintenance is required
A side question, when adding the vent line to the filler neck, does it radically improve the filling efficiency?
I guess I have got used to pulling the nozzle out, holding back the vapor recovery snorkle and finishing the fill.
A side question, when adding the vent line to the filler neck, does it radically improve the filling efficiency?
I guess I have got used to pulling the nozzle out, holding back the vapor recovery snorkle and finishing the fill.
- gus
- Fourth Gear

- Posts: 729
- Joined: 05 May 2011
Some of the Key points of the ?Club Lotus? modified breather.
When tank is filled, air is expelled at a high rate via the big bore tubing connected to the filler neck.
The reason for the breather tube still going to roof height is to help eliminate fuel discharge via the tubes. Much lower tubing can still spill out fuel, particularly when travelling around fast sharp corners with a full tank of fuel.
Trevor
1968 Elan +2 50/0173
1968 Elan +2 50/0173
-

TeeJay - Fourth Gear

- Posts: 540
- Joined: 30 May 2007
+1 the breather tube still needs to go up and over the top 
Alan
Alan
Alan.b Brittany 1972 elan sprint fhc Lagoon Blue 0460E
- alan.barker
- Coveted Fifth Gear

- Posts: 3788
- Joined: 06 Dec 2008
Tee Jay
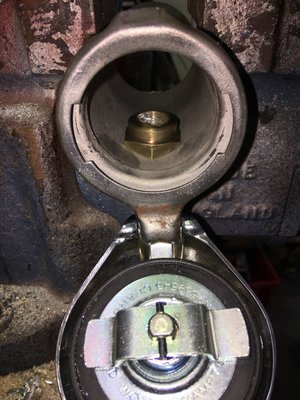
How have you secured the tapping point into the fuel filler neck please, how have you sealed around it, do you have something securing it attached inside the filler neck?
I?m thinking I?ll need some sort of screwed boss brazed inside the filler neck.
Cheers
Simon
How have you secured the tapping point into the fuel filler neck please, how have you sealed around it, do you have something securing it attached inside the filler neck?
I?m thinking I?ll need some sort of screwed boss brazed inside the filler neck.
Cheers
Simon
Change is inevitable, except from a vending machine!
- Bigbaldybloke
- Fourth Gear

- Posts: 889
- Joined: 16 May 2017
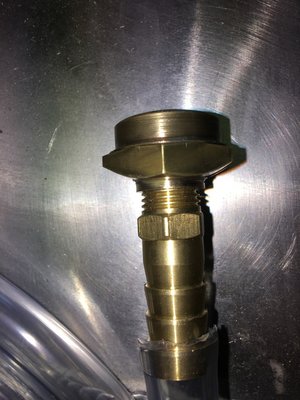
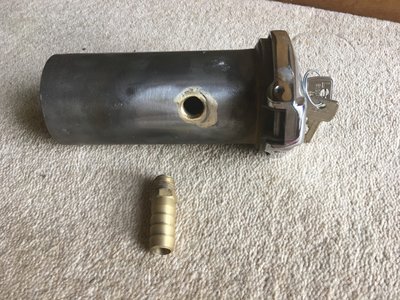
Simon, you?ve got it in one.
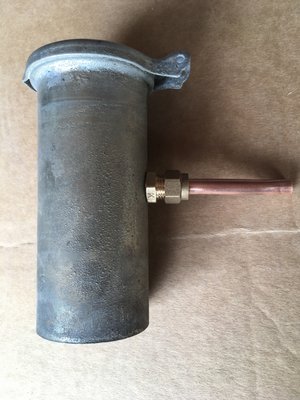
Yes a tapped boss shaped and brazed to the inside.
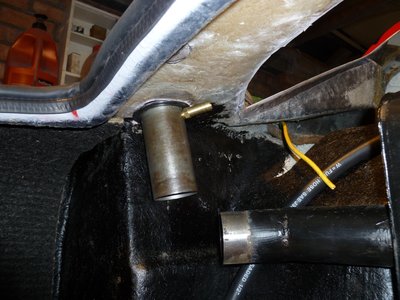
My picture shows the initial setup, which I had tapped the filler neck.
It is import to position the filler neck so that the fuel cap is in the correct position and then position the hose connector. The boss was then brazed to the filler neck.
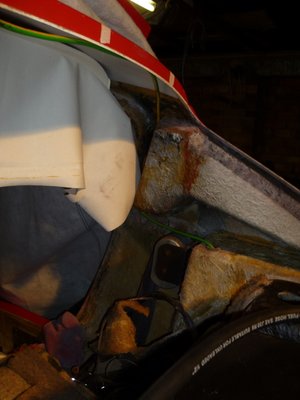
For further information, the photo shows the yellow (earth wire), which I used to route and measure the tubing which goes over the roof and out into the RH rear wheel arch. All being part of the revised breather system.
As I fitted a new roof lining, it was an easy decision to route the hose in the roof as recommend.
I had spent many months scraping the paint off the body, then used fibre glass matt to reinforce the know weak areas of the body, then tissue for repairs. Then a long protracted spraying of the several layers of paint. There was no way I would risk a breather system which could result in petrol spills.
Trevor
1968 Elan +2 50/0173
1968 Elan +2 50/0173
-

TeeJay - Fourth Gear

- Posts: 540
- Joined: 30 May 2007
Thanks for those pictures, most helpful. Plan decided, just need to obtain the necessary fittings and get on with it.
Change is inevitable, except from a vending machine!
- Bigbaldybloke
- Fourth Gear

- Posts: 889
- Joined: 16 May 2017
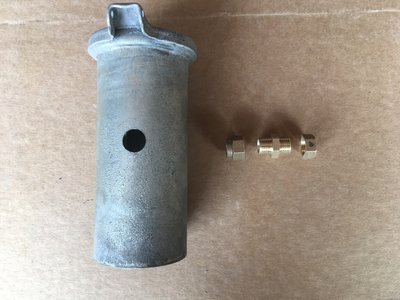
Hi all, I used all the info everyone provided and came to a similar solution using slightly different parts but to the same effect. It?s actually two parts machined and brazed together to form the boss that was then brazed into the filler neck and the third part screwed into that once the filler neck was in the car. I haven?t fitted the breather pipes over the roof, I?ve gone for breather valves and a pipe that goes up the rear pillar and then back down into the same side wheel arch. I?ve posted pictures in another thread but can repost here if anyone is interested.
Change is inevitable, except from a vending machine!
- Bigbaldybloke
- Fourth Gear

- Posts: 889
- Joined: 16 May 2017
Hi all
I'm just in the process of installing the breather mod discussed here, I've sorted the breather into the filler neck and the big bore breather hoses but have a question regarding the small bore vent pipe. What bore is required for this please? I'm looking at taking it up the C post and then back down again through the original exit hole.
Thanks
-

Andiken - Second Gear

- Posts: 103
- Joined: 05 Jun 2017
I don't believe the bore size needs to be all that large.
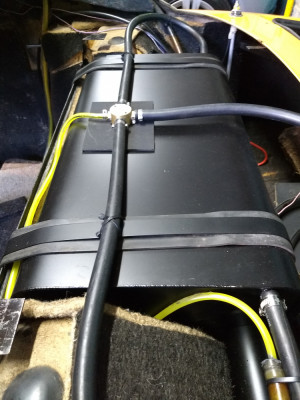
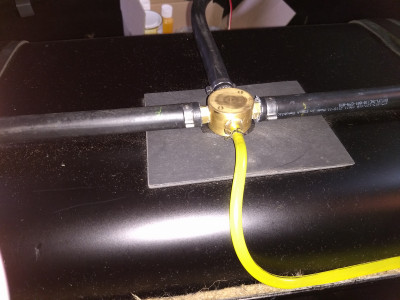
Having done the filler pipe mod and the MX-5 one way valve mod I retained the original breather pipes on the car due to not wanting to disturb the headlining. I just blocked one off completely and then fed a small bore fuel resistant pipe up the other original breather pipe from a centre manifold that I made up.
All seems to be adequate without issues so far and I have no smells now at all.
Alan
Alan
Currently:-
1971 +2 S130/ 5speed Type 9.
1960 MGA 1600 Mk1 Coupe. 5speed type 9.
Currently:-
1971 +2 S130/ 5speed Type 9.
1960 MGA 1600 Mk1 Coupe. 5speed type 9.
- alanr
- Coveted Fifth Gear

- Posts: 1055
- Joined: 14 Sep 2018
It was a while ago now but the small bore breather pipe I used was I think 4.5mm ID and 7.5mm OD.
The manifold was turned up from a solid piece of round brass, drilled and threaded accordingly with 3 x1/2 inch outlet tails for the large breather pipes and a smaller one 4.5 mm for the breather pipe.
Here's another shot of the manifold. As you can see i mounted it on a piece of plywood stuck down with Tigerseal.
Hope this helps.
Alan.
Alan
Currently:-
1971 +2 S130/ 5speed Type 9.
1960 MGA 1600 Mk1 Coupe. 5speed type 9.
Currently:-
1971 +2 S130/ 5speed Type 9.
1960 MGA 1600 Mk1 Coupe. 5speed type 9.
- alanr
- Coveted Fifth Gear

- Posts: 1055
- Joined: 14 Sep 2018
31 posts
• Page 2 of 3 • 1, 2, 3
Total Online:
Users browsing this forum: No registered users and 21 guests

