Sows Ear Chassis
Enough with the Sow's Ear crud....
My vision may be failing, but I know a silk purse when I see one.
AMA

My vision may be failing, but I know a silk purse when I see one.
AMA
- TurbineHeli
- Second Gear

- Posts: 64
- Joined: 24 Nov 2012
TurbineHeli wrote:Enough with the Sow's Ear crud....
My vision may be failing, but I know a silk purse when I see one.
AMA
As purchased on the 16th of May 1999
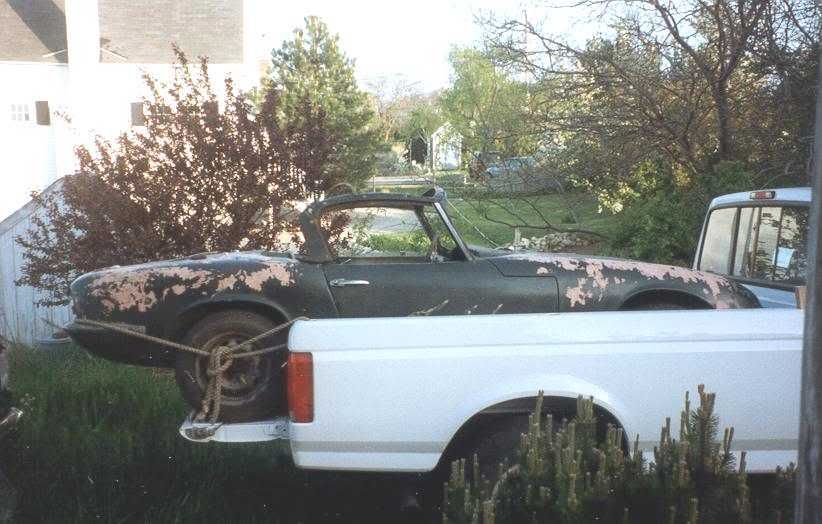
elan-photos-f18/early-4020-t12947.html
OK, stop by and take a look.
How about a pig with lip stick?
There are good Elans and then there are ones that have had a hard life, been neglected, been beaten to a near death experience, floor sweepings, etc..
Paint and paper make it what it ain't! Call it what you like.
If you spent 30 years outside on the north side of Long Island you'd look pretty rough and there is is not a lot that you can do about it. This body shell was hand sanded with 180 grit wet paper and all of the pock marks blown out with 180 psi of air, it sounded like pop corn popping. There were holes on nearly every panel that were done by a back hoe and a cultivator rake that was clearing the overgrown brush away so that the Elan could be pulled away from the side of a barn where it had been left for dead for those 30 years. The holes were fixed with some old resin and mat that I had left over and The pocks were filled, several times, the rotted lattice replaced (like most type 26 that are rotted) and the shell primed and sanded 2 or 3 times and a coat of cheap base coat applied and two coats of clear. It was the last car painted in September of 2003 by my friend before the building was razed by the MBTA to build a parking lot. It never was wet sanded or buffed as it was moved out the next day. This is no queen like many of the sweet things that you see here on the forum and elsewhere. Photos tell a story and normally its a pretty good one, pictures lie too, but I don't. I tell it like it is and how I see it, there is no cheaten the truth, it is what it is and no more or no less!
Gary
December 9th 5:40 am
It was warm again yesterday (mid 40's) so I was out in the garage looking for something to do. I thought that since all of the electrics were tested it was time to bolt in the dashboard and tighten the rest of the loose bolts under the dash and tighten up the column bolts. I didn't have the fiber washers or the 2 lower dash bolts so I went down to the local hardware store and found what I was looking for. The fiber washers were gray and too large in the outside diameter, so I stacked all 6 between a couple of AN washers and slide the stack onto a 5/16 diameter bolt and tightened up a nut on the end. Inserted the bolt into the drill chuck and spun them and took some 80 grit paper and turned them down to a diameter that was close to what I wanted. Without the radio cutout it was tough to get to the top center dash bolts, I had to access them through the radio speaker cutout. I am still not sure of the correct order of assembly but its not something that I do a lot and will probably try another assembly order next time.
Gary
1:00pm
A bit more done this morning, not a lot but I got some more parts out of the living room so its a good day.
When I started
Not a lot better but they work
6:50 pm
It got dark so I could get a decent picture of the dash without the light for outside messing things up. It still needs a few things like the correct light knob but it will work and that is what this Elan is all about. better to drive a rat than to not drive at all
-

garyeanderson - Coveted Fifth Gear

- Posts: 2626
- Joined: 12 Sep 2003
Hi Gary,
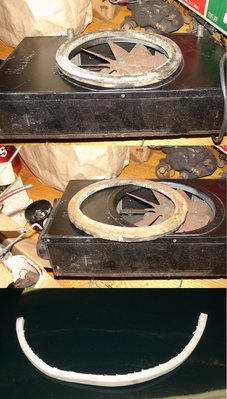
Is there some sort of seal that's supposed to fit between the heater plenum and heater box?
Attached is your pic from some months ago.
Also, if I had a VIN #, it was lost many, many years ago. Guess I'll have to begin the Kabuki dance soon with the folks at MA RMV.
Angier
Is there some sort of seal that's supposed to fit between the heater plenum and heater box?
Attached is your pic from some months ago.
Also, if I had a VIN #, it was lost many, many years ago. Guess I'll have to begin the Kabuki dance soon with the folks at MA RMV.
Angier
- TurbineHeli
- Second Gear

- Posts: 64
- Joined: 24 Nov 2012
Hi Angier
Lets step back a bit, this is an Elan Built buy me and in no way represents what Lotus built on there production line. There are a lot of things that I don't do that they did or might have done.
The gap between the heater and the heater plenum would normally be much less. Lotus used a layer of jute under the heater and it was likely 1/2 inch thick (from memory, I tossed out all of that smelly stuff) which would have raised up the heater so that it was much closer to the plenum, If I remember correctly there was a 1/4 inch ring of open cell foam that disintegrated when the heater was pulled out. and the open cell foam probably worked well enough as it compressed to nearly nothing when the dash was pushed back and bolted int place. I had a much larger gap to fill, it was nearly 1/2 inch and when I looked around I found some closed cell polyurethane foam and cut that into strips and used some 3M trim adhesive and stuck it to the heater. what you see in the first two pictures is the gasket from a Ford Cortina mk1 and may get used on the next build (if it is the right height), the third picture is what was left over after cutting the closed cell foam that I had, it was cut from a 1 x 4 inch piece with a razor knife and coiled like a snake for a couple hours and then glued with the 3M adhesive. That is what I did, what you do is entirely up to you, I am sure that some sort of replacement is sold by some of the vender's but I tried to keep the cash outlay for this kind of stuff at a minimum. Hope this helps you and others too.
Gary
-

garyeanderson - Coveted Fifth Gear

- Posts: 2626
- Joined: 12 Sep 2003
Well so that seemed to work - and now my sows ear contribution.
Gary and all - last monday I went and bought this Type 36 - sort of a bastard sows ear at the right price.
A restoration was started about 15 years ago at a pals shop. Body / paint work was done, new Spyder chassis instaled, brakes - suspension - steering done. then the owner abandoned it about 10 years ago AFTER he sold the twink and tranny. The car is complete otherwise and comes with a zetec engine but no transmission.
Of course I do have the spare twink engine / tranny from the S2 future project to use but I will still enterain the zetec option if the transmission problem could be resolved.
Basically it will be an assembly job without major $$ outlay - fun in other words.
I would appreciate any advise / opines on a 5 speed tranny scource / convertion for the zetec install' Like Gary I dont need to be a purest on this one - 26/0538 fills that bill for me.
Bill Rathlef
Vancouver Island, Canada
"Keep your stick on the ice, boys."
Vancouver Island, Canada
"Keep your stick on the ice, boys."
-

Bill - Third Gear

- Posts: 368
- Joined: 05 Oct 2003
Hi Bill
26/0538 looks great, so does the garage. Not sure what that camper is doing taking up all of that useful space though I don't think my garage has ever been that clean.
That Coupe needs some "Sprint" stripes, Steve (Elanfan1) makes some nice reproductions I believe. Not sure about that Zetec question, probably belongs in the mods section. I think that they are old tech and I don't think I would use one, I am still debating in my mind (vote with your wallet mentality) Pre-Crossflow, Crossflow, or Twin Cam for Tingles C prod body but at the moment the money is glued to the inside of my wallet and I can't make any decision. To be honest, with any engine swap its all a lot of work and to end up with something that I just couldn't smile when I opened up the bonnet would just make me not do a lot of the swaps that are possible. I like Alan's DurElan, it is the money that puts me off on that one (not surprising). My guess is that when the time comes to drop an engine into the fake medici blue Elan, it will be a 83mm bore, tall deck 2737 or 681 Twin Cam of 1680cc. My reasons are I have a good head that has been rebuilt and both or those blocks. It still will cost a fair bit and with winter not really started yet all of my spending is on hold.
Almost forgot, I swapped out the front directionals on the sows ear for a pair of dual filament bulb lamps, I don't have a decent pair of L658 thimble lamps so the L691 will do double duty. I am going to see if I can find a pair of white reflectors to fill in the openings.
p.s that Coupe will make a great winter beater, some good snows and you will be all set...
Gary
26/0538 looks great, so does the garage. Not sure what that camper is doing taking up all of that useful space though
That Coupe needs some "Sprint" stripes, Steve (Elanfan1) makes some nice reproductions I believe. Not sure about that Zetec question, probably belongs in the mods section. I think that they are old tech and I don't think I would use one, I am still debating in my mind (vote with your wallet mentality) Pre-Crossflow, Crossflow, or Twin Cam for Tingles C prod body but at the moment the money is glued to the inside of my wallet and I can't make any decision. To be honest, with any engine swap its all a lot of work and to end up with something that I just couldn't smile when I opened up the bonnet would just make me not do a lot of the swaps that are possible. I like Alan's DurElan, it is the money that puts me off on that one (not surprising). My guess is that when the time comes to drop an engine into the fake medici blue Elan, it will be a 83mm bore, tall deck 2737 or 681 Twin Cam of 1680cc. My reasons are I have a good head that has been rebuilt and both or those blocks. It still will cost a fair bit and with winter not really started yet all of my spending is on hold.
Almost forgot, I swapped out the front directionals on the sows ear for a pair of dual filament bulb lamps, I don't have a decent pair of L658 thimble lamps so the L691 will do double duty. I am going to see if I can find a pair of white reflectors to fill in the openings.
p.s that Coupe will make a great winter beater, some good snows and you will be all set...
Gary
-

garyeanderson - Coveted Fifth Gear

- Posts: 2626
- Joined: 12 Sep 2003
Gary and all
I can afford to be patient on this one for the engine swap, but I am more inclined to do up my spare twink and keep it origional, a 5 speed would be nice tho. I will do the sprint stripes of course. I may just consider the S2 roadster as spare parts on the shelf for now. Yhe 36 will now be next years project start - I want to complete the TR3 for this spring first. I have some parts sorting and inventory to do with the 36 to get me going with it till the serious work begins.
I go in for a heart proceedure (angioplasty / stents) on Thursday - so I have been kind of slow these past few months put will get at it with VIGOR after the new year.
Two great christmas presents for Billy - A rebuilt personal fluid pump and a pretty type 36.
A couple of photos attached including the 26/0538 on the MaxJax -- it's brilliant!!
Bill Rathlef
Vancouver Island, Canada
"Keep your stick on the ice, boys."
Vancouver Island, Canada
"Keep your stick on the ice, boys."
-

Bill - Third Gear

- Posts: 368
- Joined: 05 Oct 2003
Not a lot happening as of late, but have done a few things that needed to get done. I had 8 wheels that had the original 1960 or 1970 tires still on them. I needed to get them off. I guess I could have taken them someplace and given some money to have it done or even drive up for lunch and used a friends machine but both options would have cost $40 or $50 so what I did was to use the F250 Diesel and a 2 x 12 board about 4 feet long to break the bead off of the rim and used a pair of bolt cutters to cut the tire bead band. The bolt cutters were over at my folks house so I went over to see them and asked my father if he remembered where they were, 87 years old and he replies "on the top of the old table saw" and there they were, I wish I could find the 1/2 box that I just put down for Christ sakes. Anyway I was done and cleaned up by noon and I called it a good day. I spent another morning working on tightening up the Webers as I didn't think they were coming off (at least till I try to get it running) and rigged up a throttle cable. I had to rob a bicycle for the brake cable pinch bolt to get that to work. Then there was my screw up of not installing the ground strap on the rack for the horn to deal with, took a couple hours of swearing at myself to take care of that. I looked, around for some horns but could only find some Fiamm air horns and the horns should have been painted but this isn't painting season so they went one the way they were. I tested the compressor and it worked off of the Elan just with the + and - touched to the battery. It took me almost a day to to get them working in the car. Several issue and the fact that its cold and I guess I am just stretching this out as there will be a couple of months of winter to deal with before I have to think about getting it running. I also have to spend some money. To spend to just see it sit does not make me want to open my wallet. I think its almost time to drop in one of the radiators as there is nothing left in the nose that I need to access, I even pulled out one of the old nose grills, the sun is supposed to be out today so maybe some black lacquer will get put over the rust, I don't think that I want to sand blast it as there may be nothing left 
Gary
Hi Bill
I do hope that the stints went in ok and you are feeling much better...
Gary
Hi Bill
I do hope that the stints went in ok and you are feeling much better...
-

garyeanderson - Coveted Fifth Gear

- Posts: 2626
- Joined: 12 Sep 2003
lotocone wrote:Hi Gary,
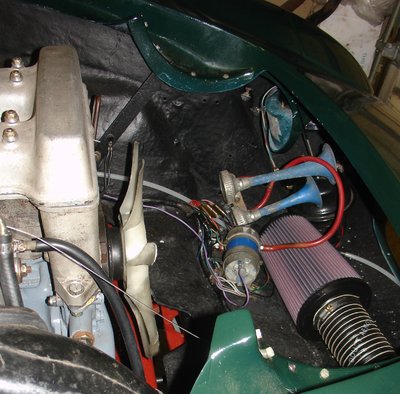
There is a nice looking air filter in the nose of your car. I think it's probably a K&N. Do you have a model number?
I hope Bill will be okay too. I've had stents myself and it worked out well.
Thanks,
Bob
Hi Bob
I got it from Ray at RD, about $110 for the hose and filter, 50 and 60 each (from memory), you can maybe save $20 on the filter if you shop around but I try and order enough stuff so the shipping is all but lost on what is saved by "shopping around".
I checked the radiator for leaks this morning and didn't see any so I used up the last of the black lacquer that I got this past summer to use for a guide coat and called it good enough. I had a 15 year old nos bottom hose kicking around so I used that. No top hoses yet but I don't have the rest of the parts to finish off the cooling system so it does not matter. I manged to get a washer and nyloc on the bottom two studs of the radiator, always one of my favorite jobs on a type 26, Kind of like the type 36 and type 45 door handle clips, what the hell were they thinking anyway.
Last edited by Guest on Sun Dec 23, 2012 12:36 am, edited 1 time in total.
-

garyeanderson - Coveted Fifth Gear

- Posts: 2626
- Joined: 12 Sep 2003
[quote="piss-ant
Hi Bob
I got it from Ray at RD, about $110 for the hose and filter, 50 and 60 each (from memory), you can maybe save $20 on the filter if you shop around but I try and order enough stuff so the shipping is all but lost on what is saved by "shopping around". [/quote]
Thanks Gary. I got my hose from Ray a few years ago, so his filter should work. Good luck with the radiator. Wow, your dash looks really nice. You mst happy with it.
Bob
Hi Bob
I got it from Ray at RD, about $110 for the hose and filter, 50 and 60 each (from memory), you can maybe save $20 on the filter if you shop around but I try and order enough stuff so the shipping is all but lost on what is saved by "shopping around". [/quote]
Thanks Gary. I got my hose from Ray a few years ago, so his filter should work. Good luck with the radiator. Wow, your dash looks really nice. You mst happy with it.
Bob
- lotocone
- Third Gear

- Posts: 238
- Joined: 09 Feb 2010
Thanks for best wishes guys, unfortunately I ended up with only an angiogram they found that I needed an MRI to make a decision if what damage that is there would be best addressed with a sts=ent or a bypass - so I must be patient I guess. y In the interim - no heavey work - sure glad I have the lift.
Your "sows ear" is looking great Gary - you are inspiring. At least I can work on the cars in a warm garage thru the winter guys.
Merry Christmas.
Your "sows ear" is looking great Gary - you are inspiring. At least I can work on the cars in a warm garage thru the winter guys.
Merry Christmas.
Bill Rathlef
Vancouver Island, Canada
"Keep your stick on the ice, boys."
Vancouver Island, Canada
"Keep your stick on the ice, boys."
-

Bill - Third Gear

- Posts: 368
- Joined: 05 Oct 2003
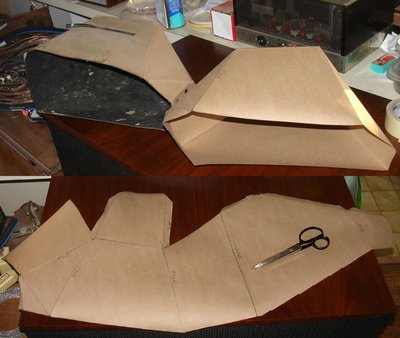
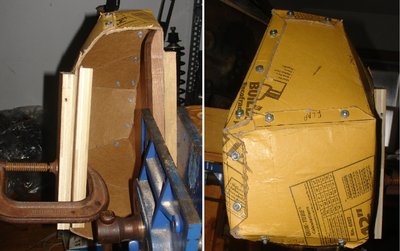
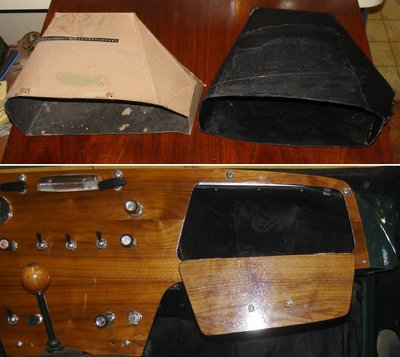
Well I can't top Bill's picture and not too sure how to follow it. Not a lot to do today and I thought it was going to slip into tomorrow without getting anything done but I had thought about the glove box and how gearbox had posted a reply to his rebuild about folding one up. I started by dumping everything out of 26/4597 glove box and trying to measure it in the S2. After 10 minutes of writing it all down, I just laughed and said what the hell am I doing and undid the 3 screws that held the box in and brought it inside to trace out on some rosin paper that I have a 3 foot wide roll of. I pulled of a piece about 3 feet long and started tracing one side and rolling to box onto the next side. After I had finished I was all the way to the other side of the rosin paper and cut out the lines and made the folds. A bit of tape later I was into the trial assembly mode. Tomorrow I'll see if I can find some heavy cardboard or ? I might even have to buy something, eek. Did I use that three letter word? 
Gary
I folded it up as I would for a RHD box, must remember to make the folds the opposite way!
Christmas Day Morning
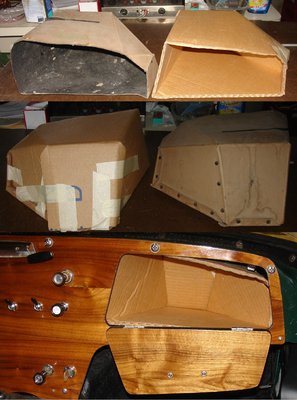
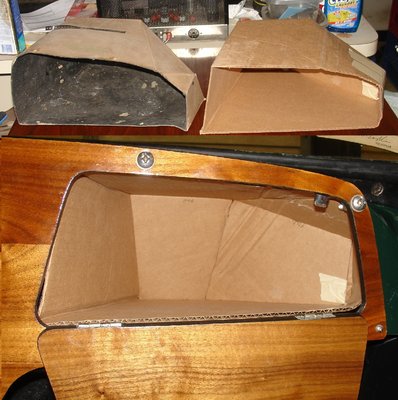
I was killing some time this morning and I have yet to find some decent card stock, I did have some double corrugated cardboard so I figured I could waste some time and cut out a prototype and see if I was close on the pattern. I messed it up on one of the folds but it is close so I think I can move forward and maybe even pay some money for something that is close to the stock needed to make one or two. I will update the pattern a bit and see if I can get something a bit closer to original. I will probably do another prototype or two with some thinner stock but this piece was handy so I used what I had.
Well the first proto was close so I made a second out of single thickness corrugated cardboard. I think its getting close enough to get some real stock to try out.
Gary
Thursday December 27th 01:30 pm
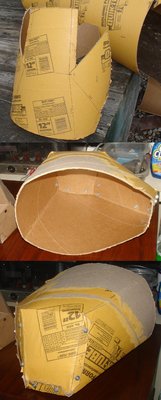
Had some time this morning to play with the glove box. I found some material that I thought would work at Lowe's. I was going to hunt around and try to get something that was better for the job but that meant looking and calling around and more than likely getting nothing done. What I got was a 12 inch sonotube for poring concrete piers. I gave $8 for the paper tube and thought it was worth it to come home with something. This material was .100 inch thick including the quick tube yellow paper covering, the stock material for the glove box was .090 inch so I called it a match. I traced my pattern on the tube and cut it out with the skill saw and jig saw, I flattened out over night underneath Beau's new birthday cinder block. when I pulled it out it still was on the rounded side but I didn't let that bother me. The Lotus box was riveted and that looked like it was not going to be the way that I was going to do it as I didn't have the rivets or the bucking tool, or the patients to try and hold the box in place while I bucked the rivets. I found some 10 x 32 screws and lock nuts and tried them, if they didn't work, we'll it didn't cost me anything. I lined up the ends and clamped them together. Then I drilled a hole and put the screw and nuts on. anyway, I ended up with a "rounded box" and now I have some clamps and plywood to try and straighten out the top and bottom. A bit of black enamel and I'll have to make some angle brackets and put it in...
Gary
Saturday December 29th 9:00 am
Well it is not a thing of beauty, but thats ok with me. It will do what is needed and that is to hold a bunch of stuff that will not be used much. I guess it's better than the hole that was there before I started.
Gary
Gary
I folded it up as I would for a RHD box, must remember to make the folds the opposite way!
Christmas Day Morning
I was killing some time this morning and I have yet to find some decent card stock, I did have some double corrugated cardboard so I figured I could waste some time and cut out a prototype and see if I was close on the pattern. I messed it up on one of the folds but it is close so I think I can move forward and maybe even pay some money for something that is close to the stock needed to make one or two. I will update the pattern a bit and see if I can get something a bit closer to original. I will probably do another prototype or two with some thinner stock but this piece was handy so I used what I had.
Well the first proto was close so I made a second out of single thickness corrugated cardboard. I think its getting close enough to get some real stock to try out.
Gary
Thursday December 27th 01:30 pm
Had some time this morning to play with the glove box. I found some material that I thought would work at Lowe's. I was going to hunt around and try to get something that was better for the job but that meant looking and calling around and more than likely getting nothing done. What I got was a 12 inch sonotube for poring concrete piers. I gave $8 for the paper tube and thought it was worth it to come home with something. This material was .100 inch thick including the quick tube yellow paper covering, the stock material for the glove box was .090 inch so I called it a match. I traced my pattern on the tube and cut it out with the skill saw and jig saw, I flattened out over night underneath Beau's new birthday cinder block. when I pulled it out it still was on the rounded side but I didn't let that bother me. The Lotus box was riveted and that looked like it was not going to be the way that I was going to do it as I didn't have the rivets or the bucking tool, or the patients to try and hold the box in place while I bucked the rivets. I found some 10 x 32 screws and lock nuts and tried them, if they didn't work, we'll it didn't cost me anything. I lined up the ends and clamped them together. Then I drilled a hole and put the screw and nuts on. anyway, I ended up with a "rounded box" and now I have some clamps and plywood to try and straighten out the top and bottom. A bit of black enamel and I'll have to make some angle brackets and put it in...
Gary
Saturday December 29th 9:00 am
Well it is not a thing of beauty, but thats ok with me. It will do what is needed and that is to hold a bunch of stuff that will not be used much. I guess it's better than the hole that was there before I started.
Gary
-

garyeanderson - Coveted Fifth Gear

- Posts: 2626
- Joined: 12 Sep 2003
Total Online:
Users browsing this forum: No registered users and 10 guests

