POR-15: Experience painting frame
8 posts
• Page 1 of 1
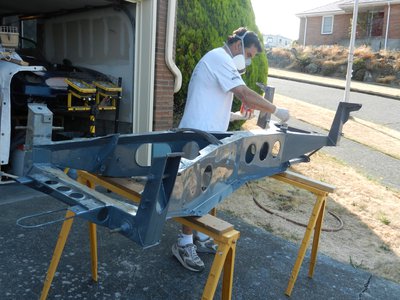
For those following along, I've been working on my frame, and on Sunday put on the final coats of POR-15. I'll post separately about the mods to the frame, etc., but thought I'd specifically weigh in on using POR-15.
Firstly, I bought it and some Metal Ready prep spray from Summit Racing (No connection, just impressed with their pricing and speed of delivery). I bought 2 quarts of POR-15 in gray (expensive at over $40/quart), and used just under 1 quart to get 2 full coats on my entire frame. I will have to break into the 2nd quart for suspension bits and other items, so I'm glad I've got it. But I'm also glad I didn't say "aaah, just give me a gallon". Definitely not needed.
POR-15 is definitely nasty smelling, so make sure you've got plenty of airflow, and I'd strongly suggest a respirator as they recommend, even if you're not spraying.
My frame had been sandblasted, and they say you can just blow it off and start painting. I went with Metal Ready, which etches the metal to give it some tooth and leaves an alkaline powder that needs to be wiped off before painting. It was probably 30 minutes to spray down the entire frame, keeping it wet with the Metal Ready for 15 minutes, then hosing it down and finally drying it with an air nozzle. During this process, staying in the shade would be ideal. I had some sun on the frame, so parts of it dried out quicker than I could spray, though I seem to have suffered no ill effects. I was able to spray down the entire frame with 1 quart (or whatever a full bottle of Windex typically holds), so if anyone in Seattle needs 3/4 of a gallon of Metal Ready, make me an offer
I actually did the Metal Ready prep a day before painting, as I wanted to be able to get right to the paint in the morning, again before the sun really hit (plus it's been in the 80's in Seattle).
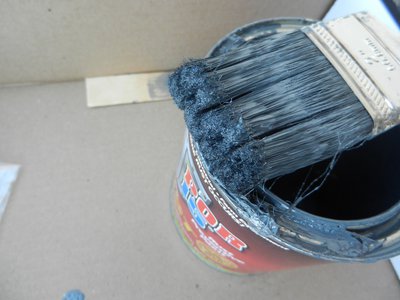
For painting, latex or other gloves are highly recommended, as is the respirator already mentioned. You'll also want brushes that are good enough not to shed hairs, but not any more expensive than necessary. I just couldn't imagine trying to rescue a brush or any tools from POR-15. It dries like a rock, and I believe you need their special solvent, as it's impervious to anything else. I figured I'd spend the money on disposable equipment.
Since I couldn't figure out how to support the frame in a way to allow painting of all sides at once, I took a 2-step approach. I did the tunnel (inside and out), engine side of the front Y and undersides of the upper flange, plus all the underside of the tunnel all the way back. Basically, with the frame upside down, I painted everything I wouldn't be able to get while I had the frame right side up. Phase 2 was the reverse of removal...I mean, same thing, with the frame right side up.
Joke is that without thinking about it, painting the bottom first meant I did all my learning on the only frame surfaces you can really see when the body is on, namely the bottom and engine bay. My 2nd day of painting yielded much better results, all of which will be firmly pressed against fiberglass where no human eyes will ever see it.
POR-15 seems to like horizontal surfaces best, so my suggestion here would be to tilt the frame on it's side, paint one engine bay inner side, tunnel, etc, give it a bit to set up, then flip and do the other. I did, however, also learn that going lighter on each coat helped immensely to get a smooth finish. The product claims to be self-leveling, and it was to some extent, especially on the horizontal. I used a new polyester brush, and when I was done, the product was just setting up on me, and melting the brush.
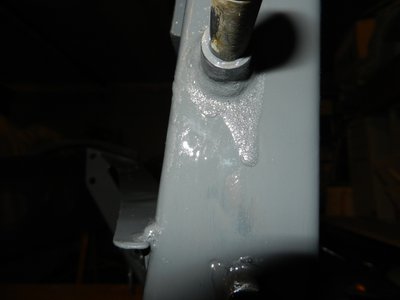
Undoubtedly, this left me some of the brush marks in some of my finish. I also learned that too much product will result in runs/sags, like any paint, and that the curing process can cause some "aeration" where it ended up so thick as to cause situations like this photo.
Overall, I'm happy with the result. It's not stellar, but I mostly think that's my inexperience. The next frame will be MUCH better. If one were bold enough to make this stuff airborne, I'd imagine you'd get a nearly powdercoat-like finish. The best portions of my frame would pass for just that, I think. And I can vouch for how hard it cures. I got some bad runs and wanted to sand them down and put another coat to smooth them out. Even with an air grinder, there was resistance. So, I think it'll be durable.
Oh, one of the biggest challenges is planning your time. You need 2 coats minimum, and need to get the 2nd coat on within a couple hours of the first. If you don't, the first coat will set up to a hard, glossy finish and you'll have to wet sand it to get some tooth back before applying the 2nd coat. I was damn determined not to let that happen, which meant a couple of 4 hour painting sessions for me since I split it into 2 phases over 2 days. All at once would be one long day, with some fancy jostling of the frame.
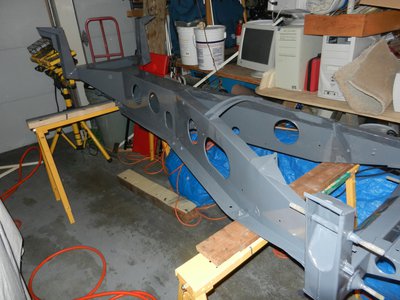
Here's the finished product:
I'm sure I've left some things out, so feel free to ask questions. I'd definitely use it again, though one could argue that I should have just gone with powdercoat, as it would have only cost me another $150 over my POR-15 material costs, and I wouldn't have had any labor in it. Perhaps, but this way, it is all mine.
Cheers,
Dave
Firstly, I bought it and some Metal Ready prep spray from Summit Racing (No connection, just impressed with their pricing and speed of delivery). I bought 2 quarts of POR-15 in gray (expensive at over $40/quart), and used just under 1 quart to get 2 full coats on my entire frame. I will have to break into the 2nd quart for suspension bits and other items, so I'm glad I've got it. But I'm also glad I didn't say "aaah, just give me a gallon". Definitely not needed.
POR-15 is definitely nasty smelling, so make sure you've got plenty of airflow, and I'd strongly suggest a respirator as they recommend, even if you're not spraying.
My frame had been sandblasted, and they say you can just blow it off and start painting. I went with Metal Ready, which etches the metal to give it some tooth and leaves an alkaline powder that needs to be wiped off before painting. It was probably 30 minutes to spray down the entire frame, keeping it wet with the Metal Ready for 15 minutes, then hosing it down and finally drying it with an air nozzle. During this process, staying in the shade would be ideal. I had some sun on the frame, so parts of it dried out quicker than I could spray, though I seem to have suffered no ill effects. I was able to spray down the entire frame with 1 quart (or whatever a full bottle of Windex typically holds), so if anyone in Seattle needs 3/4 of a gallon of Metal Ready, make me an offer
I actually did the Metal Ready prep a day before painting, as I wanted to be able to get right to the paint in the morning, again before the sun really hit (plus it's been in the 80's in Seattle).
For painting, latex or other gloves are highly recommended, as is the respirator already mentioned. You'll also want brushes that are good enough not to shed hairs, but not any more expensive than necessary. I just couldn't imagine trying to rescue a brush or any tools from POR-15. It dries like a rock, and I believe you need their special solvent, as it's impervious to anything else. I figured I'd spend the money on disposable equipment.
Since I couldn't figure out how to support the frame in a way to allow painting of all sides at once, I took a 2-step approach. I did the tunnel (inside and out), engine side of the front Y and undersides of the upper flange, plus all the underside of the tunnel all the way back. Basically, with the frame upside down, I painted everything I wouldn't be able to get while I had the frame right side up. Phase 2 was the reverse of removal...I mean, same thing, with the frame right side up.
Joke is that without thinking about it, painting the bottom first meant I did all my learning on the only frame surfaces you can really see when the body is on, namely the bottom and engine bay. My 2nd day of painting yielded much better results, all of which will be firmly pressed against fiberglass where no human eyes will ever see it.
POR-15 seems to like horizontal surfaces best, so my suggestion here would be to tilt the frame on it's side, paint one engine bay inner side, tunnel, etc, give it a bit to set up, then flip and do the other. I did, however, also learn that going lighter on each coat helped immensely to get a smooth finish. The product claims to be self-leveling, and it was to some extent, especially on the horizontal. I used a new polyester brush, and when I was done, the product was just setting up on me, and melting the brush.
Undoubtedly, this left me some of the brush marks in some of my finish. I also learned that too much product will result in runs/sags, like any paint, and that the curing process can cause some "aeration" where it ended up so thick as to cause situations like this photo.
Overall, I'm happy with the result. It's not stellar, but I mostly think that's my inexperience. The next frame will be MUCH better.
Oh, one of the biggest challenges is planning your time. You need 2 coats minimum, and need to get the 2nd coat on within a couple hours of the first. If you don't, the first coat will set up to a hard, glossy finish and you'll have to wet sand it to get some tooth back before applying the 2nd coat. I was damn determined not to let that happen, which meant a couple of 4 hour painting sessions for me since I split it into 2 phases over 2 days. All at once would be one long day, with some fancy jostling of the frame.
Here's the finished product:
I'm sure I've left some things out, so feel free to ask questions. I'd definitely use it again, though one could argue that I should have just gone with powdercoat, as it would have only cost me another $150 over my POR-15 material costs, and I wouldn't have had any labor in it. Perhaps, but this way, it is all mine.
Cheers,
Dave
Dave
'66 Elan S2 - 26/4378
'66 Elan S2 - 26/4378
-

bilcoh - Second Gear

- Posts: 136
- Joined: 10 Jul 2011
bilcoh wrote: I'm sure I've left some things out, so feel free to ask questions. I'd definitely use it again, though one could argue that I should have just gone with powdercoat, as it would have only cost me another $150 over my POR-15 material costs, and I wouldn't have had any labor in it. Perhaps, but this way, it is all mine.
Cheers,
Dave
Well, from your detailed account, I'm sold...if I ever re-do mine.
Had a quick perusal of the archives...can't find anyone regretting using POR, unlike some guys experience with powdercoating...and as you said "It is all mine! mine, I tell you!
- ardee_selby
- Coveted Fifth Gear

- Posts: 1090
- Joined: 30 Sep 2003
Sounds like spraying would give a good finish but how do you clean the gun?
Mike
Mike
- mikealdren
- Coveted Fifth Gear

- Posts: 1194
- Joined: 26 Aug 2006
I have sprayed POR15 before, just use lacquer thinner for cleanup. It flows out a lot, more so than ordinary paint, so don't get carried away.  I have used the gloss finish black, and it looks quite nice when done.
If it dries on your skin, it will be there for a while, best to avoid that.
If it dries on your skin, it will be there for a while, best to avoid that.
Mike
- elancoupe
- Fourth Gear

- Posts: 759
- Joined: 11 Sep 2003
I expect Mike is right. Just make sure to clean the gun right away. And he did remind me that the product is very thin relative to most paint products, so you really do need to go easy on that first coat, and I'm sure this would be especially true of spraying. Fog it on, or you'll have lots of sags and runs.
And here's a tip....if you're going to get some on your skin, do so in large blobs. It's been about 10 days since I finished. A couple of big drips on my skin were pretty easy to peel off within the first two days. The large patch where I just bumped my arm against the frame and got a very thin patch of paint on my forearm is almost completely intact still.
Dave
Dave
'66 Elan S2 - 26/4378
'66 Elan S2 - 26/4378
-

bilcoh - Second Gear

- Posts: 136
- Joined: 10 Jul 2011
Hi all, I went through the POR15 stage. Yes, it dries rock hard and as per original post, 2nd coat needs to tie to first coat before the first has fully cured.
In my experience, it does have some major short comings:-
1/ Nothing will stick to the cured coating so impossible to overcoat or repair. Ive tried POR's own recommened tie-coat overcoat primers etc and they all fall off.
2/ You will get some defects and they will allow rusting to occur which will lead to the POR coat lifting.
My own way forward now on anything that needs a long term coating is to start with a zinc rich primer (a whole different subject on its own), followed by tie-coat matched to the primer, followed by build coats with sufficient toughness for the application followed by a gloss coat if needed. The zinc rich primer allows for inevitable defects and/or damage without it being any great deal.
Regards
Gerry
- gerrym
- Fourth Gear

- Posts: 882
- Joined: 25 Jun 2006
gerrym wrote:Hi all, I went through the POR15 stage. Yes, it dries rock hard and as per original post, 2nd coat needs to tie to first coat before the first has fully cured.
In my experience, it does have some major short comings:-
1/ Nothing will stick to the cured coating so impossible to overcoat or repair. Ive tried POR's own recommened tie-coat overcoat primers etc and they all fall off.
2/ You will get some defects and they will allow rusting to occur which will lead to the POR coat lifting.
My own way forward now on anything that needs a long term coating is to start with a zinc rich primer (a whole different subject on its own), followed by tie-coat matched to the primer, followed by build coats with sufficient toughness for the application followed by a gloss coat if needed. The zinc rich primer allows for inevitable defects and/or damage without it being any great deal.
Regards
Gerry
Gerry,
Thankyou. A case of do it once, so do it right, I guess. On further reading the same scenario appears to apply to powder coating with not the best prep work causing the real problems.
P.S. Do I sense off-shore corrosion protection applications in the background here?
- ardee_selby
- Coveted Fifth Gear

- Posts: 1090
- Joined: 30 Sep 2003
Gerry:
Just curious about the types of defects you describe. My frame had very little rust on it after all these years. But the car was almost always garaged, and in environs without salt on the roads. Obviously, I'm already committed on the frame, but what might I expect for defects, so I know what to watch for.
Thanks,
Dave
Dave
'66 Elan S2 - 26/4378
'66 Elan S2 - 26/4378
-

bilcoh - Second Gear

- Posts: 136
- Joined: 10 Jul 2011
8 posts
• Page 1 of 1
Total Online:
Users browsing this forum: No registered users and 20 guests


