Tandem Master Cylinder
47 posts
• Page 3 of 4 • 1, 2, 3, 4
Just got home. I mounted my remote reservoir on the inside wing so height not an issue. Will try to get dimension and photo tomorrow evening weather permitting!
Mechanical Engineer, happily retired!
'67 S3 SE FHC
See Facebook page: W J Barry Photography
Put your money where your mouse is, click on "Support LotusElan.net" below.
'67 S3 SE FHC
See Facebook page: W J Barry Photography
Put your money where your mouse is, click on "Support LotusElan.net" below.
-

Galwaylotus - Coveted Fifth Gear

- Posts: 1255
- Joined: 01 May 2006
Jim,
I have just purchased a secondhand Westfield MC which I am going to have sleeved with SS, see page 6 here, part number 2314002: http://www.westfieldbuild.com/resources ... logue8.pdf
I have checked the bore diameter with a vernier caliper at .7 of an inch. The casting number on the cylinder is 74660152. The reservoir looks to be no higher than the Caterham item in your post and comes with a low level warning device. A picture of a Caterham MC, installed, can be found on page one of this thread, authored by Johan.
I will not be fitting the MC until a fluid change is required.
Regards,
Colin.
FOX5D wrote:Looks like only heavy duty industrial stuff on their website David.
Bill: I just searched for p/n 30b006a on the Caterham site, and it brought up their standard mc 2007 onwards (see below). This looks like just what I want with a nice flat reservoir. But, when I spoke to Caterham earlier today, they told me that the bore was 10/16 (0.625) not 11/16 (0.7).
I also tried the AP number on their website but the search brought up nothing.
So I will check with both of them tomorrow.
Jim
'68 S4 DHC
- fatboyoz
- Fourth Gear

- Posts: 629
- Joined: 04 Oct 2003
Hi Colin, Bill
I've just bought a brand new one from Westfields for ?130 incl vat and delivery. It's 0.7 bore and it is the Westfield standard fit, so getting them won't be a problem. The height is 7cm from the centre of the top bolt hole to the top of the filler, so no problem with the carbs. It has a low fluid warning switch and adjustable push rod. It is an AP product p/n LB06BZ00BD12FC.
I hope this is helpful to everyone else and thanks again for your help.
Cheers
Jim
Always grateful for advice.
- FOX5D
- Second Gear

- Posts: 79
- Joined: 06 Sep 2009
Glad you got sorted. Best of luck with your upgrade! 
Mechanical Engineer, happily retired!
'67 S3 SE FHC
See Facebook page: W J Barry Photography
Put your money where your mouse is, click on "Support LotusElan.net" below.
'67 S3 SE FHC
See Facebook page: W J Barry Photography
Put your money where your mouse is, click on "Support LotusElan.net" below.
-

Galwaylotus - Coveted Fifth Gear

- Posts: 1255
- Joined: 01 May 2006
Are there any recommendations for a tandem master cylinder for a LHD car?
Slightly tangentially, even without dual circuit brakes it seems to me that safety could be improved somewhat by having a "low brake fluid" warning light. I read somewhere that the Brake Fail warning lamp on the dashboard was originally connected to a switch under the brake pedal (as some sort of Chapman joke?). Anyway, mine is connected to nothing.
So is there a low level switch that can be fitted to the standard master cylinder? I read elsewhere in this forum that +2s had/have this, and even some standard Elans, but I've never seen one.
Apologies if this has been discussed to death elsewhere.
Nick
-

elanner - Fourth Gear

- Posts: 548
- Joined: 14 Sep 2010
I know you've made your decision but as I promised to do last night, here are photos of my installation. The reservoir is AP p/n CP5709-10. It has approximate dimensions: 66mm dia x 96mm height top of cap to base and 113mm top of cap to bottom of the moulded tube for attaching the hose.
Mechanical Engineer, happily retired!
'67 S3 SE FHC
See Facebook page: W J Barry Photography
Put your money where your mouse is, click on "Support LotusElan.net" below.
'67 S3 SE FHC
See Facebook page: W J Barry Photography
Put your money where your mouse is, click on "Support LotusElan.net" below.
-

Galwaylotus - Coveted Fifth Gear

- Posts: 1255
- Joined: 01 May 2006
elanner wrote:Are there any recommendations for a tandem master cylinder for a LHD car?
Slightly tangentially, even without dual circuit brakes it seems to me that safety could be improved somewhat by having a "low brake fluid" warning light. I read somewhere that the Brake Fail warning lamp on the dashboard was originally connected to a switch under the brake pedal (as some sort of Chapman joke?). Anyway, mine is connected to nothing.
So is there a low level switch that can be fitted to the standard master cylinder? I read elsewhere in this forum that +2s had/have this, and even some standard Elans, but I've never seen one.
Apologies if this has been discussed to death elsewhere.
Nick
Nick, not sure of your setup, but in the Plus 2 Federal dual brake system the dash warning lamp is connected to a device called a PDW valve, which I believe stands for Pressure Differential Warning Valve. It is connected to the piping from both brake boosters and mounted on the inside left fender. A shuttle valve is displaced to one side or the other and grounds a switch if a significant pressure differential exists between the front and rear high pressure brake fluid circuits.
Not sure, but understand other single circuit set-ups sense low fluid level on a M/C cap switch to light the warning lamp. Perhaps your M/C cap was replaced at some point for one without the low level feature? Not sure of details on the level float as my car does not have this feature.
HTH
Stu
1969 Plus 2 Federal LHD
1969 Plus 2 Federal LHD
-

stugilmour - Coveted Fifth Gear

- Posts: 1949
- Joined: 03 Sep 2007
Nick,
My Brake Warning light is connected to a switch on the under-dash handbrake mechanism, see first item here:
http://www.holden.co.uk/displayproducts ... t+Switches
For low level switches incorporated in reservoir caps see here: http://www.nfauto.co.uk/master_cylinders.htm
and here:
http://www.cbsonline.co.uk/category/Bra ... irs,b.html
Regards,
Colin. '68 S4
elanner wrote:Are there any recommendations for a tandem master cylinder for a LHD car?
Slightly tangentially, even without dual circuit brakes it seems to me that safety could be improved somewhat by having a "low brake fluid" warning light. I read somewhere that the Brake Fail warning lamp on the dashboard was originally connected to a switch under the brake pedal (as some sort of Chapman joke?). Anyway, mine is connected to nothing.
So is there a low level switch that can be fitted to the standard master cylinder? I read elsewhere in this forum that +2s had/have this, and even some standard Elans, but I've never seen one.
Apologies if this has been discussed to death elsewhere.
Nick
'68 S4 DHC
- fatboyoz
- Fourth Gear

- Posts: 629
- Joined: 04 Oct 2003
Stu and Colin,
Many thanks for your help.
The PDW valve is obviously the best solution, but will have to wait until I have a dual circuit setup (which is kinda low on my list right now).
The links to Car Builder Solutions worked out very well. I've just ordered a switch - at 7.50 GBP it seems like a no brainer. After speaking to the vendor the only wrinkle appears to be that the cap, at 1 3/4", is too small for the brake m/c. But the switch can be transferred to the original cap with "some ingenuity" according to the web site. That probably counts me out, but I'll give it a try.
Nick
-

elanner - Fourth Gear

- Posts: 548
- Joined: 14 Sep 2010
Since I made the suggestion of fitting a low level fluid warning switch I guess I should finish.... So, after three months on the to-do list, I finally got around to it.
The switch from Car Builder Solutions worked fine. See: http://www.cbsonline.co.uk/product/Brak ... _Cap_FLCAP
The float depth seems appropriate for the Girling master cylinder - if the Brake Fail light ever comes on there's not going to be a lot of fluid left.
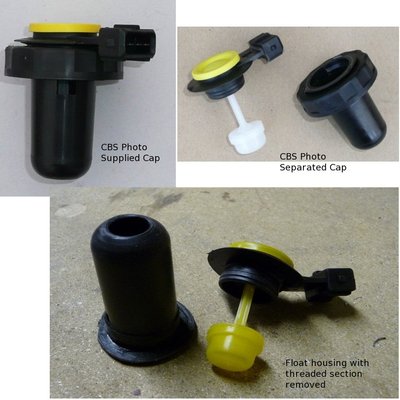
The stages needed to transfer the float switch from the supplied 1 3/4" plastic cap to another cap are described in a pair of articles in the CBS catalogue. It?s pretty simple::
- Use a broad blade to prise the new cap into its two halves - the top comprises the float and switch, the bottom comprises the screw cap and float housing.
- Cut the threaded part of the screw cap off leaving the float housing and flange.
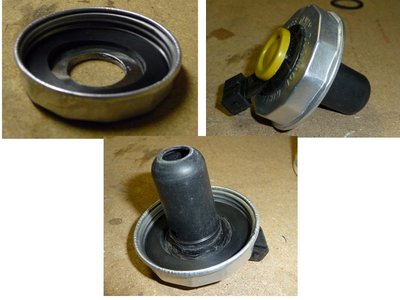
- Cut a hole in the Girling cap large enough to accept the top half of the switch.
- Snap the top and bottom halves of the switch back together, with the Girling cap in the middle.
- Wire the switch to the Brake Fail lamp. I used a red/black wire that is shown in the wiring diagram going from the Brake Fail lamp to the brake servo that I don?t have.
A few extra points:
- To avoid the risk of destroying the original cap I purchased a new Girling cap and rubber seal from Burtons. Part numbers: GIR64473019 (Cap) and GIR378763 (Seal). http://www.burtonpower.com/catalogue-20 ... e-127.html
- The Girling cap is surprisingly thick, which means that it?s tough to snap the two halves of the float switch back together with the cap in between them. It?s necessary to remove a small extraneous flange at the top of the float housing to ensure there?s enough space.
- The float housing has a very small drain hole in the bottom that seems to be a recipe for getting brake fluid all over the place whenever the cap is taken off. I opened this up to ensure rapid draining back into the master cylinder as the cap is removed.
- I got the optional plug (FLCAPPLUG) from CBS so that the wiring can be easily unplugged when removing the cap. It can also be tucked out of sight and a standard cap fitted in a few seconds.
- The connector block on the switch fouls the Girling cap slightly, so it needs to be warmed up in hot water and then bent to create some clearance.
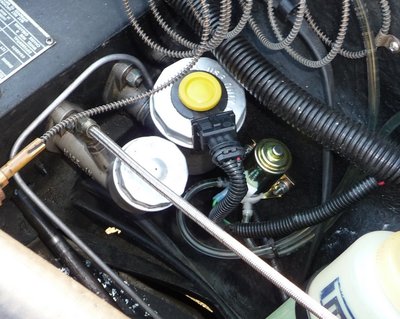
- The yellow cap on top of the switch is the test button, pressing on it pushes the float down and tests the switch/circuit/lamp.
All-in-all it was a straightforward exercise and my Brake Fail lamp now actually does something (but hopefully never!).
Nick
-

elanner - Fourth Gear

- Posts: 548
- Joined: 14 Sep 2010
Info below in bold is from a Datsun site.
I have just installed a JB1196 as per list below. Rang my parts supplier and they had it at their Taren Point outlet (Burson's) that afternoon !
The one I removed was a .75 - the one I installed was a .7 (11/16) - the pedal pressure is noticeably lighter as expected and the pedal travel is actually less. I had to put in a stop, so made it adjustable as the pushrod is not captured, and with it adjustable only a minute loss of travel can be adjusted into it, whereas the circlip captured one, as removed, had about a quarter inch of lost travel. Only minus is that the carby aircleaner has to be removed to top it up - but that was the case anyway with the standard system. Did take quite some time, making the stop, removing some fibreglass under the master cylinders to make room for the vertical pipes under to be accomodated etc. The bolt holes in the tandem master cyl did not need alteringr, anyone who plays with our cars knows the fettling that has to be done .... There is about 1/4 inch of space between the top of the caps to the bottom of the carbies - after I had removed about 3/16 inch off the plastic bottles bottoms - you could use a remote reservoir instead of course.
Hope this helps anyone thinking of converting to a tandem system ...
Ed

Shot at 2012-04-21
This is a rough guide
But don't take it as gospel
11/16 1200
3/4 120Y
13/16 Sunny
7/8 240-260z
15/16 280zx
1" patrol
or if buying new
11/16 JB1196
3/4 JB1181
13/16 JB1289
7/8 JB1133
15/16 JB1361 (hard to get and huge $$)
1" JB1273
Most have at least one part # they go under......the ones above are usually the cheapest.
I have just installed a JB1196 as per list below. Rang my parts supplier and they had it at their Taren Point outlet (Burson's) that afternoon !
The one I removed was a .75 - the one I installed was a .7 (11/16) - the pedal pressure is noticeably lighter as expected and the pedal travel is actually less. I had to put in a stop, so made it adjustable as the pushrod is not captured, and with it adjustable only a minute loss of travel can be adjusted into it, whereas the circlip captured one, as removed, had about a quarter inch of lost travel. Only minus is that the carby aircleaner has to be removed to top it up - but that was the case anyway with the standard system. Did take quite some time, making the stop, removing some fibreglass under the master cylinders to make room for the vertical pipes under to be accomodated etc. The bolt holes in the tandem master cyl did not need alteringr, anyone who plays with our cars knows the fettling that has to be done .... There is about 1/4 inch of space between the top of the caps to the bottom of the carbies - after I had removed about 3/16 inch off the plastic bottles bottoms - you could use a remote reservoir instead of course.
Hope this helps anyone thinking of converting to a tandem system ...
Ed

Shot at 2012-04-21
This is a rough guide
But don't take it as gospel
11/16 1200
3/4 120Y
13/16 Sunny
7/8 240-260z
15/16 280zx
1" patrol
or if buying new
11/16 JB1196
3/4 JB1181
13/16 JB1289
7/8 JB1133
15/16 JB1361 (hard to get and huge $$)
1" JB1273
Most have at least one part # they go under......the ones above are usually the cheapest.
- EdHolly
- First Gear

- Posts: 29
- Joined: 22 Apr 2012
Hi Ed
Glad you found the type of master cylinder we were talking about. The number I had JB1203 I guess was for the same cylinder but with the connections for remote reservoirs rather than the reservoirs on top like the JB1196 you got - otherwise looks identical
cheers
Rohan
Glad you found the type of master cylinder we were talking about. The number I had JB1203 I guess was for the same cylinder but with the connections for remote reservoirs rather than the reservoirs on top like the JB1196 you got - otherwise looks identical
cheers
Rohan
-

rgh0 - Coveted Fifth Gear

- Posts: 8409
- Joined: 22 Sep 2003
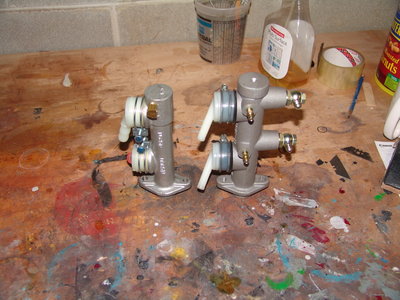
Pictures of the two I used -
The raybestos type has the ports off the bottom - the Nabco as Jeff@jae mentioned had the ports on the wrong side so we modified it. One of them was converted to remote reservoir, the other came that way ( used some tilton parts to convert) - I think i posted this before with parts details - I can attempt to look them up again but when i bought these a few years ago the part from raybestos was NLA and I had to source it out in the channel .
George
- cabc26b
- Fourth Gear

- Posts: 903
- Joined: 21 Sep 2003
47 posts
• Page 3 of 4 • 1, 2, 3, 4
Total Online:
Users browsing this forum: No registered users and 9 guests


