Rear Brake Caliper Rebuild-Restoration.
29 posts
• Page 1 of 2 • 1, 2
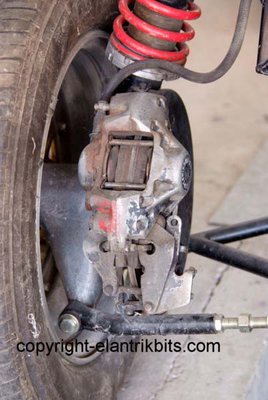
Image # 1.
The rear brake caliper looks pretty sad after more than twenty years
of service, they should be serviced at more regular intervals, but like
many things automotive... if it ain?t broke ...don't fix it.
So we want to go from a very grungy looking old caliper...
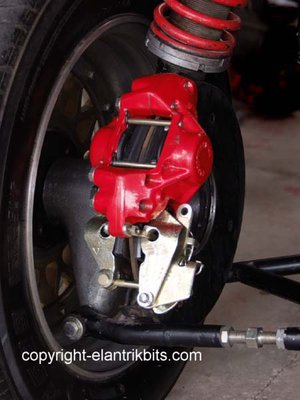
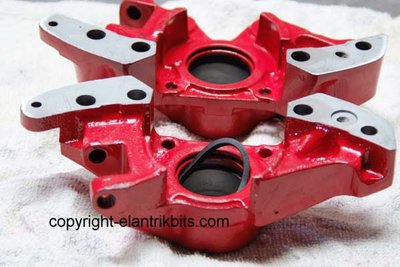
Image # 2:
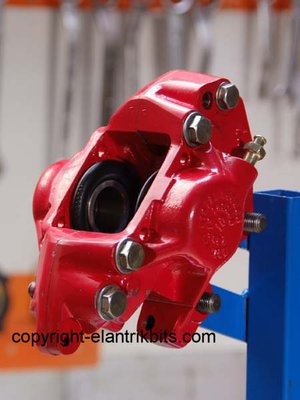
To this... a completely rebuilt & restored near perfect
rear brake caliper.
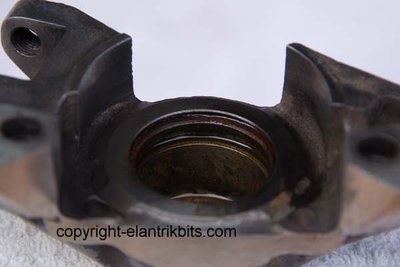
Image # 3:
The dismantling can reveal many things, you live in hope that the
internal piston cylinder bore of the caliper has not been wrecked
by corrosion, before a close inspection was made, this bore
looked like it was not in very good condition.
But after a degrease and hot wash blast and then a quick dry
with compressed air it looked OK.
The pistons were sods to remove, but after a soak with WD 40
and a large amount of air pressure from the workshop compressor
they finally moved upwards and were popped out (Careful here,
they can come out like missiles? cover with a large rag.
The next step was to take
all the calliper components to a mate?s workshop to bead blast
to strip every bit of paint and rust back to bare metal.
This sure beats most forms of metal cleaning, but the parts must be
cleaned afterwards with compressed air, the outside of caliper housings
must be painted within an hour or so to prevent oxidation
on the cast iron occurring. The special paint used on the calipers
was 3M-brake caliper paint (Spray can)... about 4 to 5 coats
were applied along with a hot air quick drying process
(Hair dryer) was used between coats.
The hand brake mechanism on both calipers was checked &
rebuilt with new pins etc to get rid of the wear that occurs over a long period
of service, the parts were then sent to the electroplaters to be gold
zinc passivated for protection.
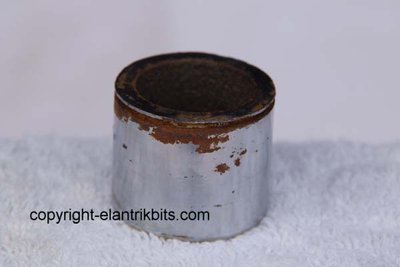
Image # 4:
The scourge of brake calipers, old hard chromed pistons that
succumb to moisture and corrosion, there's only one place for
pistons in this bad state, and that is the rubbish bin.
We bought some free machining stainless bar and machined up
a set of four new stainless steel pistons, what a difference
they make.
Image # 5:
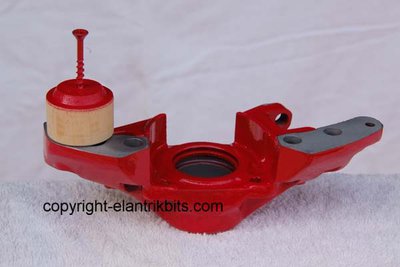
You might think that painting the calipers is a tricky job?
Well it could be if you are not careful, the biggest worry
is preventing any paint getting into the piston bore.
We solved that problem by machining up a wooden plug
that simply slipped into the bore recess, a long wood
screw was then inserted to make insertion and removal
a simple job; note the shape of the plug.
We wanted to get some paint into the first groove where the
rubber dust/moisture cover seal rim is inserted, but a very
small amount of colour mist did find it's way into the bore,
but was easily removed with a cotton swab saturated with
paint thinners.
The mating faces of each caliper was masked off with
tape and trimmed with a sharp knife.
Image # 6:
The Lotus workshop manual says "On no account should
you dismantle the caliper halves" Why not?
They make it sound like re-assembly is some deep dark secret known
only to a few select people.... are they afraid that the calipers
will be mixed with another and end up being a badly matched
pair... difficult to do if you only have two calipers to work with!
Or maybe they think that someone will assemble the two halves
minus the small O-ring that provides the seal between the transfer
gallery from one caliper to the other.... but you'd have to be a complete
idiot to do that. And yes, it is important to understand what you are
about if you delve into brake calipers, the workshop manual
also does not provide any torque figures for the 3/8" and 5/16" UNF bolts
that hold the callipers together.... but 33-38 foot-pounds is about right
for the 3/8? & 14 -19 foot pounds for the smaller bolts... too easy.
Another great advantage of splitting the calipers is that it makes
the rebuilding job very easy, it is such a simple job to insert the piston
seals, and quite simple to place the dust cover lip correctly into the
groove before carefully the pistons are inserted, I've tried this
with the calipers assembled and it drives you nuts trying to
get the seal, dust cover & piston in.
Image # 7:
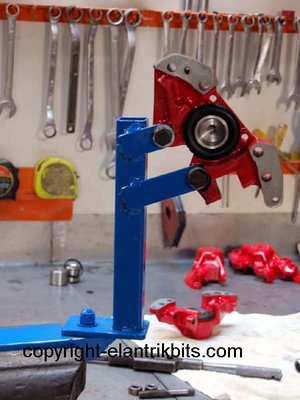
Now before you embark on the caliper rebuilt project spend
A couple of hours building a brake caliper bench vice holding
Tool, this will make the job a whole lot more enjoyable.
The tool is designed to rotate 360Deg on the base, so
Whatever it is you have to access, the tool will allow that.
Image # 8:
The caliper jig or holding tool, simple in design and simple
To make, well worth the effort to have this tool in your workshop,
sure, you are not going top use it much, but I have a whole bunch
of tools that make servicing and working on the elan so much easier.
So there you have it, the hand brake rods will be attached at later date,
as will the drive shafts, but that will down the road a bit yet.
Image # 9:
There are only two ways to remove caliper pistons that are
seized in the bores, you may need to use a penetrating compound,
Don?t worry, this can be removed later during restoration.
Now, the first and best way I believe is to force them out
with air pressure,as you can?t lever them out. Take a look at
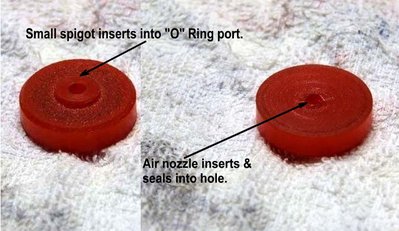
Image # 9. This is small bung machined from urethane, yes the
same stuff that suspension bushes are made from, it has
a small hole drilled through the bung, note also the small
spigot on one side of the bung?refer to image seven
and you will notice the O ring recess or port, place the
spigot of the bung into the recess, holding the bung in one hand,
take the air compressor airline nozzle in the other, place the
nozzle into the hole in the bung, and pull the trigger on the air
nozzle and hold it tight, also place a heavy rag over the
caliper piston, as when the piston ejects, it will come out
with considerable force.
This method will 95% of the time, remove stubborn pistons,
Depending how badly seized they are, and if they are totally
seized, then new calipers may be required.
Have fun, and work carefully.
CeeJay
- ceejay
- Fourth Gear

- Posts: 558
- Joined: 27 Mar 2007
Ceejay, big thanks for the description of your organised and meticulous approach to the rear caliper overhaul/rebuild.
I agree that the prohibition on caliper dismantling is a bit silly. When I did mine, I got the new square section seals from a UK brake supplier and then also went to the trouble of replacing the through fasteners with Capscrews (the only fasteners I could source with a high yield rating).
The groove for the dust boot and piston seal does appear to be a high corrosion point. Ideally a sacrificial zinc coating would be helpful here.
SJ Sportcars provide new pins for the handbrake assembly in stainless. J Farrell (USA) can provide SS pistons for those unable to machine their own.
By the way, the entire caliper/handbrake assembly is Common to the Plus 2 as well.
Regards
Gerry
Last edited by gerrym on Tue Jun 21, 2011 4:14 pm, edited 1 time in total.
- gerrym
- Fourth Gear

- Posts: 882
- Joined: 25 Jun 2006
Classicar automotive brakes in Cheshire now recast/make the hand brake bits that dangle. Last time I was in for parts they told me that restoration of original, at a fixed cost, was not possible due to a lot of the hand brake parts being worn beyond reclamation. This is handy to know as I have been lucky up to now with the 3 set I have done in the last 12 years.
Mike
Mike
Mike
Elan S4 Zetec
Suzuki Hustler T250
Suzuki TC120R trailcat
Yamaha YR5
Suzuki Vstrom 650XT
Suzuki TS185K
Elan S4 Zetec
Suzuki Hustler T250
Suzuki TC120R trailcat
Yamaha YR5
Suzuki Vstrom 650XT
Suzuki TS185K
-

miked - Coveted Fifth Gear

- Posts: 1191
- Joined: 29 Sep 2003
Thanks Gerry for your kind words. If you have the skills & the tools you can
save heaps of time & money on mechanical rebuilds.
===
Mike, it is good to see that the handbrake mechanism parts are also
available, but I reclaimed the parts by drilling out where the pins
go through and machining small bushes (under size) and brazing
them in so that the new pins and holes could be reamed and
matched perfectly.
Yes, the parts will wear again in the long term, but for now
they are fine.
ceejay
- ceejay
- Fourth Gear

- Posts: 558
- Joined: 27 Mar 2007
Just a comment.... on the REALLLY stuck brake pistons... when the compressed air does not pop them out... I use a grease gun with a fitting made to screw into the bleeder hole. It does waste a lot of grease and makes a real mess but it has never failed me.....
- zog
- Second Gear

- Posts: 200
- Joined: 15 Nov 2003
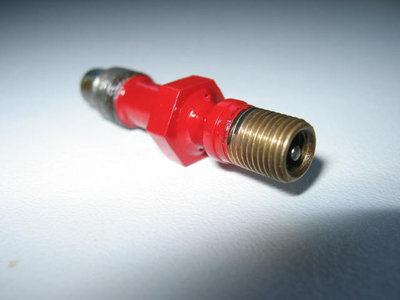
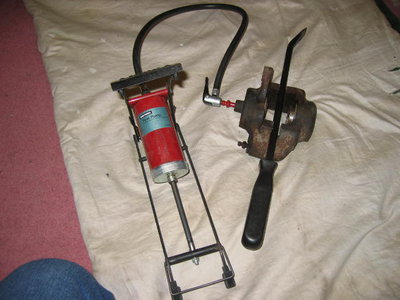
A foot pump is another option for piston removal if you don't have a compressor. The adaptor is made from a bleed nipple and a tyre valve. The pry bar stops one piston popping right out before the other moves.
This method is also useful when assembling the caliper to check that the pistons are moving freely. A little bit of pressure in the caliper acts as an air spring and you can "bounce" the pistons on that to check they are moving freely before you refit the caliper to the car.
This method is also useful when assembling the caliper to check that the pistons are moving freely. A little bit of pressure in the caliper acts as an air spring and you can "bounce" the pistons on that to check they are moving freely before you refit the caliper to the car.
Roger
S4 DHC
S4 DHC
- oldelanman
- Coveted Fifth Gear

- Posts: 1928
- Joined: 02 Jan 2008
Roger - is that bleed nipple / tyre valve gadget something you bought or did you make it? If it's the latter, your welding is a bit better than mine! The one I made works well enough but looks like something the Time Team dug up 

Stuart Holding
Thame UK / Alpe D'Huez France
69 S4 FHC
Honda GoldWing 1800
Honda CBX1000
Kawasaki H1 500
Yamaha XS2
Thame UK / Alpe D'Huez France
69 S4 FHC
Honda GoldWing 1800
Honda CBX1000
Kawasaki H1 500
Yamaha XS2
- 69S4
- Coveted Fifth Gear

- Posts: 1124
- Joined: 23 Sep 2004
69S4 wrote:Roger - is that bleed nipple / tyre valve gadget something you bought or did you make it? If it's the latter, your welding is a bit better than mine! The one I made works well enough but looks like something the Time Team dug up
Yes I made it. The tyre valve bit is brass so I must have brazed or soldered it together - can't remember now. I also find that painting helps fill in the blow holes
Roger
S4 DHC
S4 DHC
- oldelanman
- Coveted Fifth Gear

- Posts: 1928
- Joined: 02 Jan 2008
Dear All
....is the sincerest form of flattery,mine is silver soldered and is now interchangeable with the grease gun AND metric and imperial connectors...
John
Thanks Roger
....is the sincerest form of flattery,mine is silver soldered and is now interchangeable with the grease gun AND metric and imperial connectors...
John
Thanks Roger
-

john.p.clegg - Coveted Fifth Gear

- Posts: 4522
- Joined: 21 Sep 2003
I made a little adaptor that screws into the bleed nipple hole. A plug screwed into the hose connection to blank off, and a grease gun with liquid grease and the pistons just slowly pump out.
Splitting the two halves is fine but you must keep everything spotless. ... Granny/eggs/ sucking?? I know, I know... Replace the o rings without fail.
Another example of the brilliant knowledge to be found on this forum. Well done lads. Great job CeeJay...
I also made some new pins for the handbrake lever pivots / parts. Stainless. secured with 'r' clips. Drilled out the worn holes to round, & made the pins to suit.
Al' .......
Alex Black.
Now Sprintless!!
Now Sprintless!!
-

alexblack13 - Coveted Fifth Gear

- Posts: 2072
- Joined: 17 Oct 2007
29 posts
• Page 1 of 2 • 1, 2
Total Online:
Users browsing this forum: No registered users and 5 guests

