Brake pipe flaring tools: review
15 posts
• Page 1 of 1
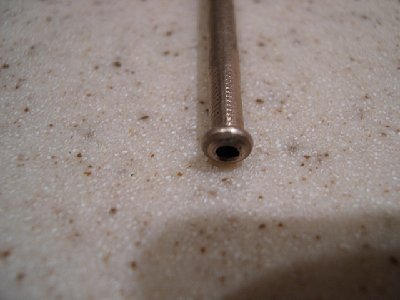
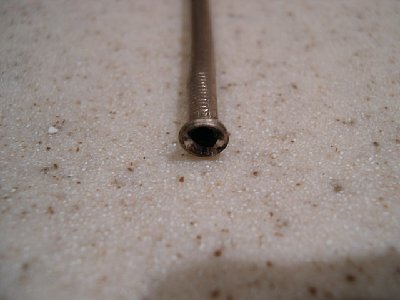
I have just completed my brake pipes, using 3/16" Kunifer pipe. Two types of flares are required: a single flared one (top picture) that is used with a male nut (this would go into a master cylinder or a T piece for example) and a double flared end one (second picture) that would be used with a female nut (this would fit onto the end of a flexible brake pipe for example) As the nut is tightened the soft Kunifer (copper and nickel, hence the name) forms itself into the shape of the other part of the joint, forming the seal.
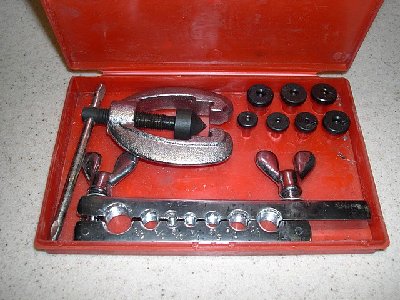
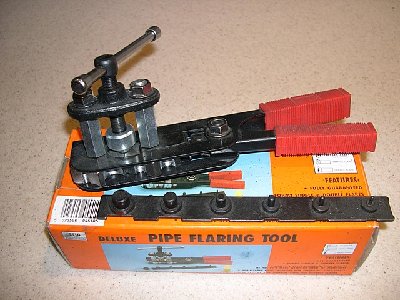
I first bought a pipe flaring tool that cost about ?10, see third picture. You clamp the pipe between the bars, in the right sized hole, and then insert the correct die in the end of the pipe, and apply the forming tool. I never had a good or usable flare from this tool. They were either slewed to one side, or mis-shapen. On problem is that there is nothing to set the amount of pipe projecting onto which you will form the flare, and this is crucial. The second tool ("Deluxe pipe flaring tool") is the one shown in the last photograph, sitting on top of it's cardboard box. This cost ?20.63, and produces perfect flares every time, even if you are not particularly careful. This one, IMHO, is the canine gonads. It has a combined gauge and die plate (seen on top of the box) that enables you to set the amount of pipe projecting above the jaws of the tool, thus all the flares are consistent. You then insert the correct die, and wind down the handle to form the flare. I have never had a duff one. To make one with a female flared end, you use the pointed end after you have formed the main shape, to put a female cone into it. You can buy it from CPC for ?20.63 +VAT, part number PU81639. (www.cpc.farnell.com)
Tony Taunton
- ttaunton
- Second Gear

- Posts: 54
- Joined: 11 Feb 2007
Tony,
Wish you had posted this two months ago.
My research on flaring kits, similar to the Canine Gonads "deluxe" one, resulted in similar kits at 3 times the cost.
Had I seen this one I would have bought it, because I understand that this tool type simplifies pipe flaring.
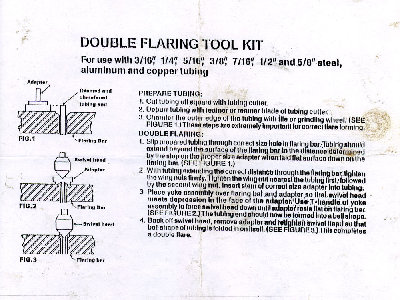
I purchased a Clarke kit from Machine Mart for a total ?17.61. This is similar to the one in your third photo, but each die in this kit did have a setting gauge so that the amount of pipe projecting was correct.
Also having researched Pipe Flaring techniques, I learned 3 important points that helped to ensure quality flares.
1) Amount of pipe projecting was important.
2) Ensure a square cut pipe end.
3) Carefully remove any burr on both the OD and ID of the pipe end.
Using the Clarke kit with the techniques stated, I was successful in producing all the pipe joints for a complete braking system.
Trevor
1968 Elan +2 50/0173
1968 Elan +2 50/0173
-

TeeJay - Fourth Gear

- Posts: 540
- Joined: 30 May 2007
I have normally used a tool like your not recommended one for many years and never had any problems.
My tool instructions say to use the dies height to set the amount of tube that projects through the clamp. Combine this with a good square cut using a pipe cutter, the right bevel on the pipe outside to start the first stage bubble flare and no burring on the pipe and I have had no problems doing a good double flare.
However having said all that the more expensive tool looks easier to use and more reliable for occasional use.
cheers
Rohan
-

rgh0 - Coveted Fifth Gear

- Posts: 8412
- Joined: 22 Sep 2003
I recently used the "not recommended" tool kit for the first time and had no problems... I'm sure both kits work.
Gary
'71 Elan Sprint
Miami, FL
Gary
'71 Elan Sprint
Miami, FL
-

archigator - Third Gear

- Posts: 447
- Joined: 15 Sep 2003
I built new brake pipes with steel (Bundy?) tube available at the local auto parts store. I just pressure-tested the system and got the last of the leaks out.
The flares that go into the MC and the junctions are Girling bubble flares. I think the flares that mate to the standard hoses are SAE inverted (double) flares, but I had new hoses from Dave Bean - the fronts had SAE flare unions and the rear were AN (37 degree) unions. I also introduced an AN union between the MC and the pipe to the 5-way junction.
For the SAE inverted flares and the bubble flares, I used a tool similar (not identical) to the "not recommended" tool. The inverted flares were no problem since that's what the tool is designed to do. The bubble flares (essentially the result of the first half of the inverted flare) were a bit dodgy. Having the correct amount of tubing protruding from the die was critical - for this tool, just a smidgen more than what the gage called for. The part of the die that gripped the tube left scars on the surface of the tubing, which I cleaned up with a file and smeared with anti-seize before assembling. Since they don't leak, they must be just right!
I used an Imperial flare tool for the AN flares. It made perfect flares and didn't mar the tubing much.
I also got a tube bender that made very tidy bends. I'll try to post photos of the tools and some of the installation soon.
I found the information here very helpful in understanding the various types of flares, their use, and their construction.
Andrew Bodge
'66 Elan S2 26/4869
I love the sound of a torque wrench in the morning. Sounds like... progress.
'66 Elan S2 26/4869
I love the sound of a torque wrench in the morning. Sounds like... progress.
-

RotoFlexible - Fourth Gear

- Posts: 624
- Joined: 01 Sep 2005
I have one of the cheap tools but it didn't come with any instructions. Can one of you who use a sililar one tell me how much pipe should be protruding for the 3/16 brake line used on the Elan?
Keith Marshall
69 S4 SE DHC RHD Original owner
69 S4 SE DHC RHD Original owner
- saildrive2001
- Fourth Gear

- Posts: 554
- Joined: 29 Oct 2003
Hi Keith,
I have the cheap kit, the same as the one in the photo with 7 adapters.
It did the complete braking system OK.
Important to have a square cut pipe, use a small pipe cutting tool. Also carefully remove the burr on the OD & ID of pipe.
The instructions are in the attachment, but for the 3/16 pipe it should protrude 0.118" (3mm)
Trevor
1968 Elan +2 50/0173
1968 Elan +2 50/0173
-

TeeJay - Fourth Gear

- Posts: 540
- Joined: 30 May 2007
msd1107 wrote:Any instructions for AN flares?
I got an AN flaring tool from Summit, and it arrived with narry a word of instruction.
David,
The Summit tool looks very similar to the Imperial tool I purchased. Cut the tubing square and deburr. Clamp it into the die so the end of the tube is level with the surface of the die. Line up the, um, pointy thing and crank away until you hit a firm stop. You probably want to try a couple of practice flares before you take your one shot at the tube you just spent hours bending. And, put the nut on first!
Andrew Bodge
'66 Elan S2 26/4869
I love the sound of a torque wrench in the morning. Sounds like... progress.
'66 Elan S2 26/4869
I love the sound of a torque wrench in the morning. Sounds like... progress.
-

RotoFlexible - Fourth Gear

- Posts: 624
- Joined: 01 Sep 2005
I have an Imperial-Eastman flairing set, which is capable of both 45 and 37 degree flairs. I purchased if from Eastwood Company. My pirmary reason for the purchase was fabrication of brake lines on my race car. Although, I have used it for the hard line from the dry sump pump to the oil tank as it will handle up to -12 or 3/4" line. It was a bit on the expensive side, but I have been able to hire myself out for other hard line projects, which has more than paid for the tool.
As suggested, pracitice makes perfect. An odd bit of brake line and a little time will make the job easy and leakproff. A square cut of the line and deburing the end of the tube is essential. Bulk Bundy tubing is available in 25' lengths from any NAPA store. My set did come with some instructions, which were basic in nature. The exact amount of protrusion of the tubing takes a bit of playing with to make a good flair. Once done to your satisfaction, it then becomes simple. Kind of like getting the engine and transmission in and out your Elan.
Don' forget to put the fitting on before the flairing or bending of the tubing starts.
Rob
- 264889socal
- Second Gear

- Posts: 73
- Joined: 09 Feb 2007
Andrew, Rob,
Thanks for the responses. I'll go off and practice some now.
Just thought it was a bit short of Summit not to include the most elementary of instructions. Even inexpensive Chinese tools come with an unreadable page of instructions.
David
Thanks for the responses. I'll go off and practice some now.
Just thought it was a bit short of Summit not to include the most elementary of instructions. Even inexpensive Chinese tools come with an unreadable page of instructions.
David
-

msd1107 - Fourth Gear

- Posts: 765
- Joined: 24 Sep 2003
I bought a cheap Chinese one from a Co. called Princess Auto here in Ontario & it didn't have any instructions with it either. That's why I asked for info on how to use it in a previous post. It looks identical to the photo shown earlier. I suspect that they all come from China, just have different names on the packaging.
Keith Marshall
69 S4 SE DHC RHD Original owner
69 S4 SE DHC RHD Original owner
- saildrive2001
- Fourth Gear

- Posts: 554
- Joined: 29 Oct 2003
hi Kieth ---glad to see your making such good progress ----I have used these flare tools on all my race cars and brit cars using -3 fittings and single flare tube and never had a problem -----ed law
dont close your eyes --you will miss the crash
Editor: On June 12, 2020, Edward Law, AKA TwinCamMan, passed away; his obituary can be read at https://www.friscolanti.com/obituary/edward-law. He will be missed.
Editor: On June 12, 2020, Edward Law, AKA TwinCamMan, passed away; his obituary can be read at https://www.friscolanti.com/obituary/edward-law. He will be missed.
-

twincamman - Coveted Fifth Gear

- Posts: 2460
- Joined: 02 Oct 2003
15 posts
• Page 1 of 1
Total Online:
Users browsing this forum: No registered users and 24 guests

