My new Project - One (real) owner from new Plus 2
10 posts
• Page 1 of 1
It's a tad rough but I like a challenge. Its a Plus 2, vin number is just over 1000, and was one owner until 2014, when the guy I bought it from bought it from the original owner. It needs everything doing, the chassis is very rotten - the gearbox mount fell off while it was being unloaded - but apart from carpets its just about all there. Watch this space.....
Matthew Vale - Classic Motoring Author
1968 Plus 2 - Somewhat cosmetically and mechanically modified
1969 Plus 2S - Currently undergoing nut and bolt restoration
Visit me on matthewvale.com
1968 Plus 2 - Somewhat cosmetically and mechanically modified
1969 Plus 2S - Currently undergoing nut and bolt restoration
Visit me on matthewvale.com
-

Matt Elan - Fourth Gear

- Posts: 603
- Joined: 27 Oct 2011
A plea here (from me) ..... if it's unmolested & original, then please take plenty of pictures of the way things are fitted together, route of pipes, wires, etc, etc .... [I suspect I'll be asking about this - hope you don't mind!]
The door locks look later, but I'm not sure of the change point. Is it a transverse silencer ?
The door locks look later, but I'm not sure of the change point. Is it a transverse silencer ?
1968 Elan plus 2 - project
2007 Elise S2 [modified with a Hethel 70th sticker (yellow)]
2000 Elise S1 - Sold
2007 Elise S2 [modified with a Hethel 70th sticker (yellow)]
2000 Elise S1 - Sold
- wotsisname
- Third Gear

- Posts: 452
- Joined: 24 Jun 2015
Hi Matt,
Your car is very close in age to mine and I got mine in a very similar condition. It's amazing how complete you think it is, and then renew so much of it! I'm into my third year this month and just satarting the bodywork and the tediuous paint removal. I still have a great passion for it so that says something, I think we must both like a good challenge.
Yes, it's really important to take strategic photos but with the great help on here, you can't go that wrong.
Looking forward to seeing your progress.
Kev.
- KevJ+2
- Fourth Gear

- Posts: 641
- Joined: 23 Aug 2013
Thanks for the encouragement guys and I'm taking loads of photos. As its stopped raining I've found the engine number which I've forwarded to Andy at Lotus along with the vin and body numbers to verify if it is the original engine. The chassis is shot, the fight hand turret has collapsed damaging the inner wing and the gearbox mount fell off while getting the car off the low loader- luckily it was still attached to bits of the chassis, unluckily the bit of chassis it's still bolted to is no longer part of the chassis......
The car doesn't have a transverse silencer, in fact it doesn't seem to have any exhaust system at all (-:
I've also got to finish my 69 plus 2 S project, the chassis should be rolling this weekend....
The car doesn't have a transverse silencer, in fact it doesn't seem to have any exhaust system at all (-:
I've also got to finish my 69 plus 2 S project, the chassis should be rolling this weekend....
Matthew Vale - Classic Motoring Author
1968 Plus 2 - Somewhat cosmetically and mechanically modified
1969 Plus 2S - Currently undergoing nut and bolt restoration
Visit me on matthewvale.com
1968 Plus 2 - Somewhat cosmetically and mechanically modified
1969 Plus 2S - Currently undergoing nut and bolt restoration
Visit me on matthewvale.com
-

Matt Elan - Fourth Gear

- Posts: 603
- Joined: 27 Oct 2011
Looks like we're all in the same boat.
My +2S dates from the end of 1969, and is in a similar state - pretty much complete and not messed with, but needing a complete restoration.
I will take lots and lots of pics, and build a blog around it. Link to follow (when I set it up!).
Cheers
Ned
My +2S dates from the end of 1969, and is in a similar state - pretty much complete and not messed with, but needing a complete restoration.
I will take lots and lots of pics, and build a blog around it. Link to follow (when I set it up!).
Cheers
Ned
+2S 1969 50/2283
-

NedK - Second Gear

- Posts: 99
- Joined: 31 Aug 2015
Quick update - hope to get the White (almost) one owner plus 2 unwrapped this weekend now winter is officially over (hollow laugh....) and check her out. Hopefully it won't have deteriated too much! Pickies to follow. I'm going to go back to standard as far as possible in contrast to my other restro project so I'll be looking for a new lotus style galvanised chassis in the next few months. Anyone know who has some in stock?
Matthew Vale - Classic Motoring Author
1968 Plus 2 - Somewhat cosmetically and mechanically modified
1969 Plus 2S - Currently undergoing nut and bolt restoration
Visit me on matthewvale.com
1968 Plus 2 - Somewhat cosmetically and mechanically modified
1969 Plus 2S - Currently undergoing nut and bolt restoration
Visit me on matthewvale.com
-

Matt Elan - Fourth Gear

- Posts: 603
- Joined: 27 Oct 2011
Had the white whale basking in the sun this morning - it has survived sitting under a tarpaulin remarkably well! Just starting to assess what will be needed; there are a few bits that are probably beyond repair:
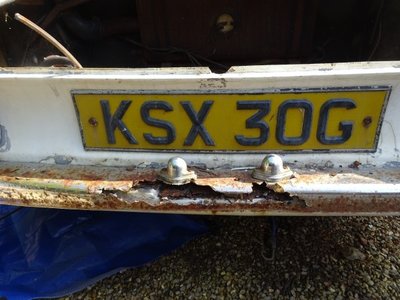
The rear bumper has seen better days - mind you its only the centre section which is rotten; both corners are OK and the number plate lights are salvageable:
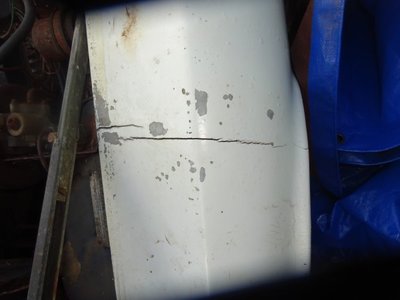
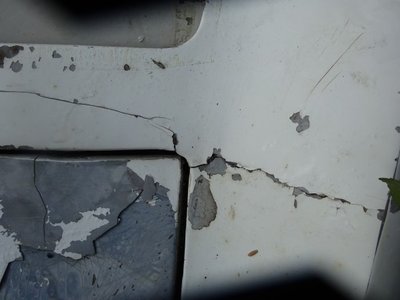
The left hand side front wing is only loosely attached at the wheel arch and headlamp pod:
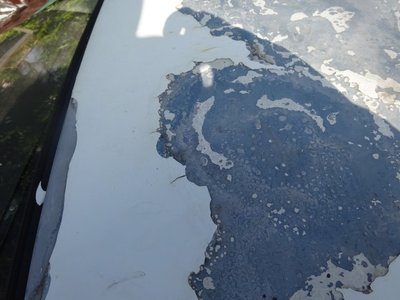
And the paint is pretty scabby all over:
So something to look forwards to while I press on with my Plus 2S..........
Matthew Vale - Classic Motoring Author
1968 Plus 2 - Somewhat cosmetically and mechanically modified
1969 Plus 2S - Currently undergoing nut and bolt restoration
Visit me on matthewvale.com
1968 Plus 2 - Somewhat cosmetically and mechanically modified
1969 Plus 2S - Currently undergoing nut and bolt restoration
Visit me on matthewvale.com
-

Matt Elan - Fourth Gear

- Posts: 603
- Joined: 27 Oct 2011
A quick update on the white whale....
bought a chassis from RichC of this site and just got it home today - proving that a plus 2 chassis will fit in a VW T4 van if you leave one door open....
It'll go into storage in my garage while I finish off the other plus 2 but it means the project is slowly getting started.
Photos to follow
bought a chassis from RichC of this site and just got it home today - proving that a plus 2 chassis will fit in a VW T4 van if you leave one door open....
It'll go into storage in my garage while I finish off the other plus 2 but it means the project is slowly getting started.
Photos to follow
Matthew Vale - Classic Motoring Author
1968 Plus 2 - Somewhat cosmetically and mechanically modified
1969 Plus 2S - Currently undergoing nut and bolt restoration
Visit me on matthewvale.com
1968 Plus 2 - Somewhat cosmetically and mechanically modified
1969 Plus 2S - Currently undergoing nut and bolt restoration
Visit me on matthewvale.com
-

Matt Elan - Fourth Gear

- Posts: 603
- Joined: 27 Oct 2011
Hi all
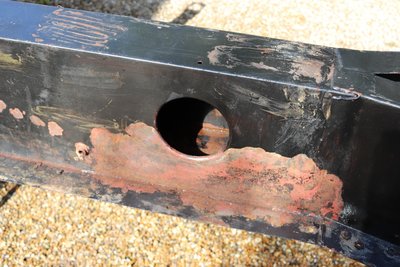
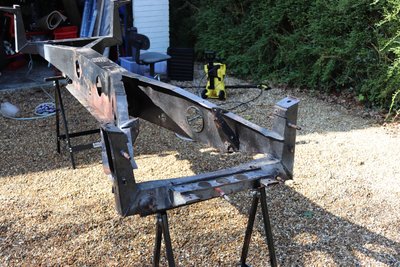
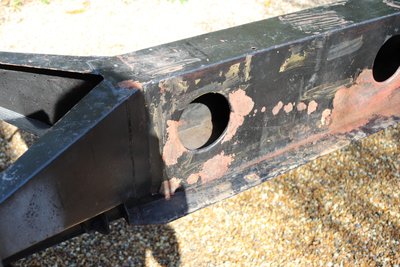
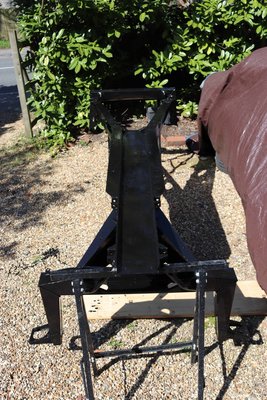
As the summer has arrived and KSX's new chassis is sitting in the garage getting in the way of ALD's restoration, I decided to POR-15 the slightly rusty beast.
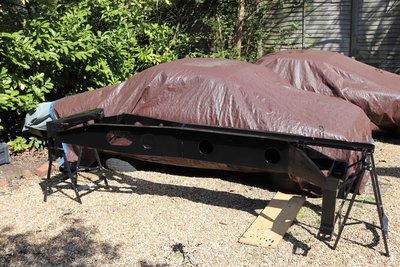
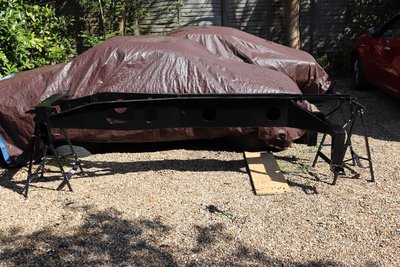
So I was up bright and early to lug the chassis out of the garage and onto the drive, then a jolly good jet wash got most of the crud off it. I'd ordered various POR-15 products from Frosts so first off it was their cleaner and degreaser, Whacked it on with a paintbrush and then jet washed it off and that got the remaining crud off. It did take a certain amount of contortion to get the cleaner into the centre box, and then out but I think its done a good job in there. The front turrets are solid but one had a lot of crud in its base; this eventually came out and both drain holes are now clear. Next step was to go over the wet chassis with the air line to dry it out as much as possible, then onto the Metal Prep stage. This meant spraying the chassis with the anti rust/rust converter stuff, leaving it for 30 mins or so, then going over it again, leave again, and finally wash it off with the jet wash, then dry it off with the air line and leave it to bake in the sun. So not much actual painting so far, but the chassis is now ready for the first coat of POR-15 Rust Preventative paint, and then a coat of POR-15 top coat - so that's tomorrow's job sorted!
Pictures of the chassis basking in the sun:
Matthew Vale - Classic Motoring Author
1968 Plus 2 - Somewhat cosmetically and mechanically modified
1969 Plus 2S - Currently undergoing nut and bolt restoration
Visit me on matthewvale.com
1968 Plus 2 - Somewhat cosmetically and mechanically modified
1969 Plus 2S - Currently undergoing nut and bolt restoration
Visit me on matthewvale.com
-

Matt Elan - Fourth Gear

- Posts: 603
- Joined: 27 Oct 2011
So the chassis survived the night on my drive, and it was (and still is) a glorious day, it was time to press on with the chassis. So after the sun had been on it the chassis for about hour or so to burn off any dew, I got the brushes out and started slapping on stage 3 of the POR-15 system - the Rust Preventive paint. I somewhat un-wisely got glass black (as I was planning to top coat in black as well) but wisely boought my supply as a six pack - this was six small 113.6 ml / 4 US ounce cans. I used four on the chassis; the paint went on easily and covered well and it took me about 1 1/2 hours to do it all and then I left it to go off for three hours.
I had bought a 1 l (well 946 ml) tin of top coat. also in Gloss Black, and so decanted about 1/3 into a plastic pot and started painting. This paint seemed to cover slightly less well than the previous stuff, and I ended up using virtually all the litre can, but this may have been compensating for not realising how well it was covering the Rust Preventative coat. Again it took about 1 1/2 hours to get the paint on, and now the chassis is sitting on the drive looking good and waiting for the paint to go off. Then it can be consigned to the shed so its out of the way while I finish ALD!
The only hard parts were getting the paint into the centre box, doing the insides of the turrets and having to flip the chassis over single handedly to get to the bottom. In the centre section the the cutouts in the side and the holes in each end meant it was it is achievable using a brush (although one of my arms is also nicely painted as well). The insides of the front turrets needed car as the inner edges are folded in on themselves and it needed some dextrous brush work to get the paint into the fold, and all the way down the inside the front and rear faces inside the turret.
Matthew Vale - Classic Motoring Author
1968 Plus 2 - Somewhat cosmetically and mechanically modified
1969 Plus 2S - Currently undergoing nut and bolt restoration
Visit me on matthewvale.com
1968 Plus 2 - Somewhat cosmetically and mechanically modified
1969 Plus 2S - Currently undergoing nut and bolt restoration
Visit me on matthewvale.com
-

Matt Elan - Fourth Gear

- Posts: 603
- Joined: 27 Oct 2011
10 posts
• Page 1 of 1
Total Online:
Users browsing this forum: No registered users and 10 guests

.jpg)
