Lotus Elan +2 Chassis 151 restoration
24 posts
• Page 1 of 2 • 1, 2
Hi to all members,
My fianc?e and I are restoring Lotus Elan +2 chassis 151. We began the strip down in December and are now progressing to the chassis assembly which we plan to have completed by the end of the month. Many thank to Pete Williams Engineering for his help with the engine, gearbox and diff rebuilds and Andy and Sean from Spyder for all technical help over the last three months with providing a new chassis, suspension etc .for the car. Plan to finish the rebuild by September at the latest,
I am still searching for a really decent front bumper for my car, any help from members would be greatly appreciated.
Kind regards
Steve Brown
- Steve Brown
- First Gear

- Posts: 15
- Joined: 22 Jan 2019
Have you been in touch with Melodyk from this forum - she and her husband are resident in Cornwall and have another lovely early Plus 2.
Have you managed to source a front bumper yet - Oddly rear bumpers are harder to come by than front ones.
Have you managed to source a front bumper yet - Oddly rear bumpers are harder to come by than front ones.
Matthew Vale - Classic Motoring Author
1968 Plus 2 - Somewhat cosmetically and mechanically modified
1969 Plus 2S - Currently undergoing nut and bolt restoration
Visit me on matthewvale.com
1968 Plus 2 - Somewhat cosmetically and mechanically modified
1969 Plus 2S - Currently undergoing nut and bolt restoration
Visit me on matthewvale.com
-

Matt Elan - Fourth Gear

- Posts: 599
- Joined: 27 Oct 2011
Hi. Thank you for your message. No I have not had any contact with Melodyck. Bumpers are still being sought.
- Steve Brown
- First Gear

- Posts: 15
- Joined: 22 Jan 2019
Steve, the front bumper is very easy to find as it is from a 1960s Ford Anglia 105E. The rear is much more difficult as it was specially made for a Plus Two, using a Riley Elf / Wolsley Hornet rear bumper and extending that with a piece in the middle.
There is an Anglia one for sale on ebay at the moment, but it will need to be plated.....
https://www.ebay.co.uk/itm/Lotus-Elan-2 ... SwRAZdFxvB
Mark
There is an Anglia one for sale on ebay at the moment, but it will need to be plated.....
https://www.ebay.co.uk/itm/Lotus-Elan-2 ... SwRAZdFxvB
Mark
-

Elanintheforest - Coveted Fifth Gear

- Posts: 2496
- Joined: 04 Oct 2005
Thanks Mark, all purchased. I have been trying to buy bumpers from a member for nearly four months but he just doesn't get back to me giving the excuse that they are in another garage which he doesn't appear to visit. It's been a nightmare and to be honest I have given up with him. I need to get on with the car as I have a road trip planned in the Spring to the Eiffel Mountains and the Nordschleife. At that rate I would still be thinking about it in 5 years time. The chassis is now finished, and on the floor again and rolling. I have fitted solid driveshafts from Tony Thompson Racing along with Quaife Billet shafts in both the diff and hubs and billet nuts and bolts. I have a brand new pair of Spyder semi drive-shafts which are now surplus to requirements along with brand new driveshafts for both the diff and hubs complete with nuts bolts and bearings. Oh well, could look for another build I suppose.
- Steve Brown
- First Gear

- Posts: 15
- Joined: 22 Jan 2019
If you're not stripping and painting the body then you'll have plenty of time! Sounds like a great build, and I'll bet you'll be looking for another project next year. Too much fun!
Mark
Mark
-

Elanintheforest - Coveted Fifth Gear

- Posts: 2496
- Joined: 04 Oct 2005
Hi Mark,
It is a full nut and bolt resto bud. Body to be stripped and repainted in its original baby blue colour.
Not keeping it standard though, it may seem criminal to the purist but I intend having some fun with it before I am too inflexible to get in it anymore and have to sell it. The plan is the have it looking just like it should do on the surface, but go to town on it under the skin, just as Chapman would have done, effectively improve the car. I have kept all the original parts in the garage attic just in case whoever buys it wants to go back to basics.
The rear end is, as I previously said, all billet and Quaife. The diff is rebuilt and has a Tony Thompson additional diff brace fitted. Prop-shaft rebuilt and balanced. Gearbox rebuilt, ally bellhousing, competition clutch, engine rebuilt and fully balanced to +00.30. It runs as smooth as an eel coated in baby oil. I have also fitted the Burton cassette water pump kit, expensive but well worth it I think. We had to modify the timing chain adjuster and housing a little to get the chain to run without scuffing the housing, something Burton are apparently aware of but have failed to rectify in their build, "naughty, naughty very naughty". Fortunately there is sufficient material in their casting to allow machining.
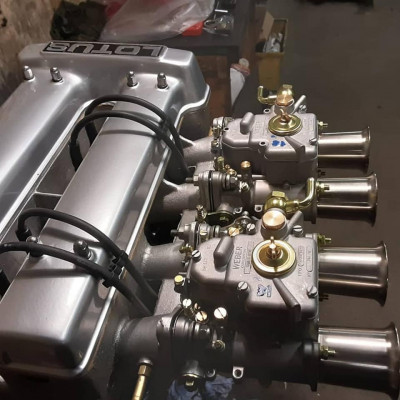
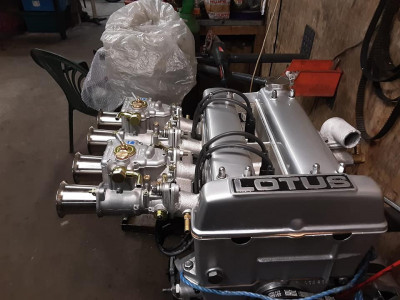
Head is rebuilt big valve and fully ported running re-jetted 45's. It is punching out 165 on the dyno. I am going to fit an aluminium rad, swirl pot and fuel tank. Servo uprated. It should be a ball to drive quickly but with plenty of good road manners when cruising. I am looking forward to my Germany trip, it should look and drive amazingly but we shall see...?????.time will tell.
Steve
- Steve Brown
- First Gear

- Posts: 15
- Joined: 22 Jan 2019
I hope you know the bodyshop folks well Steve, or you're doing it yourself! A 3 month job usually takes 6 months, and a 6 month job 18 months! That's if you're paying normal commercial rates. A fill-in job can take many years!! Make sure they know how to repair fibreglass cracks properly as well.
That's going to be a stunning Elan.
That's going to be a stunning Elan.
-

Elanintheforest - Coveted Fifth Gear

- Posts: 2496
- Joined: 04 Oct 2005
Hi Mark,
Not doing the bodywork myself bud, too specialised. I have researched this in depth and finally found just the man for the job, unfortunately he is some 200 miles away from me in the Southampton area. He is a glass fibre expert.
He is the sprayer of choice for Southern GT GT40's and I have seen his work, quite brilliant.
I will have photos of my GT40 in the next few days showing the whole process the car goes through, the man is an absolute craftsman.
I am hoping for a stunning car Mike, I have spent a lot of money and even more time to get it that way but you never know until the fat lady sings matey.
- Steve Brown
- First Gear

- Posts: 15
- Joined: 22 Jan 2019
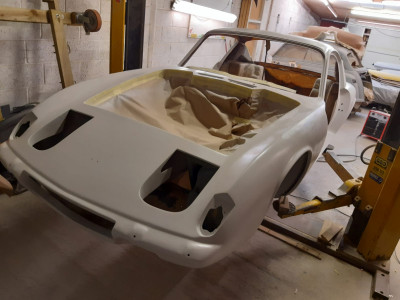
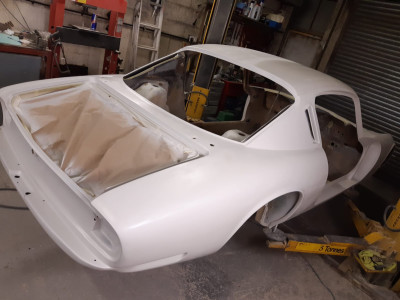
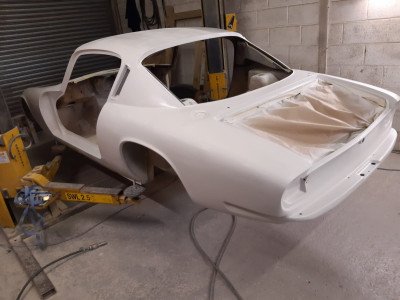
Body is finally nearing completion now, lots of issues uncovered when the years of layers of paint were removed and finally polyester coats applied and final rub down to complete.
The underside, cabin, engine bay and boot are all being body coloured too, I know that's not original but the car will never be sold so I thought I would go the whole hog.
I am hoping I can fit the body after the engine installation, The new chassis has already been test fitted and drilled and tapped.
I think I will need to remove the carbs, the manifold studs and the heater valve to achieve this. Does anyone know if this is feasible?
Kind regards
Steve Brown
- Steve Brown
- First Gear

- Posts: 15
- Joined: 22 Jan 2019
IIRC you should be able to install the body with the drivetrain in place as you have the chassis drilled and tapped. The biggest issue we had was clearance for the drill and taps on the two front turret bolts with engine in place. Definitely worth a try.
Reference to the heater valve is a bit confusing as the Plus 2 did not use one, rather relying on the heater box flaps to isolate the heater core. That said, cool if you have added a valve. I find the interior is way more comfortable with a shutoff valve, but opted for an inline style. If it is the Elan style cable operated valve it will definitely need to be removed.
Carbs and headers off as well.
I am trying to think of other gotcha items. One item to watch carefully is access to the heater hoses. Very difficult with everything in place. Consider attaching both heater hoses to the heater box nipples before lowering the body.
When bolting up the rear, I would suggest moving the main ground cable from the bolts on the boot floor to the right side tower bolt. This is a more reliable connection and out of the muck.
Probably easier to have the speedometer cable attached, but not a show stopper.
All the best. Post some pictures when you get to it.
Stu
1969 Plus 2 Federal LHD
1969 Plus 2 Federal LHD
-

stugilmour - Coveted Fifth Gear

- Posts: 1942
- Joined: 03 Sep 2007
Thanks Stu, very helpful advice.
When we drilled and tapped the front struts we ensured that the front was shimmed up to avoid the problem of the cam cover hitting the underside of the bonnet so hopefully OK there.
Your advice on the heater hoses being fitted to the heater box first is a definite must.
I am having real problems trying to add more than one photo on this site but another one for the road attached. I have taken hundreds during the strip and build which I am sure would be of use to others.
Kind regards
Steve
- Steve Brown
- First Gear

- Posts: 15
- Joined: 22 Jan 2019
Hi Stu,
I think I have managed to work out how to attach more than one photo at a time.
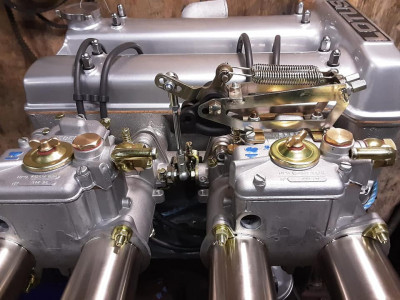
Some final engine photos attached.
Kind regards
Steve
I think I have managed to work out how to attach more than one photo at a time.
Some final engine photos attached.
Kind regards
Steve
- Steve Brown
- First Gear

- Posts: 15
- Joined: 22 Jan 2019
The engine looks absolutely mint! Did you vapour blast the carb bodies?
Yes please on photos, I have taken 1000s and the more the merrier from others. I'm sure there are many, many areas where the bit I can't figure out in the rebuild is the one photo I didn't take...
Maybe put them in an online photo album, and provide a link?
Keep us posted on the build. It looks like a really detailed job.
All the best
Ned
+2S 1969 50/2283
-

NedK - Second Gear

- Posts: 99
- Joined: 31 Aug 2015
24 posts
• Page 1 of 2 • 1, 2
Total Online:
Users browsing this forum: prezoom and 46 guests

