Bodges you've found or done on Your Elan
38 posts
• Page 2 of 3 • 1, 2, 3
The PO had tons of work done too the car. Had the gas tank pulled and freshened, engine rebuilt on and on..............they left the friggin' plastic gas line in..................hand to forehead.
"Be Polite, Be Professional, But have a plan to kill everyone you meet"
General "Mad Dog" James Mattis United States Marines
General "Mad Dog" James Mattis United States Marines
- cal44
- Third Gear

- Posts: 498
- Joined: 28 Nov 2010
I love the Jubilee clip on the temperature gauge sender. I can imagine someone tightening it, it cracks - bugger it! Almost done and now this. Take the gauge out and get it rebuilt, but for today, here's a fix.
Thing is, it'll probably last for years!
Thing is, it'll probably last for years!
-

RogerFrench - Fourth Gear

- Posts: 536
- Joined: 01 Dec 2009
cal44 wrote:The PO had tons of work done too the car. Had the gas tank pulled and freshened, engine rebuilt on and on..............they left the friggin' plastic gas line in..................hand to forehead.
mmmmm better not buy my Elan - it still has the orginal fuel line in as well - probably one of the last original components in the whole car after 30 years and 40000 miles of racing apart from the body itself and the diff casing and the rear struts.
I to wonder why i never good around to replacing it but then I never seem to have had a need
cheers
Rohan
-

rgh0 - Coveted Fifth Gear

- Posts: 8409
- Joined: 22 Sep 2003
rgh0 wrote:cal44 wrote:The PO had tons of work done too the car. Had the gas tank pulled and freshened, engine rebuilt on and on..............they left the friggin' plastic gas line in..................hand to forehead.
mmmmm better not buy my Elan - it still has the orginal fuel line in as well - probably one of the last original components in the whole car after 30 years and 40000 miles of racing apart from the body itself and the diff casing and the rear struts.
I to wonder why i never good around to replacing it but then I never seem to have had a need
cheers
Rohan
I am about to re-install the original line, what is the problem with them? I know the plastic T's were a problem but never heard of problems with the plastic fuel line. what the scoop on the perceived problem.
Gary
-

garyeanderson - Coveted Fifth Gear

- Posts: 2634
- Joined: 12 Sep 2003
I guess some people are uncomfortable with fuel in a plastic line which I can understand. However the original nylon line ( I think that is what it is made of) does not appear to deteriorate and if you replace the other fittings in the fuel system especially the Lotus fancy braided set up from the pump to carbs with its crimped on hoses, the original line through the chassis appears OK for the long term.
cheers
Rohan
cheers
Rohan
-

rgh0 - Coveted Fifth Gear

- Posts: 8409
- Joined: 22 Sep 2003
OK I may have a winner here .......
Another front turret has been welded on top of the other turret ......badly!
I don't think any kind of jig was used
Our lift the body off English bacon sandwich party is next Saturday so more will be revealed then!
Terry
Another front turret has been welded on top of the other turret ......badly!
I don't think any kind of jig was used
Our lift the body off English bacon sandwich party is next Saturday so more will be revealed then!
Terry
- terryp
- Coveted Fifth Gear

- Posts: 1264
- Joined: 29 Nov 2007
rgh0 wrote:I guess some people are uncomfortable with fuel in a plastic line which I can understand. However the original nylon line ( I think that is what it is made of) does not appear to deteriorate and if you replace the other fittings in the fuel system especially the Lotus fancy braided set up from the pump to carbs with its crimped on hoses, the original line through the chassis appears OK for the long term.
cheers
Rohan
When I was rebuilding my Europa I read somewhere that modern fuels with a lot of ethanol can weaken the plastic pipes. Maybe other people read the same thing? I'll try and find it again.
-

RogerFrench - Fourth Gear

- Posts: 536
- Joined: 01 Dec 2009
The sill reinforcing members on the +2 can be a real pain to replace when they rust, what with having to undo the bolts, prise open the sill cavity etc etc. Why bother?! A PO of my +2 came up with the ideal solution.... They just poured gallons of glass resin into cavity! Andy and the team at Spyder found the bodge when I asked them to replace the sills. That was 8 years ago, and he still remembers the car as the one with the sill bodge. Seatbelt plates were dust, set in resin. The picture shows the debris Spyder chiselled out of the cavity before putting the situation right. Fortunately the resin did not stick to the cavity because of all the mud and dirt. You can see the large chunks of resin they pulled out
If you have never checked your sill reinforcing or seatbelt mounting plates, do it now.. right now.
Jeremy
If you have never checked your sill reinforcing or seatbelt mounting plates, do it now.. right now.
Jeremy
-

JJDraper - Fourth Gear

- Posts: 923
- Joined: 17 Oct 2004
Bodge or budget? You choose.
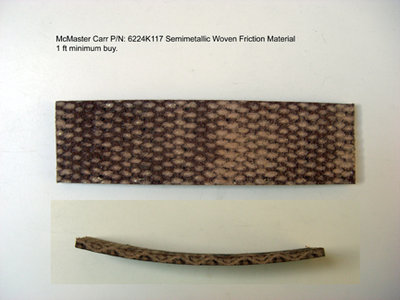
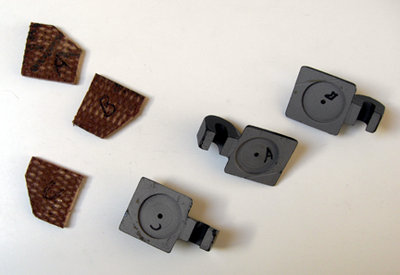
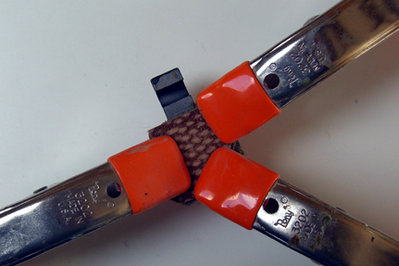
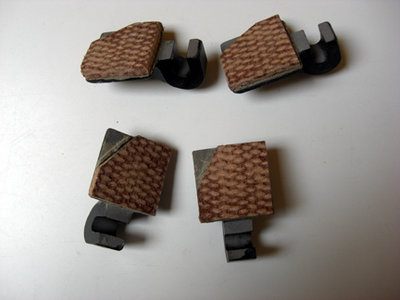
Looking at the cost to have these rebuilt on an exchange basis, I decided to have at it myself. I bought 3/16? thick, 1 ?? wide friction material, in a one foot strip (minimum buy), from McMaster Carr and cut it to shape with an abrasive cut off wheel (wear a good mask). After shaving the old pads off with a utility knife, I threw the metal bits into the blast cabinet and cleaned them up. That gave a little tooth to the surface where the new pads would be glued on. I used a two-part titanium filled epoxy mastic to attach the pads. Has to work at least as well as what was holding the old ones on.
After they cure for 8 hours, I cleaned up the edges with my cut off wheel. The metal filled epoxy is tough as nails. I have about $14 in the project, with most of the epoxy and enough friction material to do another set.
Bud
1970 +2S Fed 0053N
"Winnemucca - says it all really!!"
1970 +2S Fed 0053N
"Winnemucca - says it all really!!"
- Bud English
- Fourth Gear

- Posts: 940
- Joined: 05 Nov 2011
So far on my +2 S....
1. Nail acting as a split pin on the front hubs.
2. No jack shaft thrust plate lock washer fitted.
3. Wrong size head gasket (too small around the bores) so the head was not sealing against the block.
4. and the best so far is a bullet connector wedged at the bottom of the oil way that runs from the main bearings to the jack shaft bearing blocking the oil feed. Now how did a bullet connector get in an engine. It also took some removing and had to be knocked out with a small punch and hammer.
Others I have found is the tank breather pipe blanked off and a stripped thread on the front brake hose to metal pipe connection.
I am sure I will fine many more as the re-build continues.
- k44ent
- New-tral
- Posts: 11
- Joined: 20 Aug 2012
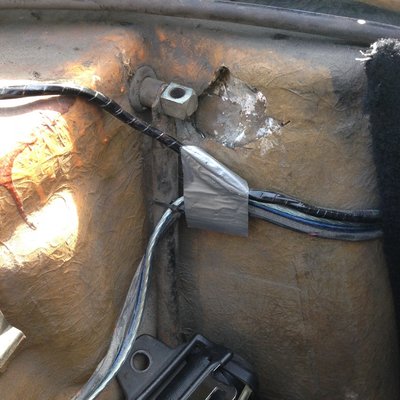
Thought I'd resurrect this thread as I found a doozy at the weekend:
Not sure what the DPO was attempting to do (remove / Install seatbelts?), but it looks like the hoIe was cut from the outside as the tin foil (yes you read that correctly ) was applied from the outside.
I'm getting better at GRP repairs...
Not sure what the DPO was attempting to do (remove / Install seatbelts?), but it looks like the hoIe was cut from the outside as the tin foil (yes you read that correctly
I'm getting better at GRP repairs...
Phil Harrison
1972 Elan Sprint 0260K
1972 Elan Sprint 0260K
-

pharriso - Coveted Fifth Gear

- Posts: 3186
- Joined: 15 Sep 2010
Ha! I had the same bodge on mine! The seat belt bolt is rather long and when backing it out,
it runs into the bulge in the body. Some PO relieved the area and used duct tape to protect it from the wheel well elements. I 'glassed in my 'relieved area' to allow the bolt to back out easily.
Doesn't look quite factory but it's solid.
it runs into the bulge in the body. Some PO relieved the area and used duct tape to protect it from the wheel well elements. I 'glassed in my 'relieved area' to allow the bolt to back out easily.
Doesn't look quite factory but it's solid.
Greg Z
45/0243K Sprint
45/7286 S3 SE DHC
45/0243K Sprint
45/7286 S3 SE DHC
-

gjz30075 - Coveted Fifth Gear

- Posts: 3020
- Joined: 12 Sep 2003
here's my bodge,
after acquiring an original steering wheel for my s3, I found that the horn push logo didn't line up correctly when the contact at the back lined up with the hole in the wheel for the horn push pencil.
I set to figuring out how to take the button apart so i could relocate the logo.
there should be three tabs at the back of the chrome ring section that holds the whole assembly together, but in my case two had been snapped off. A PO had used large amounts of super glue to glue the ring to the horn button.
so, I chipped away the super glue and wondered where i could find a new chrome ring with tabs intact.
weeks later I figured it out, I used a dremel to cut small slits just to the side of the original tabs, thus creating new tabs. I also had to cut another hole which keeps the logo aligned. It has worked a treat!
36/6612
1967 S3 Coupe (left the factory in 66)
original rego PPC 8E
original owner B.M. Wetherill ..are you out there?
1967 S3 Coupe (left the factory in 66)
original rego PPC 8E
original owner B.M. Wetherill ..are you out there?
-

dgym - Third Gear

- Posts: 330
- Joined: 05 Apr 2014
Previous owner put a self tapping screw into the weep hole of the water pump.
Rotary fuel pump was installed up by the carbs on the firewall. Fuel pump lasted exactly two days.
Rotary fuel pump was installed up by the carbs on the firewall. Fuel pump lasted exactly two days.
There is no cure for Lotus, only treatment.
-

StressCraxx - Coveted Fifth Gear

- Posts: 1273
- Joined: 26 Sep 2003
38 posts
• Page 2 of 3 • 1, 2, 3
Total Online:
Users browsing this forum: No registered users and 38 guests

.jpg)