A frame adjuster
15 posts
• Page 1 of 1
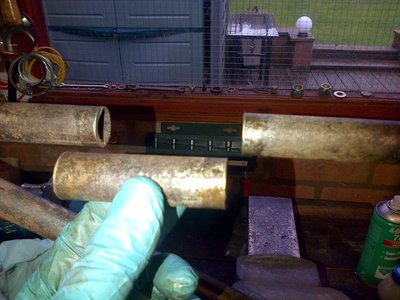
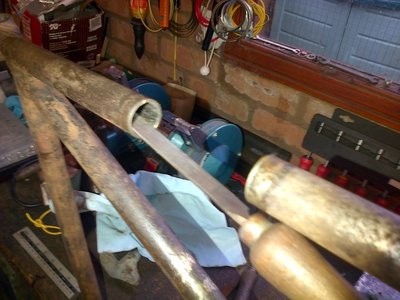
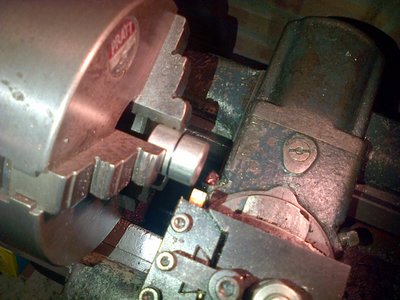
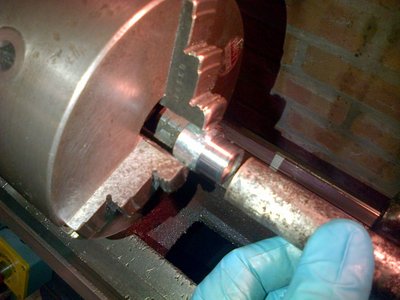
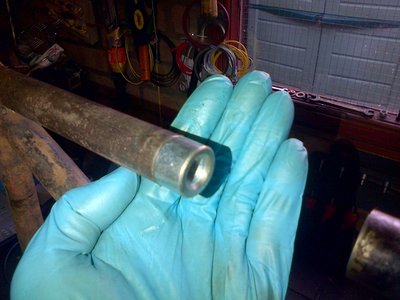
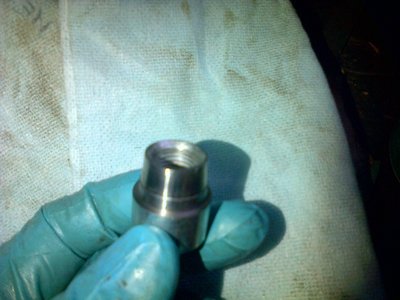
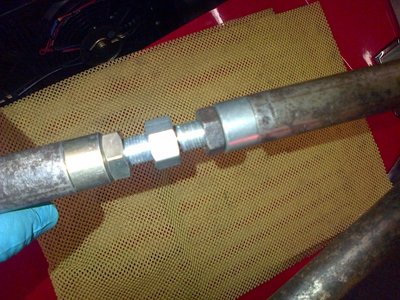
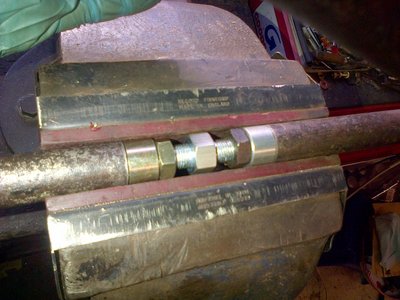
Dropped upon these when looking for kit to make one up. Pretty nifty, just need a step on lathe to match dia' of inner frame tube. All the bits are there, don't need taps and dies etc. I used the 1/2 inch one. No connection to me but pretty chuffed with the result. Bit of trial and error with the cut to get it to fit in. I will be making up a spare set for the Plus 2.
NB. After inserting with no tension and welding etc I fitted to the car and put on the string line on. The wheel was bob on straight. A small part of a turn (2/3rds) brought the amount of toe in required.
http://www.ebay.co.uk/itm/Jackscrew-Tur ... 3f0de9512d
Mike
NB. After inserting with no tension and welding etc I fitted to the car and put on the string line on. The wheel was bob on straight. A small part of a turn (2/3rds) brought the amount of toe in required.
http://www.ebay.co.uk/itm/Jackscrew-Tur ... 3f0de9512d
Mike
Mike
Elan S4 Zetec
Suzuki Hustler T250
Suzuki TC120R trailcat
Yamaha YR5
Suzuki Vstrom 650XT
Suzuki TS185K
Elan S4 Zetec
Suzuki Hustler T250
Suzuki TC120R trailcat
Yamaha YR5
Suzuki Vstrom 650XT
Suzuki TS185K
-

miked - Coveted Fifth Gear

- Posts: 1192
- Joined: 29 Sep 2003
Care to run us through the procedure for fitting & fixing these into the A frames Mike.
Seems to me that a largish length of tubing will need to be removed & then the threaded bushes welded or brazed into place. Quite a lot of work; or am I missing something?
Cheers
John
Seems to me that a largish length of tubing will need to be removed & then the threaded bushes welded or brazed into place. Quite a lot of work; or am I missing something?
Cheers
John
Beware of the Illuminati
Editor: On Sunday morning, February 8th 2015, Derek "John" Pelly AKA GrumpyBodger passed away genuinely peacefully at Weston Hospicecare, Weston Super Mare. He will be missed.
Editor: On Sunday morning, February 8th 2015, Derek "John" Pelly AKA GrumpyBodger passed away genuinely peacefully at Weston Hospicecare, Weston Super Mare. He will be missed.
-

GrUmPyBoDgEr - Coveted Fifth Gear

- Posts: 2346
- Joined: 29 Oct 2004
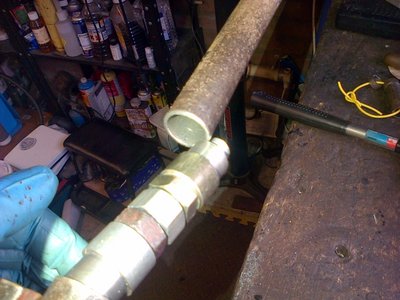
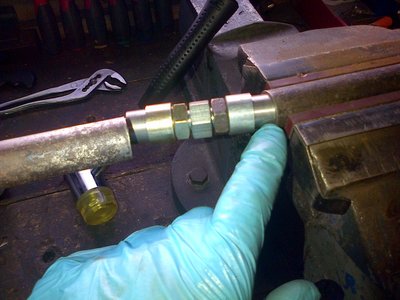
Will do John. As I recall I took out about 3 inches (eventually) but have it on record. Quite easy to do thewhole job. Will photo as I do the next. I took the minimal amount out possible to be able to strain in the device with it run together as far as possible. Then wound it out and did the welds. I even used an old pipe cutter to achieve a neat cut on the A frame. Taking the step out of the collars so they spigot into the tube helps quite a lot and makes for a strong joint.
Will do the stages in photos and time it to.
Mike
Will do the stages in photos and time it to.
Mike
Last edited by miked on Tue Dec 31, 2013 2:54 pm, edited 1 time in total.
Mike
Elan S4 Zetec
Suzuki Hustler T250
Suzuki TC120R trailcat
Yamaha YR5
Suzuki Vstrom 650XT
Suzuki TS185K
Elan S4 Zetec
Suzuki Hustler T250
Suzuki TC120R trailcat
Yamaha YR5
Suzuki Vstrom 650XT
Suzuki TS185K
-

miked - Coveted Fifth Gear

- Posts: 1192
- Joined: 29 Sep 2003
Here we go John, does this sound OK? 
Clock started at 12.00 and finished at 13.10 ( 1hr 10 mins) without rushing and taking photos etc. This could be done slightly differently but seems OK to me and well strong. I have not done the weld part yet as I want to do the other frame. Add an other 10 minutes for the weld.
Mike
Clock started at 12.00 and finished at 13.10 ( 1hr 10 mins) without rushing and taking photos etc. This could be done slightly differently but seems OK to me and well strong. I have not done the weld part yet as I want to do the other frame. Add an other 10 minutes for the weld.
Mike
- Attachments
Mike
Elan S4 Zetec
Suzuki Hustler T250
Suzuki TC120R trailcat
Yamaha YR5
Suzuki Vstrom 650XT
Suzuki TS185K
Elan S4 Zetec
Suzuki Hustler T250
Suzuki TC120R trailcat
Yamaha YR5
Suzuki Vstrom 650XT
Suzuki TS185K
-

miked - Coveted Fifth Gear

- Posts: 1192
- Joined: 29 Sep 2003
Brilliant!
Just a few step-by-step photos with a brief description makes the job look so simple; as indeed it is.
Knowing how much tubing to remove from the A-frame; was that a suck it & see procedure or did the turnbuckle supplier provide that information?
Such a great solution with "off the shelf parts" at a fair price.
Something similar that would fit into Spyder "oval" tube a frames might suit some owners who have already gone down that route.
Many thanks Mike
Cheers
John
Beware of the Illuminati
Editor: On Sunday morning, February 8th 2015, Derek "John" Pelly AKA GrumpyBodger passed away genuinely peacefully at Weston Hospicecare, Weston Super Mare. He will be missed.
Editor: On Sunday morning, February 8th 2015, Derek "John" Pelly AKA GrumpyBodger passed away genuinely peacefully at Weston Hospicecare, Weston Super Mare. He will be missed.
-

GrUmPyBoDgEr - Coveted Fifth Gear

- Posts: 2346
- Joined: 29 Oct 2004
Thanks John.
Yes, it was a suck and see. I took 2 inches out and then a couple of 1/2 " pieces. With everything screwed up and the chamfer on one of the collars it just pops in when you flex the outside part of the A frame.
Just did the second one, that only took 40 minutes. What has suprised me is cutting steel tube with a plumbers old pipe cutter. I only tried it to mark out and saw it was cutting. Toshed some cutting oil on to help and bobs your uncle. Father-in-law gave it to me about 30 years ago.
Re: Spyder oval section, I wonder if it is possible with some heat to squeeze the tube back to round in the collar area to do this. The guy does 5/8 UNF ones so perhaps they may do if the overall dia' is more with these.
PS best 130 quiid I ever spent on the old Southbend.
Mike
Mike
Elan S4 Zetec
Suzuki Hustler T250
Suzuki TC120R trailcat
Yamaha YR5
Suzuki Vstrom 650XT
Suzuki TS185K
Elan S4 Zetec
Suzuki Hustler T250
Suzuki TC120R trailcat
Yamaha YR5
Suzuki Vstrom 650XT
Suzuki TS185K
-

miked - Coveted Fifth Gear

- Posts: 1192
- Joined: 29 Sep 2003
Yes that lathe has already earned its keep!
I did notice that you have treated it to a quick change too post---------------top job.
I think that your suggestion for the oval tubing Spyder A-frames is what I'd call "a bridge too far"
I was thinking that an oval screw threaded insert to fit into the tubes would mean probably milled or computer machined parts & not necessarily cheap.
Happy New Year
John
Beware of the Illuminati
Editor: On Sunday morning, February 8th 2015, Derek "John" Pelly AKA GrumpyBodger passed away genuinely peacefully at Weston Hospicecare, Weston Super Mare. He will be missed.
Editor: On Sunday morning, February 8th 2015, Derek "John" Pelly AKA GrumpyBodger passed away genuinely peacefully at Weston Hospicecare, Weston Super Mare. He will be missed.
-

GrUmPyBoDgEr - Coveted Fifth Gear

- Posts: 2346
- Joined: 29 Oct 2004
I think that your suggestion for the oval tubing Spyder A-frames is what I'd call "a bridge too far"
I was thinking that an oval screw threaded insert to fit into the tubes would mean probably milled or computer machined parts & not necessarily cheap.
Just looked at the Spyder site and inrestingly they sell the rear wishbones with an adjuster already fitted but only in the round tube not their oval tube.
Chris.
-

tcsoar - Third Gear

- Posts: 306
- Joined: 01 May 2007
Yeh Chris, I suppose like Johns says it is harder to do and would require some special bits which would drive the cost up. I like the original "A" frames as they give you the option to go to poly' bushed if you want as they are generally accurate (save damaged one), which matters with poly'. Saying that, if they are not rusted but have suffered a bit of wrong jacking damage it is suprising what you can achieve with the press and some blocks of wood.
Mike
Mike
Mike
Elan S4 Zetec
Suzuki Hustler T250
Suzuki TC120R trailcat
Yamaha YR5
Suzuki Vstrom 650XT
Suzuki TS185K
Elan S4 Zetec
Suzuki Hustler T250
Suzuki TC120R trailcat
Yamaha YR5
Suzuki Vstrom 650XT
Suzuki TS185K
-

miked - Coveted Fifth Gear

- Posts: 1192
- Joined: 29 Sep 2003
Oh sod it, I bought a pair. It occurred to me a lathe might not be needed as I could fit the threaded inserts to a drill and use a file to grind a step off the thing. Welding's another matter of course, but I could braise it, or I could ask a garage to weld it for me.
-

JonB - Coveted Fifth Gear

- Posts: 2357
- Joined: 14 Nov 2017
Learn more here:
http://elantrikbits.com/lotus-elan-blog ... ar-a-arms/
Installing toe adjusters in the rear A frames allows exact dialling in of the rear toe. There is negligible forces or strains put on the A structure, because to get the correct adjustment will only take three quarters of a turn either way to get it right. This is an old mod that's been around for decades, and makes a huge difference to the handling of the elan. May I say that Chapman didn't always get it right.
- ceejay
- Fourth Gear

- Posts: 558
- Joined: 27 Mar 2007
15 posts
• Page 1 of 1
Total Online:
Users browsing this forum: No registered users and 5 guests

