why compress rear suspension to remove?
38 posts
• Page 3 of 3 • 1, 2, 3
To lift the body off, there are 16 bolts. That is the easy part, the shifter, carbs, choke cable, rear carb studs, E-brake cable (disco the cable at clevis fork at rear and pull the slack forward, pull hand brake all the way out and remove cable from hand brake pull and feed the cable through the firewall), brake and clutch lines from the masters, speedo cable at the gearbox, radiator hoses, temperature sender, heater valve, heater hoses, heater cable, engine harness attachments in the bay, inner rear seat slide bolts, inner seat belt bolts, rear shoulder harness bolts (if the are there), fuel line at the tank, battery cable at the starter, oil pressure line at the engine, coil wire at the distributor, exhaust bracket(s) to body in the rear, vacuum line at the T to the vacuum switch. I think thats all, it takes about a day to get everything done, check and double check. Get a case of beer and invite friends over and have a bear, trial lift to TRIPLE check. If you missed anything then they can have another beer while you attend to it. Then lift again. You can also jack up the whole Elan up about 30 inches and lower the chassis, I use this method as I don't have 3 or 4 friends that can be bribed with beer (it might be a stretch to find 3 friends to help for me  ). the work shop manual has a complete description too, this is an off the top of my head 10 minute post. If I missed anything, you will find it or maybe someone else will proof read this and update it. You really cant see much chassis with the body on, cutting access hole is going to limit what you can do, listen to Mark, he's one person that has been there a few times.
Last edited by Guest on Thu Jan 26, 2012 12:28 pm, edited 1 time in total.
-

garyeanderson - Coveted Fifth Gear

- Posts: 2634
- Joined: 12 Sep 2003
Gary, I'm not sure what to say, you make it sound so easy. Thanks, Dan
-

collins_dan - Coveted Fifth Gear

- Posts: 1102
- Joined: 09 Jan 2006
Disassembly is pretty easy, its the re-assembly that has not happened with many Elans that the real problem. I speak with some experience with that too. Space, time, and money gets it done, missing any of those three leads to problems.
Gary
Gary
-

garyeanderson - Coveted Fifth Gear

- Posts: 2634
- Joined: 12 Sep 2003
Gary, That's funny as the exact thought that went through my head was the ad that I would be placing on lotuselan.net in about 10 years... it ran when I took it apart. The other issue is that I would need to rent a garage. I mistakenly used the word "weld" early in my explanation of the problem to my wife, she shut down any chance of work happening in our garage. Her first concern was that I would blow the house up, not that I would blow myself up. As attractive a project as it sounds, I'm going to try the limited repair through trunk first. If that doesn't provide satisfactory access, then I'll need to figure out plan B, which is either your house or Mark's. Dan
-

collins_dan - Coveted Fifth Gear

- Posts: 1102
- Joined: 09 Jan 2006
Just an update for the records, the shop didn't end up going through the trunk. Instead, they removed the seats, roll bar and parcel shelf, which gave great access to both sides. They disconnected the lotocones and dropped the suspension down a bit. They cut out the surrounding fiberglass and will reinforce both sides. So if anyone else finds themselves with the need or desire to reinforce this location without removing the body, it can be done with minimal disruption. Cheers, Dan
-

collins_dan - Coveted Fifth Gear

- Posts: 1102
- Joined: 09 Jan 2006
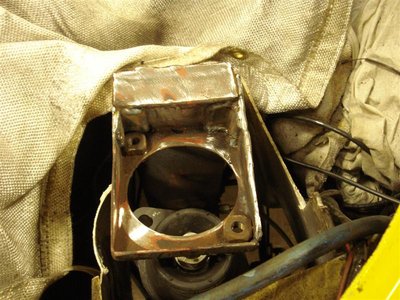
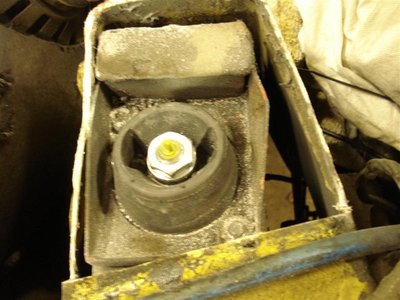
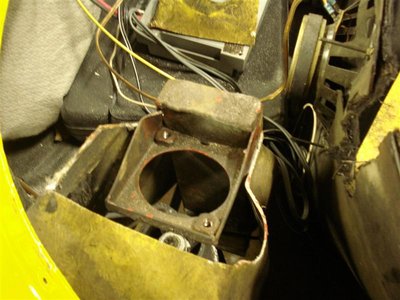
Just to close this out. Attached are the pictures of the damage to the frame and the repair. The right side, you can see where the back side completely separated and was bent in over time. I was lucky. On the left side, the weld never gave way, like on the right, but you can see how twisted it was. A shot of the frame repair and fiberglass repair. It won't win an concourse, but it's safe and drives great.
Dan
Dan
-

collins_dan - Coveted Fifth Gear

- Posts: 1102
- Joined: 09 Jan 2006
Thanks Terry. The suspension has made a huge difference. I wish I hadn't waited this long. I always discounted the poor absorption of rough roads as a function of old car design. It was the old dampers and springs, the design appears to be as relevant today as it was then. When the weather improves I will begin trying different settings. Right now it is set as softest both front and rear. Adjusting the ride height has been great as well. Its not as hard to access as I thought it would be. Good Luck with your project. Dan
-

collins_dan - Coveted Fifth Gear

- Posts: 1102
- Joined: 09 Jan 2006
38 posts
• Page 3 of 3 • 1, 2, 3
Total Online:
Users browsing this forum: No registered users and 21 guests


