TTR adjustable suspension questions
11 posts
• Page 1 of 1
So yesterday a nice heavy box arrived from the UK. 
I've got myself the TTR adjustable setup front and rear with the narrow springs in rear, which is quite exciting, but has a learning-curve as well. I've never dealt with suspension at this depth before, so I have a few questions for those of you who are experienced hands, especially as no documentation was included.
1. The front and rear dampers have adjustment knobs. I assume this is for rebound adjustment? Which way do I turn them for which result?
2. The C-spanners for adjusting the height were not included. I figure I can source those over here easily enough, but how are they sized? My guess is by the diameter of the outer dimension of the notched ring; is that correct?
3. After reading various old threads here about height-adjustable rear springs, I could use some guidance about mounting the threaded tubes. What's the general consensus about how high to mount them? I saw a few mentions of flush with the tops of the existing upright tubes; that does place them such that the approximate middle of their range is near where the existing perches are located, however I know that the old springs and new springs are quite different and that my old ones are probably too tall.
4. I saw mention of both welding and epoxy to secure the threaded tubes. My guess is that welding is probably the better way to go, and the German blood in me (LOL) says weld. I'll have to get somebody else to do the welding, so how should I instruct it to be done? A few blobs, or a full bead all around the circumference? Should I take any precautions to prevent corrosion between the tubes?
I'm sure that I'll have more questions later, especially about getting the settings right once the car is operable.
1970 Elan Plus 2 (not S) 50/2036
2012 BMW R1200GS
"It just wouldn't be a complete day if I didn't forget something!" -Me
2012 BMW R1200GS
"It just wouldn't be a complete day if I didn't forget something!" -Me
-

The Veg - Coveted Fifth Gear

- Posts: 2185
- Joined: 16 Nov 2015
As far as installing height of the sleeves:
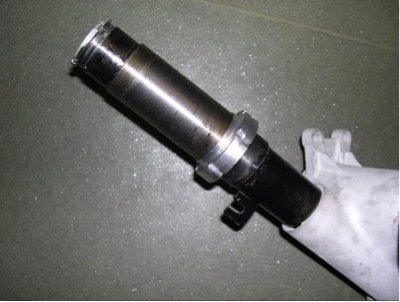
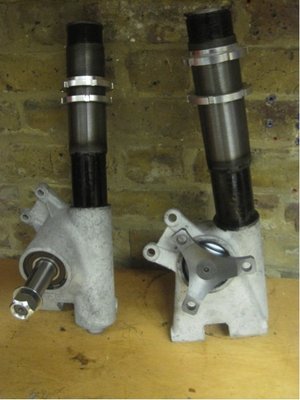
This picture was supplied by TTR, showing them installed just above the tab.
Another picture of the sleeves as installed by TTR for a customer. Tab removed.
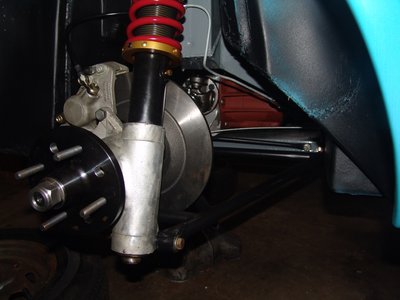
My installation:
Mine are welded, as shown.
This picture was supplied by TTR, showing them installed just above the tab.
Another picture of the sleeves as installed by TTR for a customer. Tab removed.
My installation:
Mine are welded, as shown.
'69 Elan S4 SE
Street 181 BHP
Original owner
Street 181 BHP
Original owner
- 1owner69Elan
- Fourth Gear

- Posts: 846
- Joined: 16 Jun 2015
The Veg wrote:So yesterday a nice heavy box arrived from the UK.
I've got myself the TTR adjustable setup front and rear with the narrow springs in rear, which is quite exciting, but has a learning-curve as well. I've never dealt with suspension at this depth before, so I have a few questions for those of you who are experienced hands, especially as no documentation was included.
1. The front and rear dampers have adjustment knobs. I assume this is for rebound adjustment? Which way do I turn them for which result?
2. The C-spanners for adjusting the height were not included. I figure I can source those over here easily enough, but how are they sized? My guess is by the diameter of the outer dimension of the notched ring; is that correct?
3. After reading various old threads here about height-adjustable rear springs, I could use some guidance about mounting the threaded tubes. What's the general consensus about how high to mount them? I saw a few mentions of flush with the tops of the existing upright tubes; that does place them such that the approximate middle of their range is near where the existing perches are located, however I know that the old springs and new springs are quite different and that my old ones are probably too tall.
4. I saw mention of both welding and epoxy to secure the threaded tubes. My guess is that welding is probably the better way to go, and the German blood in me (LOL) says weld. I'll have to get somebody else to do the welding, so how should I instruct it to be done? A few blobs, or a full bead all around the circumference? Should I take any precautions to prevent corrosion between the tubes?
I'm sure that I'll have more questions later, especially about getting the settings right once the car is operable.
1. The knobs vary the damping rate on bump. Wound fully out (anti-clock) = soft. Recommended to start 'soft' and test drive, keeping winding towards 'hard', stop when you are happy with the result. You should also check the front/rear balance, I have the rears set at 2/3rds of the front.
2. Correct. Use outer ring diameter. You might need to shorten the handle, or fit a nut and bolt, allowing you to use a ratchet handle.
3. As Tony Thompson supplied them , I would contact TT for this info.
4. Get a welder to MIG weld them on. Make sure the shocks are out and there is no oil in the tube !
68 Elan +2, 70 Elan +2s
-

Foxie - Coveted Fifth Gear

- Posts: 1209
- Joined: 20 Sep 2003
Slap plenty of Copaslip on the two ali rings as they tend to corrode and lock-up to each other..
Once mig welded on they'll be hard to remove,as will the rings if you should need to change them I see no problem with just dabs of epoxy to hold them in place...they're not going anywhere ...
John
Once mig welded on they'll be hard to remove,as will the rings if you should need to change them I see no problem with just dabs of epoxy to hold them in place...they're not going anywhere ...
John
-

john.p.clegg - Coveted Fifth Gear

- Posts: 4533
- Joined: 21 Sep 2003
I installed mine with epoxy more than 30 years ago - no issues. Like most things, preparation is important. A proper metal to metal adhesive can be as strong as welding, witness the many modern cars constructed that way.
I found that my old spanner for my front Spax worked perfectly on my front TTR shocks.
Once your new kit is in place, I highly recommend having the car corner weighted. I was very meticulous about equalizing the perch heights on my car, but the corner weights were quite far off. This on a new chassis.
Since my car is RHD, both driver and fuel tank are on the same side. This makes "perfect" corner weighting difficult, but the difference in stance and performance would make it a must do, IMO.
Mike
- elancoupe
- Fourth Gear

- Posts: 759
- Joined: 11 Sep 2003
Thanks guys for the suggestions- much appreciated!
Mike, the fuel tank weight isn't an either-side issue since my car is a Plus 2. But yeah, the corner weight thing sounds like a good idea.
Mike, the fuel tank weight isn't an either-side issue since my car is a Plus 2. But yeah, the corner weight thing sounds like a good idea.
1970 Elan Plus 2 (not S) 50/2036
2012 BMW R1200GS
"It just wouldn't be a complete day if I didn't forget something!" -Me
2012 BMW R1200GS
"It just wouldn't be a complete day if I didn't forget something!" -Me
-

The Veg - Coveted Fifth Gear

- Posts: 2185
- Joined: 16 Nov 2015
I use 4, $20, 550 lb bathroom scales
Born, and brought home from the hospital (no seat belt (wtf)) in a baby!
Find out where the limits are, and start from there
Love your Mother
Earth
Find out where the limits are, and start from there
Love your Mother
Earth
-

h20hamelan - Coveted Fifth Gear

- Posts: 1962
- Joined: 25 Sep 2010
I know this is an old thread, but I looked (while waiting for answer from TTR) to see what I could find since I am installing the threaded adjusters on the rear of my Elan. Here is what I got from TTR:
FITMENT OF DIY REAR PLATFORM KITS TO ELAN REAR SHOCK ABSORBER TUBES.
1. Remove the original rear spring platforms by carefully turning them off in the lathe. This can be done manually with an angle grinder with great care.
2. Clean the tube with sandpaper or emery cloth.
3. Slide the new threaded tube on so that the top of the threads are 25mm or 1 inch below the top of the shock absorber tube.
4. Weld the threaded tube on at the bottom only.
5. Seal the top with a smear of silicone.
6. Prepare and repaint the tube.
7. Smear a little thread grease on the threads of the threaded tube.
8. Screw on the aluminium locknut and platform.
1966 Lotus Elan S3- Benelli motorcycles (various)
- Lotus54
- Second Gear

- Posts: 128
- Joined: 10 Oct 2023
I was thinking of silicone bronze tig instead of welding. Less heat and easier to remove later if required.
Edit:
I just did one with silicon bronze tig. Worked great- i did several beads, but not continuous. Should work well. Mine had a boss and drain plug, so could not go quite as low as recommended.
Edit:
I just did one with silicon bronze tig. Worked great- i did several beads, but not continuous. Should work well. Mine had a boss and drain plug, so could not go quite as low as recommended.
1966 Lotus Elan S3- Benelli motorcycles (various)
- Lotus54
- Second Gear

- Posts: 128
- Joined: 10 Oct 2023
11 posts
• Page 1 of 1
Total Online:
Users browsing this forum: No registered users and 25 guests


