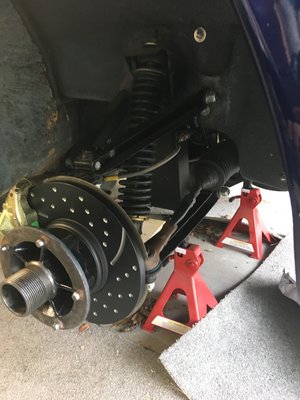
Front suspension overhaul
25 posts
• Page 1 of 2 • 1, 2
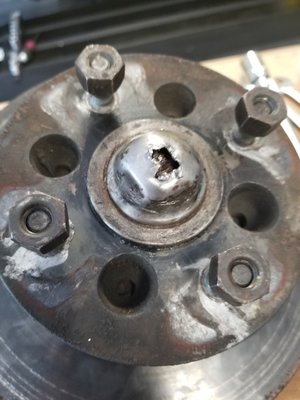
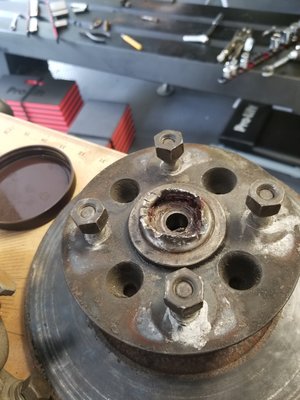
Spent the better part of today figuring out how to dismantle the front suspension (drivers side). Surprisingly, the biggest pain was the dust cap over the hub nut - had to completely butcher it to get to the nut and still need to get it out. Maybe one of you will share a trick with me before I tackle the other side. Glad I did, though, as the nut was completely loose - only in place thanks to the split pin.
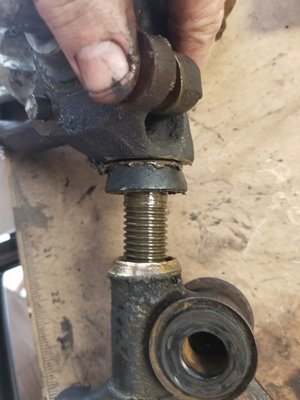
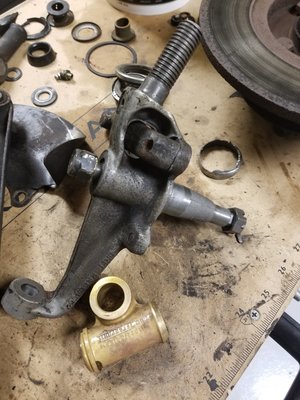
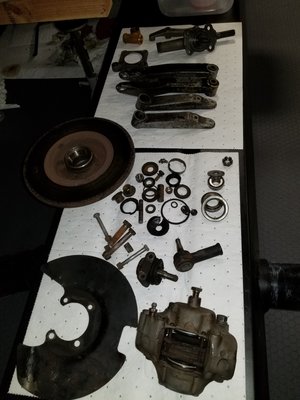
Had to cut one lower bone bolt and one of the bolts holding the rear dust cover and hub assembly - and sheared another of the latter bolts, but finally got the dust cover, vertical link, steering arm, trunnion, and hub/rotor separated. Bent that dust cover so will replace it, along with the tie rod end and upper ball joint, both of which's rubbers were perishing. On a good note, the vertical link threads look great so will rebuild the trunnion and be good. All of the wishbone and damper bushes are shot, plan to replace with poly all around.
Had to cut one lower bone bolt and one of the bolts holding the rear dust cover and hub assembly - and sheared another of the latter bolts, but finally got the dust cover, vertical link, steering arm, trunnion, and hub/rotor separated. Bent that dust cover so will replace it, along with the tie rod end and upper ball joint, both of which's rubbers were perishing. On a good note, the vertical link threads look great so will rebuild the trunnion and be good. All of the wishbone and damper bushes are shot, plan to replace with poly all around.
Henry
69 Elan S4
65 Seven S2
69 Elan S4
65 Seven S2
- SENC
- Coveted Fifth Gear

- Posts: 1017
- Joined: 30 Dec 2015
I've always managed to get this sort of dust cover out with a screw driver tapped under the 'rim' - working round to ease it out steadily if reluctant to come out.
Reassemble withe plenty of grease to prevent recurrence.
Let's hope the other side is more accommodating!
Reassemble withe plenty of grease to prevent recurrence.
Let's hope the other side is more accommodating!
- MarkDa
- Coveted Fifth Gear

- Posts: 1116
- Joined: 15 Apr 2017
Finally got the dust cover out piece by fighting piece, and the outer races and bearings came easily. The inner races are in solidly (for now).
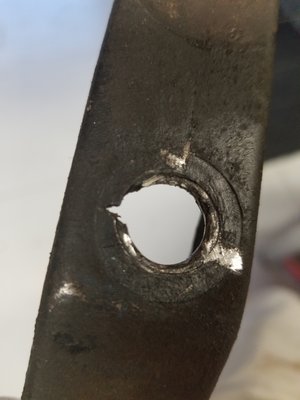
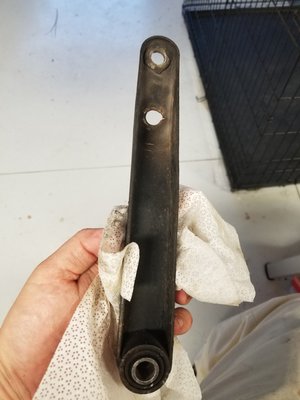
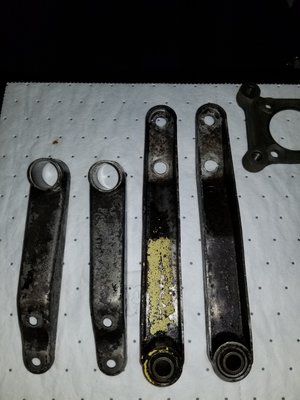
Started cleaning up parts to see what I'l need and noticed that the top of the rear hole on the outside of each upper wishbone is showing signs of failure. Can I have them welded/repaired, or take this as a sign a 50 year old part is ready to replace? If the latter, are the tubulars the right upgrade for longevity?
Otherwise things look pretty decent. Trunnion and vertical link are cleaning up nicely, though I do need to press the stub axle out of the VL as it is attached quite well.
Henry
69 Elan S4
65 Seven S2
69 Elan S4
65 Seven S2
- SENC
- Coveted Fifth Gear

- Posts: 1017
- Joined: 30 Dec 2015
Over the years and various overhauls I've ended up welding washers to all four of those holes - something like the one reinforcing the hole above. I have a vague memory of replacement wishbones coming with 'washers' already attached.
Both of my stub axles came out of their respective vertical links recently with the application of a little heat from a blow lamp. No need for a press.
Both of my stub axles came out of their respective vertical links recently with the application of a little heat from a blow lamp. No need for a press.
Stuart Holding
Thame UK / Alpe D'Huez France
69 S4 FHC
Honda GoldWing 1800
Honda CBX1000
Kawasaki H1 500
Yamaha XS2
Thame UK / Alpe D'Huez France
69 S4 FHC
Honda GoldWing 1800
Honda CBX1000
Kawasaki H1 500
Yamaha XS2
- 69S4
- Coveted Fifth Gear

- Posts: 1124
- Joined: 23 Sep 2004
The wheel bearing nut is often quite loose - it should be tightened up hard to centre the bearing then backed off until the wheel is free and there is no binding or play at the wheel perimeter. It should then be backed off slightly more until the split pin can be inserted and the play checked again. It is usual practice to recheck the bearing end float after a few hundred miles and sometimes then you can tighten the nut up one flat. If you overtighten the nut the bearing will run hot and fail quickly.
Nigel F.
Nigel F.
1970 S4SE/1760cc big valve/SA-AX block, L2s, 45DCOEs, 1978 Jensen GT, 1962 AH Sprite, Alfa-Romeo 159, 1966 Bristol Bus, 1947 AEC Regal bus.
- nigelrbfurness
- Third Gear

- Posts: 373
- Joined: 04 Apr 2008
SENC, you probably saw it but elan-wanted-f4/top-wishbone-t42028.html#p297083
Kevin might have a spare wishbone you can use, if the OP is only after one of them.
Kevin might have a spare wishbone you can use, if the OP is only after one of them.
-

JonB - Coveted Fifth Gear

- Posts: 2358
- Joined: 14 Nov 2017
I replaced the outer cap and felt inner seal with the Dave Bean Nilos Seal kit. This outer seal, seals inside the outer adjuster nut and makes keeping the front wheel end float in specification easy, especially when its routinely checked by scrutineers before a race. The inner seal replaces the standard felt seal used and adds lightness and reduces drag 
These seals where used by Lotus F1 cars of the era which had a triumph based front suspension like the Elan ! So you can feel a little more like a F1 driver
cheers
Rohan
These seals where used by Lotus F1 cars of the era which had a triumph based front suspension like the Elan ! So you can feel a little more like a F1 driver
cheers
Rohan
-

rgh0 - Coveted Fifth Gear

- Posts: 8413
- Joined: 22 Sep 2003
Rohan's solution sounds nice, but the stock caps are cheap. I keep spares in stock and drill the center of the cap to fit a machine screw. Use a 2" machine screw as a puller to remove the cap with equal force on all sides, then plug the hole between visits with a 1/4" one. Tape, wax, or ?? would also do that job.
When the usual screw pulls loose, then it's time for a bigger one to get it out, then replace the cap with a new one.
Make sure there's grease where the cap seats to avoid what you experienced, the cap rusting in place through lack of attention.
Presuming the assembly was originally set up properly (see above post), the bearings are likely in as bad shape as the rest of it, which is how the nut got loose despite the pin. I would guess this one was installed too tight, leading to the bearing failure. Shiny metallic grease will confirm that.
One of the Europa posters found that a DPO thought anti-seize compound was the correct bearing lubricant.
- denicholls2
- Fourth Gear

- Posts: 552
- Joined: 23 Jan 2006
Just curious, if the stub axle and vertical link are undamaged, why risk damaging it or the vertical link by removing it? If it?s damaged then that?s different.
Change is inevitable, except from a vending machine!
- Bigbaldybloke
- Fourth Gear

- Posts: 889
- Joined: 16 May 2017
+1 on the Nilos seals. Dave Bean introduced me to these little marvels 25+ years ago. Still available from his eponymous company.
Thanks, Dave.
Thanks, Dave.
Steve
Elan S1 1963-Bourne bodied
Elan S3 1967 FHC pre airflow
Formerly:
Elan S1 1964
Elan S3 1966 FHC pre airflow
Elan S3 1967 FHC airflow
Elan S4 1969 FHC
Europa S2 1970
Esprit S2 1979
Elan S1 1963-Bourne bodied
Elan S3 1967 FHC pre airflow
Formerly:
Elan S1 1964
Elan S3 1966 FHC pre airflow
Elan S3 1967 FHC airflow
Elan S4 1969 FHC
Europa S2 1970
Esprit S2 1979
- bitsobrits
- Third Gear

- Posts: 418
- Joined: 27 Apr 2011
Bigbaldybloke wrote:Just curious, if the stub axle and vertical link are undamaged, why risk damaging it or the vertical link by removing it? If it?s damaged then that?s different.
I've reached the same conclusion, BBB - it was merely a matter of getting things apart to clean and inspect, but since they are so satisfactorily connected and look good they will remain. The same is true for the other side (that vertical link looks equally great).
Parts have been cleaning up nicely.
Still working on getting the bushings out of the wishbones (they are also clinging for dear life), but have 2 down. Have decided to go the repair (braze on a washer) rather than replacement route, with thoughts of replacing in a few years when a full engine out, body off resto begins.
Both sides of the front suspension are fully disassembled now, with exception of getting the inner races out of the hubs and one sheared bolt out of one of the VLs, then will start rebuilding the trunnions. Planning to order bearings and the Nikos seals (thanks Rohan) as well as replacement orings for the caliper brackets tomorrow, and need to find 1 left side brake disc dust cover in case I can't bend my bent one back into shape. Have Boeshield on all the bare metal to prevent rust while finishing teardown, cleanup, and parts ordering, will then final degrease and paint with POR before reassembly.
Thanks all for your help and guidance to date.
Henry
69 Elan S4
65 Seven S2
69 Elan S4
65 Seven S2
- SENC
- Coveted Fifth Gear

- Posts: 1017
- Joined: 30 Dec 2015
I was lucky enough to be working offshore when a gang of laggers were there insulating and cladding pipework in stainless steel. They made me a couple of disc dust shields no problem, then I made a simple wooden jig and panel beat the centre to give the raised section. They turned out good and quite sataisfying and very cheap 
Change is inevitable, except from a vending machine!
- Bigbaldybloke
- Fourth Gear

- Posts: 889
- Joined: 16 May 2017
Bigbaldybloke wrote:I was lucky enough to be working offshore when a gang of laggers were there insulating and cladding pipework in stainless steel. They made me a couple of disc dust shields no problem, then I made a simple wooden jig and panel beat the centre to give the raised section. They turned out good and quite sataisfying and very cheap
Got lucky - when I called Dave Bean to order the other parts I asked about the shields and they had a pair of used in good shape for $14 each. Not as cheap as yours, but too good to leave on a shelf in California. If I can repair mine satisfactorily, will restore these and have them for the future redo.
Henry
69 Elan S4
65 Seven S2
69 Elan S4
65 Seven S2
- SENC
- Coveted Fifth Gear

- Posts: 1017
- Joined: 30 Dec 2015
You can just see mine in the picture, looks like I should have painted the track rod ends 
Change is inevitable, except from a vending machine!
- Bigbaldybloke
- Fourth Gear

- Posts: 889
- Joined: 16 May 2017
25 posts
• Page 1 of 2 • 1, 2
Total Online:
Users browsing this forum: No registered users and 29 guests

