Plus 2 petrol smell
24 posts
• Page 2 of 2 • 1, 2
Great to hear that they solved your problem, not cheap as you say, but I think worth every penny, and simple to install.
Change is inevitable, except from a vending machine!
- Bigbaldybloke
- Fourth Gear

- Posts: 889
- Joined: 16 May 2017
Bigbaldybloke wrote:Great to hear that they solved your problem, not cheap as you say, but I think worth every penny, and simple to install.
With these tank vent valves is neccesary to make other modification? Can you put some pics?
Regards
- Dieschelan
- Second Gear

- Posts: 217
- Joined: 07 May 2015
tough to take photos with enough light.
BUT its pretty simple.
Remove the rear bulkhead piece (it sits on top of the tank usually covered with black vinyl - can't remember the proper name for it.
Working from the boot
Take the existing tubing that is attached to the tank.
With the tank less than 1/2 full - cut the hose about 3 to 4" in from the tank (the tank spigot think is around 1 1/4" long).
(not smart to do this with a full tank of gas!)
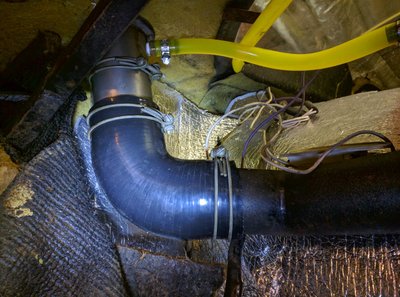
Insert one end of the valve in the hose still attached to the tank and clamp, then insert the other end into the tubing that heads up into the roof of the car and clamp that one.
Duplicate on the other side.
Little more complex if the ID of the tubing is materially bigger than the OD of the valve.
N
Nick Baxter
1970 Plus 2S (Federal)
1969 Plus 2 (UK) - sold
1970 Plus 2S (Federal)
1969 Plus 2 (UK) - sold
- nwbaxter66
- Second Gear

- Posts: 178
- Joined: 03 Aug 2006
I did mine when fitting a new alloy tank so a little bit different. My vent pipes are linked side to side and then a vent each side that goes up inside the rear pillar then rather than across the roof, turns down and out into the rear wheel arch as per the original. These valves are installed in the section of vent pipe that goes upwards inside the rear pillar before it turns down to exit in the arch.
Currently away from home but will attach a few pictures when I have decent internet access
Currently away from home but will attach a few pictures when I have decent internet access
Change is inevitable, except from a vending machine!
- Bigbaldybloke
- Fourth Gear

- Posts: 889
- Joined: 16 May 2017
The vent lines 2 main functions:
1) Allow for small amounts of air to enter or exit the tank due to exanpnsion of fuel, evaporation of fuel, replace consumed fuel with air.
2) Allow a large amount of air to escape during filling so that the tank can be filled to the top. (You need to vent air at the same rate or higher that the fuel pump can fill the tank to avoid air locking the top half of the tank.)
Unless the values flow a lot more air than I expect they do they don't address 2) and you may experience problems filling the tank to full. The common solution for 2) is to route a large vent line from both sides of the tank to the filler neck, after modifying the filler neck with a suitable screw in barp. This setup gives you large flow breather while filling which is sealed after by filler cap. A small breather line, with or without valve, can then be used for 1).
'73 +2 130/5 RHD, now on the road and very slowly rolling though a "restoration"
- mbell
- Coveted Fifth Gear

- Posts: 2643
- Joined: 07 Jun 2013
I do have the large vent to the filler pipe, just haven?t included all the details and photos yet.
Change is inevitable, except from a vending machine!
- Bigbaldybloke
- Fourth Gear

- Posts: 889
- Joined: 16 May 2017
Hi
Can someone put photos? One of the problems is if you weld to the fulmin? tube you can?t remove it.
Regards
Can someone put photos? One of the problems is if you weld to the fulmin? tube you can?t remove it.
Regards
- Dieschelan
- Second Gear

- Posts: 217
- Joined: 07 May 2015
Dieschelan wrote:Can someone put photos? One of the problems is if you weld to the fulmin? tube you can?t remove it.
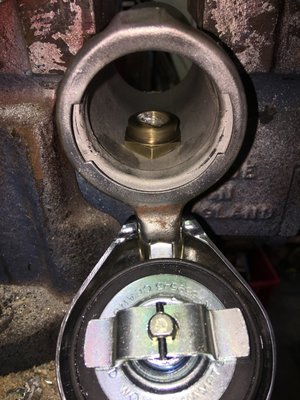
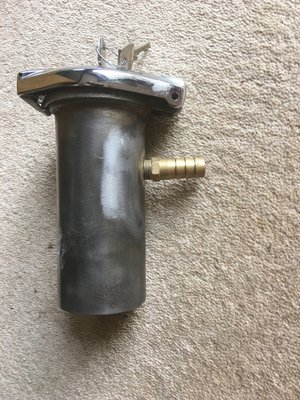
What you do is use a threaded bung, mounted such that most of it is inside the neck, and the weld/braze bead and protrusion on the outside ground down to almost nothing, just enough to get the job done. Then it adds almost no additional difficulty getting the neck through the grommet, and then you thread the Barb into the bung once the neck had been installed.
You'll have to zoom-in a bit to really see it in my pic.
1970 Elan Plus 2 (not S) 50/2036
2012 BMW R1200GS
"It just wouldn't be a complete day if I didn't forget something!" -Me
2012 BMW R1200GS
"It just wouldn't be a complete day if I didn't forget something!" -Me
-

The Veg - Coveted Fifth Gear

- Posts: 2188
- Joined: 16 Nov 2015
Braze a threaded boss inside the filler neck and screw the adaptor into it once the filler neck is in place
Change is inevitable, except from a vending machine!
- Bigbaldybloke
- Fourth Gear

- Posts: 889
- Joined: 16 May 2017
24 posts
• Page 2 of 2 • 1, 2
Total Online:
Users browsing this forum: No registered users and 30 guests


