Burton cartridge water pump
17 posts
• Page 1 of 2 • 1, 2
I'm just installing a Burton cartridge water pump. Never changed either type before so it's a learning experience. I need some advice on installing the new bearing in the housing, all instructions are for the standard type and say 'push the bearing in until the retaining pin grooves line up'. On the Burton housing there is no hole for a retaining pin so no line of site to line up the retaining grooves. Has anyone got a dimension for the shaft protrusion through the housing or tips on installation?
Incidentally the recent discussion about the bolts fouling the back of the pulley. Burton now supply ready chamfered bolts heads for clearance.
Dave
Incidentally the recent discussion about the bolts fouling the back of the pulley. Burton now supply ready chamfered bolts heads for clearance.
Dave
Elan +2
Elise mk 1
Elise mk 1
- Donels
- Fourth Gear

- Posts: 709
- Joined: 10 Sep 2016
The bearing is installed so the outer race is just flush with nose end of the aluminium Burton cartridge. Long shaft side of the bearing goes toward impellor short toward hub flange. Yes Burton supply chamfered set screws but it's still not enough. Best bet is to use the Harley Davidson Torx head screws together with BMW wave spring washers underneath (2x 6mm, 1 x 8mm). Lots of clearance then. I've currently got some of the wave spring washers on order from BMW. Let me know if you would like the part numbers. The 8mm ones are ex-stock but the 6mm ones are coming from Germany. They are very inexpensive - about 20c each. Wave spring washers are very thin whilst providing "spring" and they don't gouge the aluminium like standard spring washers do. Mind you there's a probably correct school of thought that says spring washers are a waste of time but considering there's a compressible paper gasket there I still elected to use one.
1970 Ford Escort Twin Cam
1972 Ford Escort GT1600 Twin Cam
1980 Ford Escort 2.0 Ghia
Peugeot 505 GTI Wagons (5spdx1) (Autox1)
2022 Ford Fiesta ST.
1972 Ford Escort GT1600 Twin Cam
1980 Ford Escort 2.0 Ghia
Peugeot 505 GTI Wagons (5spdx1) (Autox1)
2022 Ford Fiesta ST.
- 2cams70
- Coveted Fifth Gear

- Posts: 2163
- Joined: 10 Jun 2015
Remember don't press on the shaft, use a tube to press the outer shell of the bearing into the housing.
If you were to press the shaft you are putting a wrong load on the ball bearings/rollers and might damage them.
If you were to press the shaft you are putting a wrong load on the ball bearings/rollers and might damage them.
Bill Williams
36/6725 S3 Coupe OGU108E Yellow over Black.
36/6725 S3 Coupe OGU108E Yellow over Black.
- billwill
- Coveted Fifth Gear

- Posts: 4417
- Joined: 19 Apr 2008
The Burton carrier is aluminium. Just drop it in some boiling water, leave it 5 minutes and then fit the bearing into the module, easy peasy, no thumping or pressing. That?s how ~I did mine.
Cheers
Mark
Cheers
Mark
-

mark030358 - Coveted Fifth Gear

- Posts: 1164
- Joined: 29 May 2004
That reminds me. I forgot to mention one other thing about the Burton cartridge. The tolerances of the bore diameter where the bearing fits seem to be a bit hit and miss depending on how it was machined. Sometimes it's an OK interference fit but other times it's merely a slip fit. There is no retaining ring so the fit here is the sole thing that stops the bearing from floating about in the bore. Suggest you use some Loctite retaining compound on the outer bearing to secure it if there is any doubt. Note I prefer to use a paint stripping heat gun rather than hot water when expanding aluminium components. No water is involved so you can apply things like Loctite without fear of contamination.
1970 Ford Escort Twin Cam
1972 Ford Escort GT1600 Twin Cam
1980 Ford Escort 2.0 Ghia
Peugeot 505 GTI Wagons (5spdx1) (Autox1)
2022 Ford Fiesta ST.
1972 Ford Escort GT1600 Twin Cam
1980 Ford Escort 2.0 Ghia
Peugeot 505 GTI Wagons (5spdx1) (Autox1)
2022 Ford Fiesta ST.
- 2cams70
- Coveted Fifth Gear

- Posts: 2163
- Joined: 10 Jun 2015
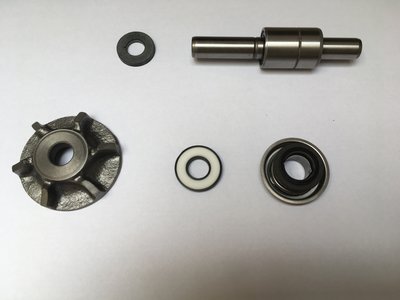
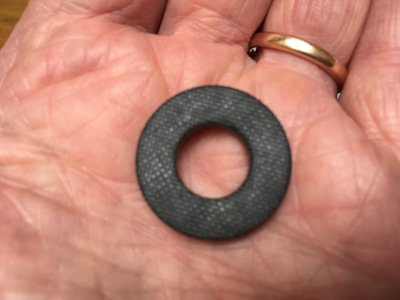
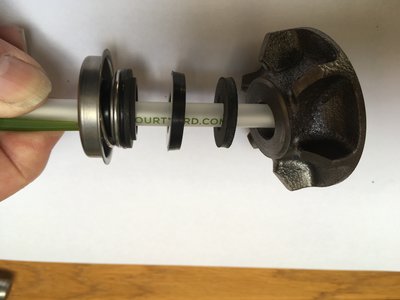
Next question. I have the sprung seal that fits into the Burton cartridge and a plastic/rubber seal that the sprung seal runs against, then I have separate rubber seal, see attached photo's.
The most obvious place for this is before the impeller. is that correct?
The most obvious place for this is before the impeller. is that correct?
Elan +2
Elise mk 1
Elise mk 1
- Donels
- Fourth Gear

- Posts: 709
- Joined: 10 Sep 2016
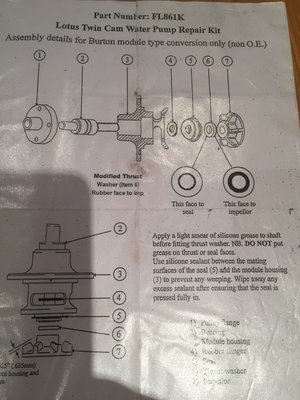
Did Burtonsnot supply a parts diagram? The are two types of modules, with different I think pumps and seals. I know this as I put one type on my Sprint and another on an S4 I rebuilt. Here is a photo of the FL861K kit. I have another diagram in the garage, will check tomorrow for that. Hope this helps.
cheers
Mark
ps looks like you have assembled it wrong
cheers
Mark
ps looks like you have assembled it wrong
-

mark030358 - Coveted Fifth Gear

- Posts: 1164
- Joined: 29 May 2004
Thanks for this. I got no instructions with the kit, hence my confusion. I clearly have the rubber 'slinger' in the wrong place and may have the seals the wrong way round. I thought the sprung seal and rotating seal should be face to face but not sure now from your diagram. I need to check it out.
Many thanks,
Dave
Many thanks,
Dave
Elan +2
Elise mk 1
Elise mk 1
- Donels
- Fourth Gear

- Posts: 709
- Joined: 10 Sep 2016
Take a look at this, which is in the Wiki here on this website.
http://www.lotuselan.net/wiki/ED_-_Engi ... _Pump_%2B2
http://www.lotuselan.net/wiki/ED_-_Engi ... _Pump_%2B2
Bill Williams
36/6725 S3 Coupe OGU108E Yellow over Black.
36/6725 S3 Coupe OGU108E Yellow over Black.
- billwill
- Coveted Fifth Gear

- Posts: 4417
- Joined: 19 Apr 2008
Thanks for the help guys, water pump now assembled correctly.
Has anyone got any tips on how to hold the seal in place between the front and back plates during assembly? It?s a real faff. It looks like it needs 'gluing' with silicon, just to hold it in position around the bosses.
Dave
Has anyone got any tips on how to hold the seal in place between the front and back plates during assembly? It?s a real faff. It looks like it needs 'gluing' with silicon, just to hold it in position around the bosses.
Dave
Elan +2
Elise mk 1
Elise mk 1
- Donels
- Fourth Gear

- Posts: 709
- Joined: 10 Sep 2016
Is the burton pump the best design out their?
Thanks
Thanks
Last edited by holywood3645 on Wed May 29, 2019 2:47 am, edited 1 time in total.
-

holywood3645 - Fourth Gear

- Posts: 894
- Joined: 07 Oct 2003
The O ring should just push into the groove and it stays in there firmly by itself. No need to slop Silicone around it. I swapped the neoprene O ring supplied with a better quality Viton one from my local bearing supplier. It's just a standard BS series size (can't remember exactly but if you take it with you for reference they'll be able to work it out for you or measure it yourself and refer to the BS size tables). Did you also check the backplate for proper machining of the groove as described in my other post about the Burton cartridge?
The only area where I used an eeny weeny tiny bit of Silicone was on the block face just around the water pump aperture and the cartridge mounting bolt holes. There was a little bit of pitting corrosion on my block in this area hence the Silicone. I know from past experience that if there is even a tiny bit of seepage between the aperture and the bolt holes the bolts can rust in making life hell when time comes for removal. Just a very thin smear applied with the finger is enough. Use the special Permatex water pump Silicone sealant too as it has the best resistance to glycol coolant.
https://www.permatex.com/products/gaske ... ne-gasket/
Note the pump cartridge itself is also available as a pre-assembled unit from Burton. Makes like a bit easier. All you need do is press the fan mounting flange on the correct amount so the fan pulley lines up correctly with the crankshaft pulley.
1970 Ford Escort Twin Cam
1972 Ford Escort GT1600 Twin Cam
1980 Ford Escort 2.0 Ghia
Peugeot 505 GTI Wagons (5spdx1) (Autox1)
2022 Ford Fiesta ST.
1972 Ford Escort GT1600 Twin Cam
1980 Ford Escort 2.0 Ghia
Peugeot 505 GTI Wagons (5spdx1) (Autox1)
2022 Ford Fiesta ST.
- 2cams70
- Coveted Fifth Gear

- Posts: 2163
- Joined: 10 Jun 2015
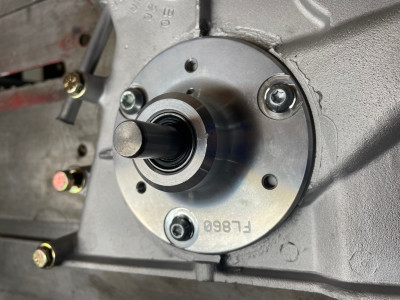
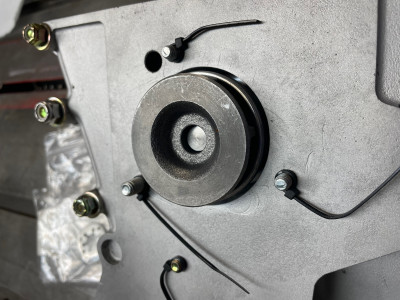
I have a Burton water pump cartridge, which I will install in modified front timing cover. I have a question about the fit of the bearing assembly & the impeller.
I heated the Aluminium housing & then fitted the bearing assembly to be flush to the top face of the housing:
I then inserted the slinger, seal & thrust washer onto the back of the assembly.
What concerns me is if I press the impeller onto the rear of the pump to give the correct clearance to the housing (.025") the impeller appears not to be far enough on the shaft:
The shaft appears to be 0.21" under flush & is not fully pressed on & would be in danger of coming off again.
I have 2 options, I could:
1. Push the whole bearing assembly further into the assembly, so it sits .25" behind the front face of the housing
-or-
2. Attempt to push the shaft further into the bearing, not sure how I would do this with the bearing pressed into the housing already.
So I'm thinking option 1 is the way to go, can someone else confirm please...
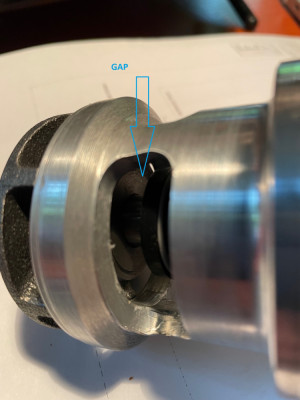
Another Issue... I'm assuming that there should not be a gap here:
I calculate the gap as 0.28"... I would have thought the front face of the impeller should compress the spring of the seal in front of the ceramic washer?
I'm not happy about the lack of instructions from Burton.
Also, can you guys measure the length of exposed shaft out the front of the bearing (can be any std water pump) as this is unmodified from the Lotus design), I have 1.005".
Thank you in advance
Last edited by pharriso on Wed Oct 19, 2022 12:46 am, edited 1 time in total.
Phil Harrison
1972 Elan Sprint 0260K
1972 Elan Sprint 0260K
-

pharriso - Coveted Fifth Gear

- Posts: 3186
- Joined: 15 Sep 2010
That looks wrong.
I have a spare module and some old bits I’ll take a look tomorrow. Stupid question you did fit the bearing the right way round as I think the shafts are different lengths.
Cheers
I have a spare module and some old bits I’ll take a look tomorrow. Stupid question you did fit the bearing the right way round as I think the shafts are different lengths.
Cheers
-

mark030358 - Coveted Fifth Gear

- Posts: 1164
- Joined: 29 May 2004
17 posts
• Page 1 of 2 • 1, 2
Total Online:
Users browsing this forum: No registered users and 24 guests

