What's the best radiator solution
59 posts
• Page 4 of 4 • 1, 2, 3, 4
Hi,
I've been trying to find thermostatic switches on the web and thought these links may be of use to others:
This site seems to be a good way to identify bits for sale on ebay:
http://partfinder.smpeurope.com/?p=1&referred=true
This is a list of switches from which you can choose the temps that you want:
http://tvr3.dspen.com/Otter_Switches.html
I found this more extended version of the list via Google:
Part No. A/F Size Thread Temp ?C
50480 19 3/8" BSP Taper 50-46 N.C.C.
50471 19 3/8" BSP Taper 77-74 N.C.C.
50460 27 3/8" BSP Taper 90-85
50370 27 3/8" BSP Taper 95-90
50372 27 3/8" BSP Taper 100-95
50010 25 3/8" x 18 NPTF 79-74
50080 21 3/8" x 18 NPTF 88
50172 22 M14 x 1.5 87-82
50042 24 M14 x 1.5 90-85/98-93
50041 22 M14 x 1.5 95-90
50173 22 M14 x 1.5 100-95
50040 22 M14 x 1.5 103-98
50481 21 M16 x 1.5 50 OFF N.C.C.
50475 17 M16 x 1.5 60 OFF N.C.C.
50430 17 M16 x 1.5 85 ON
50320 27 M16 x 1.5 85-80
50420 21 M16 x 1.5 85-80
50432 21 M16 x 1.5 85-80
50476 17 M16 x 1.5 85-80 N.C.C.
50300 27 M16 x 1.5 87-80
50317 22 M16 x 1.5 87-82
50321 22 M16 x 1.5 88-79
50310 22 M16 x 1.5 88-86
50301 22 M16 x 1.5 90-83
50474 19 M16 x 1.5 90-83 N.C.C.
50461 21 M16 x 1.5 90-85
50421 21 M16 x 1.5 90-85
50470 17 M16 x 1.5 90-85 N.C.C.
50390 17 M16 x 1.5 90-85 N.C.C.
50316 22 M16 x 1.5 92-82
50330 22 M16 x 1.5 92-82
50453 24 M16 x 1.5 92-85
50315 22 M16 x 1.5 92-87
50341 24 M16 x 1.5 92-87
50342 24 M16 x 1.5 92-87
50371 27 M16 x 1.5 92-87
50373 24 M16 x 1.5 92-87
50450 21 M16 x 1.5 92-87
50340 29 M16 x 1.5 93-86
50374 24 M16 x 1.5 93-88
50479 17 M16 x 1.5 93-88 N.C.C.
50332 22 M16 x 1.5 95-85
50477 17 M16 x 1.5 95-88 N.C.C.
50455 22 M16 x 1.5 95-90
50454 22 M16 x 1.5 95-90
50380 17 M16 x 1.5 97-92 N.C.C.
50478 17 M16 x 1.5 98-91 N.C.C.
50375 24 M16 x 1.5 98-93
50472 17 M16 x 1.5 98-93 N.C.C.
50473 17 M16 x 1.5 98-95 N.C.C.
50431 17 M16 x 1.5 100-95
50331 22 M16 x 1.5 102-97
50100 29 M22 x 1.5 82-68
50101 29 M22 x 1.5 84-79/88-83
50250 29 M22 x 1.5 86-76
50012 29 M22 x 1.5 86-77
50090 29 M22 x 1.5 86-81
50120 29 M22 x 1.5 88-79
50295 29 M22 x 1.5 88-79
50296 29 M22 x 1.5 88-79/110-102
50271 29 M22 x 1.5 88-83
50272 29 M22 x 1.5 88-83
50275 29 M22 x 1.5 88-83
50217 29 M22 x 1.5 88-83/92-87
50091 29 M22 x 1.5 88-83/92-87
50212 29 M22 x 1.5 88-83/92-87
50213 29 M22 x 1.5 88-83/92-87
50216 29 M22 x 1.5 88-83/92-87
50221 29 M22 x 1.5 88-83/92-87
50219 29 M22 x 1.5 88-83/92-97
50240 29 M22 x 1.5 90-80
50110 29 M22 x 1.5 92-82
50111 29 M22 x 1.5 92-82
50112 29 M22 x 1.5 92-82
50113 29 M22 x 1.5 92-82/95-80
50218 29 M22 x 1.5 92-82/97-92
50170 29 M22 x 1.5 92-87
50200 29 M22 x 1.5 92-87
50210 29 M22 x 1.5 92-87
50211 29 M22 x 1.5 92-87
50220 29 M22 x 1.5 92-87
50230 29 M22 x 1.5 92-87
50231 29 M22 x 1.5 92-87
50235 29 M22 x 1.5 92-87
50260 29 M22 x 1.5 92-87
50270 29 M22 x 1.5 92-87
50280 29 M22 x 1.5 92-87
50281 29 M22 x 1.5 92-87
50285 29 M22 x 1.5 92-87
50290 29 M22 x 1.5 92-87
50215 29 M22 x 1.5 92-87/97-92
50011 29 M22 x 1.5 93-88
50102 29 M22 x 1.5 93-88/97-92
50035 29 M22 x 1.5 95-85/102-92
50130 29 M22 x 1.5 95-86
50030 29 M22 x 1.5 95-90
50033 29 M22 x 1.5 95-90
50061 29 M22 x 1.5 95-90
50062 29 M22 x 1.5 95-90
50160 29 M22 x 1.5 95-90
50092 29 M22 x 1.5 95-90/100-95
50174 29 M22 x 1.5 95-90/100-95
50104 29 M22 x 1.5 97-92
50282 29 M22 x 1.5 97-92
50103 29 M22 x 1.5 97-92/101 -96
50214 29 M22 x 1.5 97-92/102-97
50190 29 M22 x 1.5 100-95
50195 29 M22 x 1.5 100-95
50196 29 M22 x 1.5 100-95
50197 29 M22 x 1.5 100-95
50198 29 M22 x 1.5 100-95/110-105
50000 29 M22 x 1.5 103-98
50013 29 M22 x 1.5 103-98
50014 29 M22 x 1.5 103-98
50191 29 M22 x 1.5 120-115
- alaric
- Coveted Fifth Gear

- Posts: 1062
- Joined: 07 Apr 2005
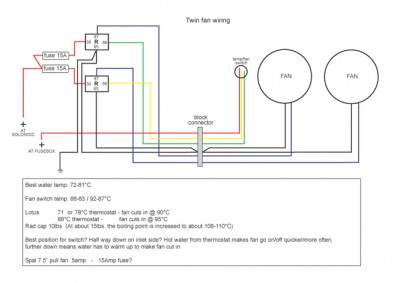
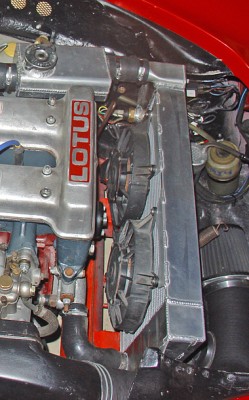
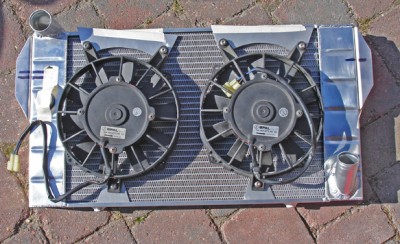
I have the TTR rad, no problems and great in any weather. Use two Triumph motorbike fans - off Ebay - one to cool, one as spare/extra/emergency/help, 2nd one is on auto temp switch and also manual override. Used the list Alaric used. had a Think Automotive ali threaded boss welded in. Nice install - even if i say so myself - er, wiring could have been neater with a proper fitting. I believe a large single fan will flow more than two small fans but i wanted a neat compact solution and the econd fan never comes on anyway.
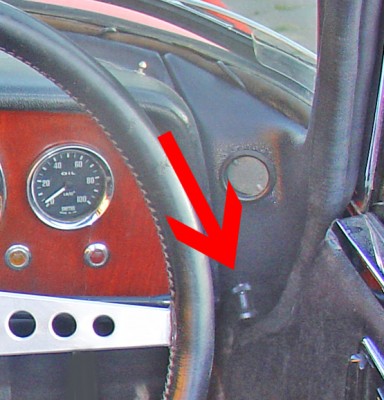
The wiring diagram is from ages ago, i tried to work out what all that stuff about what temp the fan cuts in is but too tired to bother. It all works well and the second fan never seems to come on - I just test it every now and then - a little push/pull switch low down on the plastic windscreen pillar.
Here's my 10pence worth and hope it helps someone a bit.
BTW Intermotor website is good for cross referencing the above list.
Welding by Angel welding in New Addington - no connection just helpful.
-

SADLOTUS - Fourth Gear

- Posts: 517
- Joined: 19 Oct 2003
So its time to start the spring projects, and its quite a list this year. First up, is improving the cooling at idle. I have a big aluminum radiator, which is great when moving, but in hot traffic, gets a little scary.
I just received 2 8" fans from ff dynamics (per Carlos' reco). My rad fin area is 18" wide and about 11" high. What is the optimal placement for the 2 fans? Next to each other with an 1" free at the top and bottom, both closer to the top, both closer to the bottom, one closer closer to the top inlet and one closer to the bottom outlet...? I was letting the car run last weekend and checking the temperature at different locations around the radiator, and the temperature is highest at the inlet (as you would expect) and seems to travel diagonally down to the outlet, so I'm tempted to place the fans in this manner. Thoughts?
Thanks, Dan
PS. The most shocking thing when checking temperatures was the header, 270C-370C, no wonder these cars cook slave cylinders and engine mounts!
-

collins_dan - Coveted Fifth Gear

- Posts: 1102
- Joined: 09 Jan 2006
If you are worried about temps at idle, get a Davies-Craig electric water pump and their controller. Together they run the water pump and radiator fans at a speed sufficient to keep the engine at its preset temperature.
The Lotus setup is almost sufficient. Some members do not have over heating problems, others do.
Do a query on Davies-Craig or electric water pump. Several of our members have this pump installed, and there are posts and pictures.
David
1968 36/7988
The Lotus setup is almost sufficient. Some members do not have over heating problems, others do.
Do a query on Davies-Craig or electric water pump. Several of our members have this pump installed, and there are posts and pictures.
David
1968 36/7988
-

msd1107 - Fourth Gear

- Posts: 770
- Joined: 24 Sep 2003
I've considered an electric pump and if this doesn't address the issue, then that will be the next attempt. For now, I want to try the 2 fans. The 1 10" fan was always an issue with the spring that holds the bonnet on anyway. So, back to the issue at hand, where to place the fans for optimal idle cooling? Thanks. Dan
-

collins_dan - Coveted Fifth Gear

- Posts: 1102
- Joined: 09 Jan 2006
Dan,
Not very scientific, but this would be my method:
take the car out for several runs, and on each occasion stop and measure the rad temp with a digital thermometer.
Note down the two hottest locations that would allow the 2 fans to fit.
This will also take account of airflow through your rad, which you will not get from running in the garage.
Fit 1 fan to the hottest area and take it out again for more runs. Note the new hottest area (it may not be
where the 2nd was before). Fit the 2nd fan here.
Regards,
Stuart.
- stuartgb100
- Fourth Gear

- Posts: 813
- Joined: 10 Sep 2005
With a top-to-bottom radiator, the idle flow seems to drop straight down from the entry at the top, so the fan is best fitted on the same side as the top entry. I did this with mine and it is very effective. I'm not sure if there is a similar flow pattern for the side-to-side.
I would be concerned that if you put the fan in the top half, you'll get no cooling at all if the water level drops, even though the top half is the part that is theoretically hotter.
Paddy
I would be concerned that if you put the fan in the top half, you'll get no cooling at all if the water level drops, even though the top half is the part that is theoretically hotter.
Paddy
1963 Elan S1
-

paddy - Coveted Fifth Gear

- Posts: 1036
- Joined: 27 Oct 2008
Thanks for your replies.
Stuart, I will try your method and see what happens. I don't have a cooling issue if the car is moving, only at idle in traffic when its +30C outside, that's why I was thinking the garage at idle wasn't far off from my traffic experience.
Paddy, I was expecting it to drop down the side from the inlet, but I guess with a cross flow system, it moves more diagonally. Who knew...
Thanks again, Dan
-

collins_dan - Coveted Fifth Gear

- Posts: 1102
- Joined: 09 Jan 2006
Hi all.
I've just taken the rad out of my current +2, and it's looking a bit tired. I searched for rad options on here and up came the thread that I started back in 2009 when I was mulling over which rad to use in my first +2. I've read through the whole thread. Brilliant stuff. Takes me back.
My current +2 has a two core original rad. It's not the wider version referred to earlier in the thread.
This time around, having messed with an after market wider rad with the last car, I'm going to follow Rohan's advice, from back in 2009, and just have my existing rad recored to a 3 core setup. I'll also look at a new fan setup, and maybe a thermostat housing with a filler cap on it.
The existing setup in my car has a different electric motor, which is more powerful than the original, but it only covers half the rad, so I'm wondering if I can do better.
Suggestions on replacement super powerful fans would be appreciated, and how they are mounted. I probably won't make changes to the setup just now, but if there's a simple upgrade it may be a good time to go for it.
Regards.
Sean.
- alaric
- Coveted Fifth Gear

- Posts: 1062
- Joined: 07 Apr 2005
I've been looking at rads for my restoration. Just a few thoughts:
1. There's not much room between the rad and the engine, so its better to mount the fan on the front of the rad so not to obstruct the airflow behind the rad. It also makes access to the engine easier.
2. The fan is only there for tickover / crawling through traffic as the ram effect when the car is moving at speed drives the air through the rad. Probably better to only have one fan as two fans bock a decent amount of the rad area.
3. Following on from a point made in the thread above, mount the fan over toward the 'hot' side of the rad, rather than centrally.
I would be interested if other opinions differ.
Andy.
68 Elan S3 HSCC Roadsports spec
71 Elan Sprint (still being restored)
32 Standard 12
Various modern stuff
71 Elan Sprint (still being restored)
32 Standard 12
Various modern stuff
- Andy8421
- Coveted Fifth Gear

- Posts: 1220
- Joined: 27 Mar 2011
Hi again everyone.
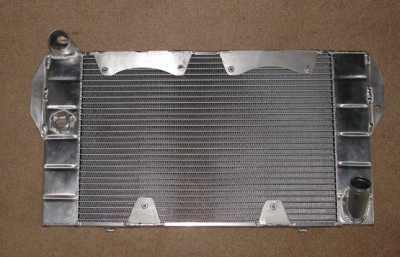
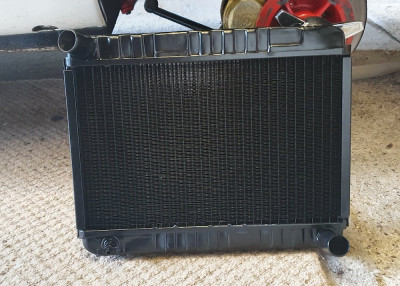
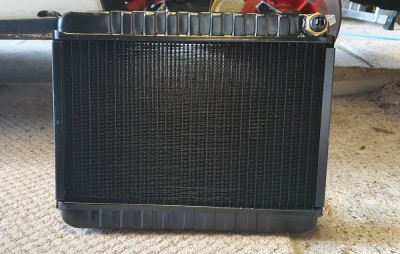
I've had my original 2 core radiator for my '73 +2 re-cored with a local company. I think they've done a really nice job, and were a pleasure to deal with. The chap that I gave the radiator to helped me choose the core pattern, and the fin pattern. I didn't stick with the traditional patterns, but went for horizontal fins instead, which looked to me to give more surface area for cooling. We worked from an old book that looked very well used. The core depth is now ~54mm, up from the original 32mm, but the radiator is no larger than with the original cores.
I asked them to remove the filler cap boss from the rad, and to fit a 22x1.5mm threaded boss for a thermostat switch. I now have a selection of switches to try, and the filler cap is on the top of the engine.
The company concerned are Raysons of Yeovil, website: http://www.raysons.co.uk. I mention them as they were so helpful and it's good to know that they are there.
Here's a couple of pics:
- alaric
- Coveted Fifth Gear

- Posts: 1062
- Joined: 07 Apr 2005
I re-cored my Coventry S3 radiator last year after it got punctured. Looks really good but loads more efficient (with a small increase in the number of tubes) and as a result it now over cools unless the ambient air temperature is high!
Malcolm
Malcolm
1966 Elan S3 Coupe
1994 Caterham 7
1994 Caterham 7
- englishmaninwales
- Fourth Gear

- Posts: 710
- Joined: 26 Jul 2013
Yes I agree. They were very patient with me while I deliberated over the core pattern.
They were very happy when I asked if I could mention them on this forum.
The radiator is now fitted. I've adjusted the position to give more clearance for the top and bottom hoses and to align it with tge engine. That took a long time, but it's perfect now. I just need to repair the bodywork and spray the brackets.
Regards.
Sean.
- alaric
- Coveted Fifth Gear

- Posts: 1062
- Joined: 07 Apr 2005
59 posts
• Page 4 of 4 • 1, 2, 3, 4
Total Online:
Users browsing this forum: No registered users and 15 guests

