Burton cartridge water pump fitment issues
50 posts
• Page 2 of 4 • 1, 2, 3, 4
A bit of an update. I can confirm that a QED crankshaft pulley is machined to the correct offset for a Lotus Twin Cam. It's shape (unlike the Burton one) appears almost identical to the original pulley except in steel rather than cast iron. It's quite heavy however. It's heavier than the original cast iron pulley and substantially heavier than the Burton pulley. It doesn't come with the timing mark machined into it either - the Burton one does.
I have now pressed the water pump pulley further onto the shaft so that the water pump and crankshaft pulleys correctly align. I've used the original pulley with it's correct offset rather than the Burton pulley with it's incorrect offset for alignment reference. There's stuff all clearance between the back of the water pump pulley and the water pump cartridge mounting bolts. Certainly the socket head cap screws supplied in the Burton fitting kit are unusable. I expect Burton's have used their pulley with incorrect offset for reference in the design of the front covers for the cartridge water pump parts which hasn't helped the situation either. Doing a few measurements I believe at least another 1.0mm or so could be gained by simply further machining the face of the front cover where the water pump sits.
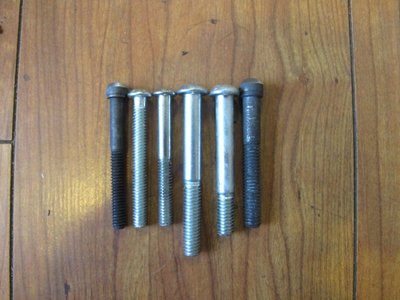
To try and get around the issue (which let's face it one should not have to do) I've investigated some low profile fastener options. Unfortunately the off the shelf options for low profile heads in combination with imperial threads are much less than with metric threads. I've decided the best option so far it to use some Harley Davidson button head Torx bolts!!. I took a trip down to my closest Harley Davidson dealer (Interesting experience that - never been inside a Harley Davidson dealership before. I felt quite out of place because I didn't have any tattoos!) See picture of the various bolts attached. From left to right we have:
1, Burton supplied 1/4"-20 x 2-1/4" cap screw (2 required for pump mounting. Not possible to use)
2. Harley Davidson P/N 946 Grade 8 1/4"-20 x 2-1/4" Torx head button screws
3. As above except with long shank (Yes same part number - Harley quality is still not yet at Japanese standards!!)
4. Harley Davidson P/N 4232 Grade 8 5/16"-18 x 2-3/4" Torx head button screw
5. Buell (owned by Harley) P/N CA0020.02AB 5/16"-18 x 2-3/8" Torx head button screw
6. Burton supplied 5/16"-18 x 2-1/4" cap screw (1 required for pump mounting. Not possible to use)
Of these I settled on using 3) and also 4) - shortened to 2-1/4". Using these parts the bolt with the least clearance to the back of the pulley is the 5/16" threaded one. It's possible to use either a flat washer or a spring washer under the head but not both. Note Burton supply their front cover with both spring and flat washers for all the fasteners securing their cover. With either a spring or flat washer under the head the clearance to the back of the pulley is about 1.0mm. To my mind at least this is still marginal. Should the water pump bearing wear it's quite likely the pulley will still make contact with this bolt. It seems to be the best solution given the sub-optimal circumstances however.
One last thing. Seniorchristo if you have a Burton front cover I would appreciate if you could measure and advise the distance from the water pump mounting face to the rear face that contacts the backplate. If this is inconsistent from front cover to front cover it also highlights an issue.
1970 Ford Escort Twin Cam
1972 Ford Escort GT1600 Twin Cam
1980 Ford Escort 2.0 Ghia
Peugeot 505 GTI Wagons (5spdx1) (Autox1)
2022 Ford Fiesta ST.
1972 Ford Escort GT1600 Twin Cam
1980 Ford Escort 2.0 Ghia
Peugeot 505 GTI Wagons (5spdx1) (Autox1)
2022 Ford Fiesta ST.
- 2cams70
- Coveted Fifth Gear

- Posts: 2166
- Joined: 10 Jun 2015
Just to conclude this the wave washers you need to fit under the Harley Davidson bolts securing the cartridge to the cover are the following BMW part numbers:
BMW P/N 07119904115 X 1 - B8 wave washer
BMW P/N 07119932099 x 2 (or x 9 if you wish to also use them on the rest of the cover) - B6 wave washer
These are current BMW numbers obtainable from any BMW car dealership.
With the low profile Harley Davidson bolts and these low profile spring washers fitted underneath them there is heaps of clearance to the fan pulley when it's in correct alignment with the crank pulley. It also looks far neater than bolts or hex screws with ground down heads.
1970 Ford Escort Twin Cam
1972 Ford Escort GT1600 Twin Cam
1980 Ford Escort 2.0 Ghia
Peugeot 505 GTI Wagons (5spdx1) (Autox1)
2022 Ford Fiesta ST.
1972 Ford Escort GT1600 Twin Cam
1980 Ford Escort 2.0 Ghia
Peugeot 505 GTI Wagons (5spdx1) (Autox1)
2022 Ford Fiesta ST.
- 2cams70
- Coveted Fifth Gear

- Posts: 2166
- Joined: 10 Jun 2015
In addition, one other problem I had was the relief machined into the backplate on the block facing side for the oil gallery plug needed to be deepened. This may vary according backplate batches and the size of the plug fitted (another can of worms).
I see yours is fitted so maybe not a problem for you.
I have to say I was greatly irritated by poor fitting and Burton?s attitude, but once fitted, has worked perfectly.
Malcolm
I see yours is fitted so maybe not a problem for you.
I have to say I was greatly irritated by poor fitting and Burton?s attitude, but once fitted, has worked perfectly.
Malcolm
1966 Elan S3 Coupe
1994 Caterham 7
1994 Caterham 7
- englishmaninwales
- Fourth Gear

- Posts: 710
- Joined: 26 Jul 2013
I have a slightly different problem. I dry assembled the recently purchased kit and it all fits perfectly, but coming to the final assembly stage it?s impossible to get the O seal to sit in the groove long enough to fit the front cover. In fact I cannot get the seal to stay in place around two bosses while I fit it around the third boss. The only solution I can see is to 'glue' it in place with silicon or something. Anyone got any tips?
Dave
Dave
Elan +2
Elise mk 1
Elise mk 1
- Donels
- Fourth Gear

- Posts: 710
- Joined: 10 Sep 2016
englishmaninwales wrote:I was greatly irritated by poor fitting and Burton?s attitude
Me too - Its seems if you go further up the hierarchy at Burtons you receive a better response.
Donels wrote:I have a slightly different problem. I dry assembled the recently purchased kit and it all fits perfectly, but coming to the final assembly stage it?s impossible to get the O seal to sit in the groove long enough to fit the front cover. In fact I cannot get the seal to stay in place around two bosses while I fit it around the third boss. The only solution I can see is to 'glue' it in place with silicon or something.
I think you raised this issue before in another thread and I responded. The "O" ring should stay firmly in the groove if you press it in by hand using your fingers a small section at a time. If it does not stay in place I would be concerned that the groove has not been machined deep enough - which wouldn't be surprising given the inconsistency in the quality of these parts. Sticking it in place with some form of goop is not required and will not solve the issue. If the groove is not deep enough the O ring will be overstressed once installed and will fail.
1970 Ford Escort Twin Cam
1972 Ford Escort GT1600 Twin Cam
1980 Ford Escort 2.0 Ghia
Peugeot 505 GTI Wagons (5spdx1) (Autox1)
2022 Ford Fiesta ST.
1972 Ford Escort GT1600 Twin Cam
1980 Ford Escort 2.0 Ghia
Peugeot 505 GTI Wagons (5spdx1) (Autox1)
2022 Ford Fiesta ST.
- 2cams70
- Coveted Fifth Gear

- Posts: 2166
- Joined: 10 Jun 2015
Donels wrote: have a slightly different problem. I dry assembled the recently purchased kit and it all fits perfectly, but coming to the final assembly stage it?s impossible to get the O seal to sit in the groove long enough to fit the front cover. In fact I cannot get the seal to stay in place around two bosses while I fit it around the third boss. The only solution I can see is to 'glue' it in place with silicon or something. Anyone got any tips?
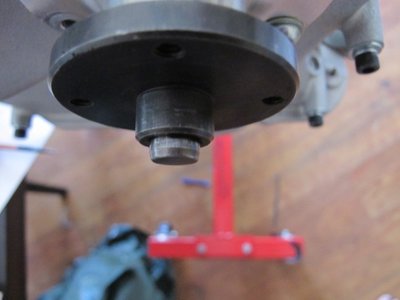
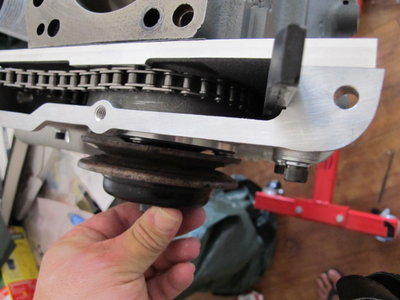
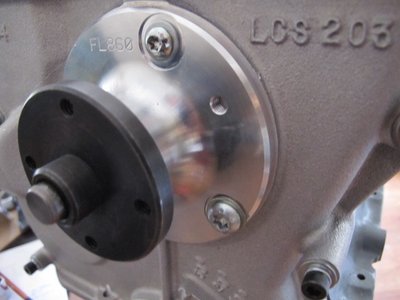
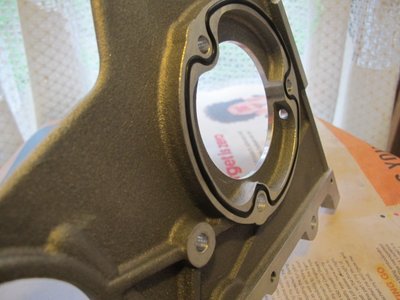
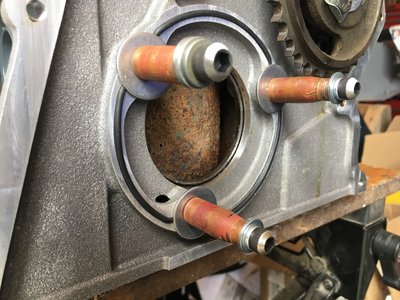
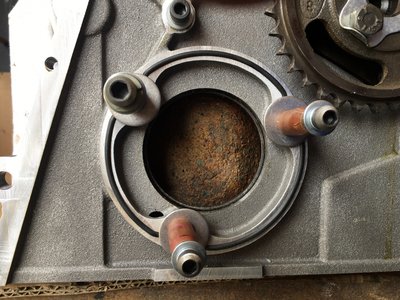
Pictures attached of "O" ring in groove. No problems installing. I measured the depth of the groove as 2.0mm. Anything less on yours could be the source of the problem. Perhaps the face of the backplate was ground down by the manufacturer after the groove was machined in an attempt to alleviate the fan pulley bolt clearance problem??
Last edited by 2cams70 on Sun Jun 30, 2019 6:59 am, edited 1 time in total.
1970 Ford Escort Twin Cam
1972 Ford Escort GT1600 Twin Cam
1980 Ford Escort 2.0 Ghia
Peugeot 505 GTI Wagons (5spdx1) (Autox1)
2022 Ford Fiesta ST.
1972 Ford Escort GT1600 Twin Cam
1980 Ford Escort 2.0 Ghia
Peugeot 505 GTI Wagons (5spdx1) (Autox1)
2022 Ford Fiesta ST.
- 2cams70
- Coveted Fifth Gear

- Posts: 2166
- Joined: 10 Jun 2015
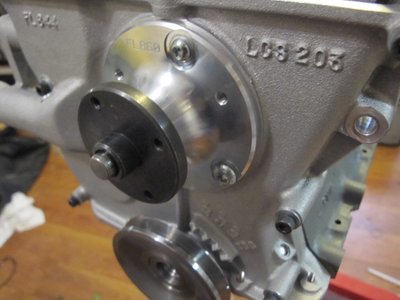
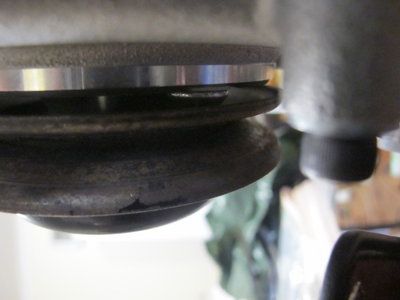
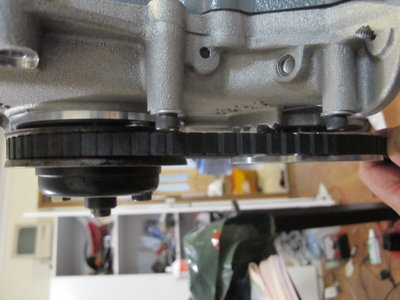
Picture showing how the fan pulley looks when the belt is in perfect alignment. I know it's perfect because I measured with Vernier calipers the distance from the fan belt edge to the front of the cylinder block at both the fan and crankshaft pulleys!
As you can see there isn't much clearance between the pulley and the bolt heads and this is with the Harley Torx head bolts and BMW wave washers fitted. No way would the original 5/16" hex head bolt supplied by Burtons have fitted even as supplied by them with the head ground to a tapered shape.
As you can see there isn't much clearance between the pulley and the bolt heads and this is with the Harley Torx head bolts and BMW wave washers fitted. No way would the original 5/16" hex head bolt supplied by Burtons have fitted even as supplied by them with the head ground to a tapered shape.
1970 Ford Escort Twin Cam
1972 Ford Escort GT1600 Twin Cam
1980 Ford Escort 2.0 Ghia
Peugeot 505 GTI Wagons (5spdx1) (Autox1)
2022 Ford Fiesta ST.
1972 Ford Escort GT1600 Twin Cam
1980 Ford Escort 2.0 Ghia
Peugeot 505 GTI Wagons (5spdx1) (Autox1)
2022 Ford Fiesta ST.
- 2cams70
- Coveted Fifth Gear

- Posts: 2166
- Joined: 10 Jun 2015
Deleted.
1966 Elan S3 Coupe
1994 Caterham 7
1994 Caterham 7
- englishmaninwales
- Fourth Gear

- Posts: 710
- Joined: 26 Jul 2013
Well I don?t know if they have changed the O seal material but fitting mine was like trying to nail a jelly to the wall, it could not be fitted as you describe. For those who encounter the same problem here are some tips on how I did mine.
1. Make up some spacers and using large washers lightly clamp the O seal in place on one boss.
2. Repeat for other two bosses then slacken and adjust O seal so it snuggly fits the groove all round.
3. Leave for a while to allow O seal to take a permanent ish set. I left mine overnight. Note: This is temperature dependant if the O seal is warm it will spring out back to it?s circular shape when the clamps are removed. I did mine early morning when it was cool.
4. Remove clamps and fit front housing.
Elan +2
Elise mk 1
Elise mk 1
- Donels
- Fourth Gear

- Posts: 710
- Joined: 10 Sep 2016
Donels wrote:Well I don?t know if they have changed the O seal material but fitting mine was like trying to nail a jelly to the wall, it could not be fitted as you describe. For those who encounter the same problem here are some tips on how I did mine.1. Make up some spacers and using large washers lightly clamp the O seal in place on one boss.2. Repeat for other two bosses then slacken and adjust O seal so it snuggly fits the groove all round.3. Leave for a while to allow O seal to take a permanent ish set. I left mine overnight. Note: This is temperature dependant if the O seal is warm it will spring out back to it?s circular shape when the clamps are removed. I did mine early morning when it was cool.4. Remove clamps and fit front housing.
Something is clearly wrong, You should not have to do that. Measuring mine the groove should be around 2mm in depth and the O-ring around 2.6mm in diameter. Your O-ring appears to stand proud of the backplate far more than mine. You'll overstress things if the size of the groove is too small or the O-ring diameter too large.
1970 Ford Escort Twin Cam
1972 Ford Escort GT1600 Twin Cam
1980 Ford Escort 2.0 Ghia
Peugeot 505 GTI Wagons (5spdx1) (Autox1)
2022 Ford Fiesta ST.
1972 Ford Escort GT1600 Twin Cam
1980 Ford Escort 2.0 Ghia
Peugeot 505 GTI Wagons (5spdx1) (Autox1)
2022 Ford Fiesta ST.
- 2cams70
- Coveted Fifth Gear

- Posts: 2166
- Joined: 10 Jun 2015
Just measuring up the O-ring now. The type you need is BS155 size standard. It's a commonly available size from any bearing supplier. I chose to replace the Burton supplied Nitrile ones with better quality Viton material. Viton seals are generally brown in colour compared to black for Nitrile. No fitting problem with either material at BS155 size.
1970 Ford Escort Twin Cam
1972 Ford Escort GT1600 Twin Cam
1980 Ford Escort 2.0 Ghia
Peugeot 505 GTI Wagons (5spdx1) (Autox1)
2022 Ford Fiesta ST.
1972 Ford Escort GT1600 Twin Cam
1980 Ford Escort 2.0 Ghia
Peugeot 505 GTI Wagons (5spdx1) (Autox1)
2022 Ford Fiesta ST.
- 2cams70
- Coveted Fifth Gear

- Posts: 2166
- Joined: 10 Jun 2015
Yes but what diameter is your O-ring?? If it's the wrong diameter it will be overstressed regardless of whether or not the cover can be assembled. It won't have a long life if so. Big job to pull it all off once the engine is in the car! You are the decision maker though.
1970 Ford Escort Twin Cam
1972 Ford Escort GT1600 Twin Cam
1980 Ford Escort 2.0 Ghia
Peugeot 505 GTI Wagons (5spdx1) (Autox1)
2022 Ford Fiesta ST.
1972 Ford Escort GT1600 Twin Cam
1980 Ford Escort 2.0 Ghia
Peugeot 505 GTI Wagons (5spdx1) (Autox1)
2022 Ford Fiesta ST.
- 2cams70
- Coveted Fifth Gear

- Posts: 2166
- Joined: 10 Jun 2015
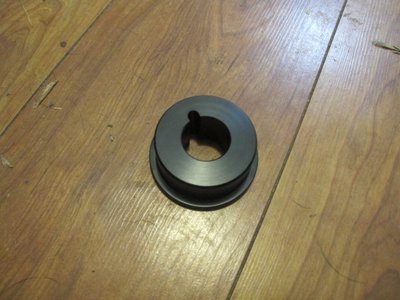
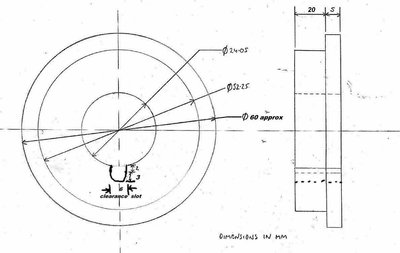
Just some further information about this. For final assembly I decided to have a special tool made up to very accurately align the seal location with the crankshaft centre. This will hopefully minimize the chances of the seal leaking and it also allows quick assembly of the front cover to the backplate without having to jiggle it around whilst trying to centralise the seal location. I used anaerobic Loctite 518 sealant between backplate and front cover and I've found with this that once the two surfaces come together it starts to harden very quickly (don't believe the datasheet!) so the quicker you can get things aligned and torqued up the better. I've attached pictures of the tool and the drawing for it. Since I'm not fortunate enough to have access to a lathe I had it machined up in plastic by a guy in Australia I found on Ebay! Ebay listing attached. I must say his service was excellent and the fitment was perfect first time.
https://www.ebay.com.au/itm/BEARING-or- ... Sweq9c8tbv
Other notes and list of sealants used:
Front cover to backplate: Loctite 518 P/N 25583A
Block front surface around water pump aperture: Permatex water pump silicone (glycol resistant) P/N 22071
Note only a VERY thin smear using finger to spread on engine block around the water pump opening and surrounding bolt holes. Only did this because my block had some minor pitting corrosion in these areas. NO Silicone anywhere else if your surfaces are flat and in good condition.
Bolt that secures backplate to the engine block front: Loctite 243 P/N 44089
Normally I don't use Loctite on bolts unless specified but the bolt in this particular location gave me nightmares about coming loose, dropping out and falling into the "works". There's a paper gasket between block and backplate which could conceivably relax so it's possible the bolt may loosen over time.
The three water pump cartridge securing bolts: Permatex high performance thread sealant P/N 56521
Although I haven't really experienced it with Kent series engines there have been cases I've come across where the water pump gasket has had very slight seepage which has allowed coolant to reach the threads of the securing bolts. Although the coolant leak is often not externally visible over time this causes the bolts to rust firmly in place making them a real PITA to remove later. Even when the bolt holes are blind and not going into the water jacket as with the LTC it can still occur. This sealant on the threads prevents the possibility of this happening.
Backplate to engine block gasket : Fabricate using Mahle gasket paper P/N JV100.
The precut gaskets provided by the main Lotus parts suppliers are a total waste of time. Thin poor quality paper with inaccurately cut openings and bolt hole locations. Buying one to use just as a template to cut your own is useful as a guide only but to be really accurate I brush painted the contacting surface on my backplate with black enamel and whilst wet pressed it onto some white cardboard to transfer the pattern. I then used the pattern from the black paint to cut a template gasket out from the white cardboard. This cardboard template gasket was then used to trace out a pattern on to the proper JV100 paper in preparation for cutting it with an Exacto knife and hole punches. The original and most replacement off the shelf gaskets are around 0.2mm thick. The JV100 paper at 0.4mm is a bit more forgiving without being excessively thick to cause problems.
Top of cover cork gasket: Coat with Loctite MR5009 Hi-Tack Gasket Sealant
I hate using sealant but it's really a case of poor LTC design here. There's not enough bolts here or other restraint methods used to stop the gasket extruding. The Hi-Tack helps to glue the gasket in place. Much better than silicone or shellac based aviation gasket for this purpose.
Front cover to backplate O-ring: Size BS155. Supplied in NBR material but replaced with Viton
Water pump cartridge to front cover O-ring: Size BS037. As above.
1970 Ford Escort Twin Cam
1972 Ford Escort GT1600 Twin Cam
1980 Ford Escort 2.0 Ghia
Peugeot 505 GTI Wagons (5spdx1) (Autox1)
2022 Ford Fiesta ST.
1972 Ford Escort GT1600 Twin Cam
1980 Ford Escort 2.0 Ghia
Peugeot 505 GTI Wagons (5spdx1) (Autox1)
2022 Ford Fiesta ST.
- 2cams70
- Coveted Fifth Gear

- Posts: 2166
- Joined: 10 Jun 2015
Although it's a bit off topic I have to add to this and say that I was very, very impressed by my experience at the BMW dealership when collecting the washers. They don't have a parts service counter as such. No that's too offensive to the eyes and besides BMWs don't require spare parts. I had to go to the reception and lounge area and ask for what I wanted whilst they called someone from up above in the clouds to attend. Seated in the beautifully comfortable lounge amongst all the gleaming brand new BMWs I was able to quietly peruse some sophisticated style magazines and watch television. Only thing that was missing was a coffee machine to make myself a coffee so I went to reception again to ask about that. "Oh Sir - how do you like your coffee and we will bring it to you" Wow - this is the life!! Eventually the guy from the clouds with a hanky and white gloves came through the door and brought me down three gleaming washers at 20c each on a silver platter. It usually costs me $3.50 to buy a coffee each morning so I'm beginning to think maybe I should buy a 20c washer each day from BMW just so I can have a coffee and enjoy the experience.
Quite a contrast to the Harley Davidson dealership. No tattoos in sight. At the Harley Davidson dealership you can even buy leather Harley jackets that fit newborns starting at around $250 a pop.
So I say thank you to Burtons for providing me with the opportunity to have a few enjoyable experiences I would not have had otherwise.
1970 Ford Escort Twin Cam
1972 Ford Escort GT1600 Twin Cam
1980 Ford Escort 2.0 Ghia
Peugeot 505 GTI Wagons (5spdx1) (Autox1)
2022 Ford Fiesta ST.
1972 Ford Escort GT1600 Twin Cam
1980 Ford Escort 2.0 Ghia
Peugeot 505 GTI Wagons (5spdx1) (Autox1)
2022 Ford Fiesta ST.
- 2cams70
- Coveted Fifth Gear

- Posts: 2166
- Joined: 10 Jun 2015
50 posts
• Page 2 of 4 • 1, 2, 3, 4
Total Online:
Users browsing this forum: No registered users and 48 guests

