Heater fan bush housing / heater box renovation
36 posts
• Page 1 of 3 • 1, 2, 3
Hello
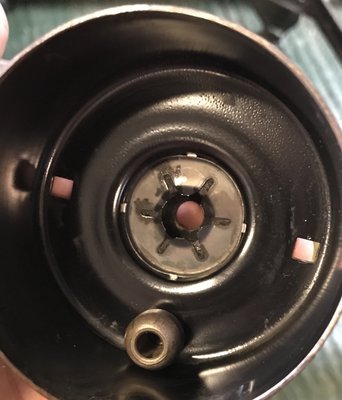
Took out the heater fan today and thought I?d have a look at its insides. It felt a bit stiff so I thought to lubricate the bearings. Anyway the output shaft was a bugger to get out of the top cover and I soon found out why - I?ve pulled the bush out of the housing. It?s held in place by a circular spring washer, staked to the housing. Any idea how to get the bush back in there?
Took out the heater fan today and thought I?d have a look at its insides. It felt a bit stiff so I thought to lubricate the bearings. Anyway the output shaft was a bugger to get out of the top cover and I soon found out why - I?ve pulled the bush out of the housing. It?s held in place by a circular spring washer, staked to the housing. Any idea how to get the bush back in there?
Last edited by JonB on Mon Sep 09, 2019 4:10 pm, edited 1 time in total.
-

JonB - Coveted Fifth Gear

- Posts: 2358
- Joined: 14 Nov 2017
It's OK, I worked it out. Had to use a Dremel to grind back two of the stakes, then could tap the star washer out wit a small screwdriver. Phew.
So, all reassembled and lubricated and it sounds like this: https://drive.google.com/open?id=1MSS_m ... 6s_s4zPRZc (small zip file with the recording files contained). These recordings were taken with no flaps installed and one side of the heater box missing, so perhaps it'll be even quieter when installed in the car.
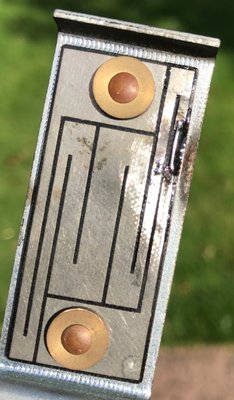
Next up, the resistor that delivers half speed. Looks like it burned out, but I was able to solder a piece of wire across the burned out bit, and now it is working again.
Of course, the problem is that the resistor gets hot in use, maybe hot enough to melt the solder. So I've used super glue to hold the tiny bridge wire down. For reference, this part can be replaced entirely by soldering a 3 Ohm 20A wire wound resistor across the terminals.
-

JonB - Coveted Fifth Gear

- Posts: 2358
- Joined: 14 Nov 2017
A bit of solder looks like a cheap fix. I did something similar with the fuel sender when the resistance coil in that broke. 15yrs ago and it's still working (and accurate  ). I've been wrestling with the part doing the same blower speed function in my Land Rover today. Sadly no cheap fix with that - over ?100
Stuart Holding
Thame UK / Alpe D'Huez France
69 S4 FHC
Honda GoldWing 1800
Honda CBX1000
Kawasaki H1 500
Yamaha XS2
Thame UK / Alpe D'Huez France
69 S4 FHC
Honda GoldWing 1800
Honda CBX1000
Kawasaki H1 500
Yamaha XS2
- 69S4
- Coveted Fifth Gear

- Posts: 1124
- Joined: 23 Sep 2004
JonB wrote:Hello
Took out the heater fan today and thought I?d have a look at its insides. It felt a bit stiff so I thought to lubricate the bearings. Anyway the output shaft was a bugger to get out of the top cover and I soon found out why - I?ve pulled the bush out of the housing. It?s held in place by a circular spring washer, staked to the housing. Any idea how to get the bush back in there?
I just ran into a more significant heater motor issue in my S4 and didn't have much success tracking a replacement down here in the States but discovered what I hope is the solution (Clayton, not Smiths) across the pond at Holden, https://www.holden.co.uk/p/clayton_heat ... aft_1_4_in
Not sure if it's the same as a +2 but I'm encouraged by the fact that it seems to be totally enclosed/sealed rather than the ventilated version I took out!
Jerry:
'61 S2 Elite | '69 S4 Elan FHC | '00 S1 Elise Sport 190
'61 S2 Elite | '69 S4 Elan FHC | '00 S1 Elise Sport 190
-

jabingb - Second Gear

- Posts: 174
- Joined: 22 Dec 2004
Thanks Mark, I appreciate the moral support!
So, some "top tips" when overhauling the fan motor:-
Now we come to the damper flaps. I bought some rubber foam 6mm thick and attached it to the flaps. It's quite a bit firmer than the stuff that came out of the car - which was more or less totally disintegrated. I'm waiting for the glue (temporary dabs, not the full monty) to set then I will do a trial fit. The foam is quite cheap so if the flaps don't work properly it'll be easy enough to get more. I'm planning on going round the airbox looking for leaks which I will seal. Then I can put it back in the car, and the real fun (dashboard) can begin...!
So, some "top tips" when overhauling the fan motor:-
- To remove the fan, use a trim clip remover. You have to put it on the spindle between the motor housing and fan, squeeze the handles, turn the fan, and repeat. Watch the end of the spindle (from inside the heater box) - you should see it gradually slip inside the fan. Eventually the fan will pop off.
- If the spindle prevents the top cover coming out, do not drift it out like I did! Instead, refit the cover and use emery cloth or wet & dry to clean the spindle. It'll likely have rust on it which is preventing the bush sliding over it.
- Watch out for springs and other bits flying out of the assembly as you separate the two halves of the housing. The best way to prevent this is to make sure the two long bolts do not escape. If it does happen, the pieces belong in the following locations: thin washers on the shaft adjacent to the bushes (2 top, 2 bottom); black plastic spacer tubes under the brush housing plate; springs above the plate with washers on top; long bolts go through these parts.
- Lubricate the bushes and thin washers only. I used 3-in-1 oil (light machine oil).
- Clean the armature contacts with fine emery cloth. On my motor I didn't bother but I did wipe it with brake cleaner. If you are fitting new brushes I'd definitely sand the contacts back a bit to remove any ridges left by the old brushes.
- When reassembling you will be doing the two little nuts up against the springs. Tighten them evenly (half a turn each side) so that the upper housing mates squarely with the lower housing. If the spindle is stiff, loosen and re-try. Don't over tighten the nuts or you will get a stiff spindle. Also, when torquing them up, lightly tap the case all round with a hammer. This helps the case mate squarely.
Now we come to the damper flaps. I bought some rubber foam 6mm thick and attached it to the flaps. It's quite a bit firmer than the stuff that came out of the car - which was more or less totally disintegrated. I'm waiting for the glue (temporary dabs, not the full monty) to set then I will do a trial fit. The foam is quite cheap so if the flaps don't work properly it'll be easy enough to get more. I'm planning on going round the airbox looking for leaks which I will seal. Then I can put it back in the car, and the real fun (dashboard) can begin...!
Last edited by JonB on Mon Sep 09, 2019 11:30 am, edited 2 times in total.
-

JonB - Coveted Fifth Gear

- Posts: 2358
- Joined: 14 Nov 2017
The foam is a challenge, the original disintegrates totally over the years into a pile of dust.
I settled on the foam used as underlay for wooden flooring on the basis that it's a suitably thin foam with closed cells to keep it dry and it should have a long life.
I settled on the foam used as underlay for wooden flooring on the basis that it's a suitably thin foam with closed cells to keep it dry and it should have a long life.
- mikealdren
- Coveted Fifth Gear

- Posts: 1194
- Joined: 26 Aug 2006
I considered using that (unfortunately have none to hand at the moment, it all got used on my kit car to back bits of vinyl covered panelling) but I was concerned it might be too thin. I did see a picture of it in situ on a flap on the forum - maybe yours?
I guess the real question is how effective is it? Does your heater seal off the various chambers properly?
I guess the real question is how effective is it? Does your heater seal off the various chambers properly?
-

JonB - Coveted Fifth Gear

- Posts: 2358
- Joined: 14 Nov 2017
OK, so I trial fitted the 6mm neoprene foam and it seems to work well. The hot/cold flap was a little bit tight but with adjustment I have it sealing properly. I expect it will improve as the foam forms itself against the lip it is sealing against.
Now there is a new problem with the motor. Seems it likes to rattle about a bit when there is resistance to the air pressure the fan generates. It sounds like the motor shaft is bottoming out on the rear of the casing. I'm going to have a look around for lost parts - there may be some additional washers that belong in the bottom housing to prevent this..
Now there is a new problem with the motor. Seems it likes to rattle about a bit when there is resistance to the air pressure the fan generates. It sounds like the motor shaft is bottoming out on the rear of the casing. I'm going to have a look around for lost parts - there may be some additional washers that belong in the bottom housing to prevent this..
-

JonB - Coveted Fifth Gear

- Posts: 2358
- Joined: 14 Nov 2017
i believe a small nylon bushing
Born, and brought home from the hospital (no seat belt (wtf)) in a baby!
Find out where the limits are, and start from there
Love your Mother
Earth
Find out where the limits are, and start from there
Love your Mother
Earth
-

h20hamelan - Coveted Fifth Gear

- Posts: 1968
- Joined: 25 Sep 2010
I'll see if I can find it on the garage floor!
Meanwhile, I've been looking for a diagram of the motor so I can be sure everything is in the right place. I came across this post in a thread about overhauling the heater. Seems the OP had the same problem as me with the top bush. Anyway... look at the picture in the post, it shows the plastic spacer, washer and spring that locates the brush housing relative to the motor body.
viewtopic.php?t=22942&f=39&start=15#p141654
I have mine assembled in the following order: Body, plastic spacer, brush carrier, spring, washer, top casing. This seemed to be the correct position with regards to the witness marks on the commutator, but is it correct? I'm obviously getting too much end float for the shaft to be bouncing off the bottom casing.
Edit: Found this, which seems to suggest that there are no washers involved. Scroll down to see the motor internals.
http://www.74tr6.com/heater.htm
-

JonB - Coveted Fifth Gear

- Posts: 2358
- Joined: 14 Nov 2017
I reckon that the bottom line is - if you've got end float and don't want it you'll have to put something in to take it away!
It thought mine had thin dished shims but I'm not sure.
Nylon washer would do I expect.
Your linked threads show that there's nothing new under the sun!
You must be chuffed that you proved more ingenious than them at reinserting the bush - maybe more dremels about nowadays.
Hopefully others in the future will pick up on the advice to take the time clean the fan shaft before rushing in to take the motor apart.
I think my shaft is loose in the bush as I have light vibration at low speed and a bit more at high.
Neither of which is too big a deal in practice because engine noise masks it!
- MarkDa
- Coveted Fifth Gear

- Posts: 1116
- Joined: 15 Apr 2017
Plus 2. Supposed to be refined (if possible). Actually pretty quiet for a 47 year old car. So, I will pull the motor and see if I can pack it out a bit. Willing to bet you there is some part that fell out!
Anyway there is always the option of buying a new one.
Anyway there is always the option of buying a new one.
-

JonB - Coveted Fifth Gear

- Posts: 2358
- Joined: 14 Nov 2017
So, a fun filled morning in the garage, fiddling with the motor. Eventually, and by luck, I spotted a very thin spring washer on the floor, same size as the washers that go on the motor shaft and rub up against the bushes. Once agin, I pulled the motor apart and this time fitted the spring washer between the lower shaft washers so as to provide a soft landing for the shaft when it moves vertically.
Job done. No more rattling, and the fan is back to being quiet again.
Job done. No more rattling, and the fan is back to being quiet again.
-

JonB - Coveted Fifth Gear

- Posts: 2358
- Joined: 14 Nov 2017
36 posts
• Page 1 of 3 • 1, 2, 3
Total Online:
Users browsing this forum: No registered users and 10 guests


