RVI Tachometer Conversion
29 posts
• Page 1 of 2 • 1, 2
Seemingly in common with a lot of owners I have had issues with the performance of the RVI tachometer fitted to my +2 S130. It has the usual symptoms of jerky readings, suspect accuracy and this is in spite of renewing a lot of the old electronic components. Part of the issue is probably the tied up with using an Aldon ignition system which has a different characteristic than the old points arrangement. The Aldon system was fitted to the car when I bought it and performs with no problems at all, so no complaints there.
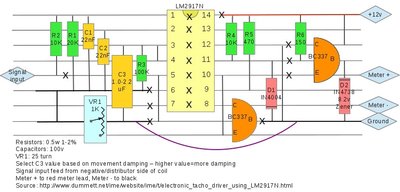
I spotted an article by Stuart King posted on the Internet Mini Encyclopaedia (http://www.ime.org.uk search for LM2917N)
in which he had replaced the original electronic circuitry with a modern circuit using the National Semiconductors LM2917N integrated circuit. The datasheet circuit had been amended to raise the meter current drive to suit the RVI movement by adding a couple of transistors and other components and resulted in a neat solution. This circuit picks up voltage pulses from the -ve connection of the coil and converts these to a current drive proportional to the pulse frequency.
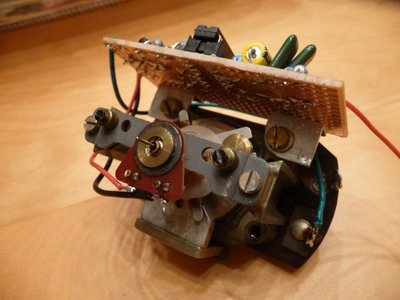
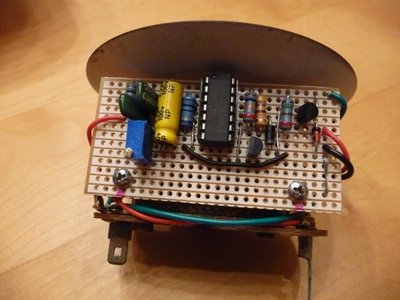
The pcb layout was convieniently shown in the article and the board measures only 1" x 2.6" so will fit easily inside the RVI housing. In my case I mounted the board on two right angle brackets attached to the meter movement through two existing tapped holes. The only modification made to the RVI housing was to drill a hole in the side to enable access to the adjustment potentiometer.
The electrical wiring was relatively straight forward, the meter has two connections wired to the pcb and also needed is a 12volt supply, an earth and a signal connection. I utilised the existing 12volt and earth spade connections and made a new bullet connection for the signal wire.
I have included photographs below which show the construction and wiring details.
Whilst I had the tachometer in bits I also decided to sort out the internal lighting which in standard form in pretty weak. Trailing through the internet I found what I thought would be a neat solution courtesy of the model train world. In related sites on e-bay LED strip lights were advertised in various lengths which operated from 12volts.
The circumference of the tachometer housing is approx 300mm which happened to be the length of one of LED strips available. Not wishing to change the car wiring I terminated the LED wiring with the brass threaded portion of an MES bulb which would then screw directly into the existing lighting circuit.
The LED strip has a self adhesive backing and once positioned clear of any protrusions in the housing can be stuck into position around the meter movement behind the dial.
Again the LED installation is shown on the photgraphs below.
The tachometer operation on the bench is very good the only outstanding issue is to calibrate the meter in the car in its installed attitude otherwise there may be an error.
I am very pleased with the lighting circuit, it gives an clear even illumination which is not too bright, a big improvement over the original. I shall now look into converting other instruments lighting with an the LED strip.
Richard
- rjaxe
- Second Gear

- Posts: 196
- Joined: 04 Dec 2006
Richard - nice job.
I think you might have found yourself a little cottage industry there if you have the time and inclination!!
Could you post up a photo of how the lighting looks with the face and bezel in place?
Cheers
Steve
I think you might have found yourself a little cottage industry there if you have the time and inclination!!
Could you post up a photo of how the lighting looks with the face and bezel in place?
Cheers
Steve
Steve
Silence is Golden; Duct Tape is Silver
Silence is Golden; Duct Tape is Silver
-

elanfan1 - Coveted Fifth Gear

- Posts: 1713
- Joined: 13 Jan 2004
Brilliant!
Gets my vote as best post of the year.
Maybe you should consider marketing the conversion or a kit of parts on here.
It'll be interesting if you could provide similar illumination for the other instruments.
Food for thought maybe?
Cheers
John
Gets my vote as best post of the year.
Maybe you should consider marketing the conversion or a kit of parts on here.
It'll be interesting if you could provide similar illumination for the other instruments.
Food for thought maybe?
Cheers
John
Beware of the Illuminati
Editor: On Sunday morning, February 8th 2015, Derek "John" Pelly AKA GrumpyBodger passed away genuinely peacefully at Weston Hospicecare, Weston Super Mare. He will be missed.
Editor: On Sunday morning, February 8th 2015, Derek "John" Pelly AKA GrumpyBodger passed away genuinely peacefully at Weston Hospicecare, Weston Super Mare. He will be missed.
-

GrUmPyBoDgEr - Coveted Fifth Gear

- Posts: 2340
- Joined: 29 Oct 2004
Absolutely superb, what a brilliant conversion !
I really like the idea of LED strip lights. When you show it in action it seems so obviously "right", all operating off 12v and a perfect solution.
A great post, thanks for taking the time to do so, posts like that get us all thinking afresh.
Brian
I really like the idea of LED strip lights. When you show it in action it seems so obviously "right", all operating off 12v and a perfect solution.
A great post, thanks for taking the time to do so, posts like that get us all thinking afresh.
Brian
-

UAB807F - Fourth Gear

- Posts: 603
- Joined: 20 Dec 2010
Thanks for all the nice comments. I don't have any plans to go into business although I can see the temptation. Photo below of the LED lit tacho apologies for the lack of focus try as I might I could not get that any better but the illumination shows up pretty well.
Richard
- rjaxe
- Second Gear

- Posts: 196
- Joined: 04 Dec 2006
I'm in Burnham on Sea in Somerset, where are you?
I think we Somerset boys need the occasional "get together" thingy
Cheers
John
I think we Somerset boys need the occasional "get together" thingy
Cheers
John
Beware of the Illuminati
Editor: On Sunday morning, February 8th 2015, Derek "John" Pelly AKA GrumpyBodger passed away genuinely peacefully at Weston Hospicecare, Weston Super Mare. He will be missed.
Editor: On Sunday morning, February 8th 2015, Derek "John" Pelly AKA GrumpyBodger passed away genuinely peacefully at Weston Hospicecare, Weston Super Mare. He will be missed.
-

GrUmPyBoDgEr - Coveted Fifth Gear

- Posts: 2340
- Joined: 29 Oct 2004
Merci, Richard. Great write up and I could well need the mod' when I change dizzy.
I reckon I could knock that up on a piece of strip board. If you have the eBay seller for the LED strip that would save looking.
Thanks again.
Vernon
I reckon I could knock that up on a piece of strip board. If you have the eBay seller for the LED strip that would save looking.
Thanks again.
Vernon
-

vernon.taylor - Fourth Gear

- Posts: 678
- Joined: 05 Nov 2010
A bit of an update, I have finally installed the modified Tachometer into the car and with a break in the weather had an opportunity to calibrate the Speedometer and gearing with the 5 speed gearbox conversion against my satnav. In summary the speedometer read 3mph fast at 60 mph and 5th gear gave 23.5mph/1000rpm. The tachometer operation is excellent, the wavering and dubious readings are all gone. The Tachometer and Speedometer have both had the LED internal lighting mod so I can now see them clearly in the dark. Fanfare of trumpets over.
Cheers
Cheers
Richard
- rjaxe
- Second Gear

- Posts: 196
- Joined: 04 Dec 2006
Richard's mod is just the sort of project that catches my eye. Wonderful stuff. I implemented it in a spare tacho and have just installed it in the car. It works really nicely, very solid with no bouncing.
I don't have a lot to add except the following notes:
- I used a stripboard/Veroboard rather than a custom built circuit board. I made it as small as I could, hence the strange layout. I could have been a little more generous with space.
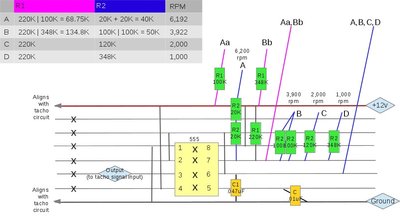
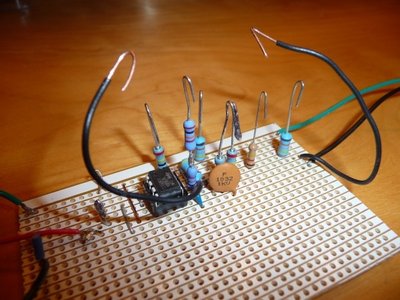
- I don't have a signal generator so made one with a 555 chip and a few other components. It's a serious hack, with C1 fixed at 0.47uF and resistors arranged vertically with hooks at the top. A couple of flying leads allow different values to be set for R1 and R2, resulting in outputs for 1,000, 2,000, 4,000 & 6,000rpm. Amazingly, it works fine. I borrowed an old Sun tacho/dwell meter to check the signal generator and calibrate the new tacho circuit. There are lots of calculators on the web for component values for 555 astable frequencies.
- The old electronics needs to be removed in order to fit the new electronics. This involves removing the needle and the face plate. The mounting bolts for the old circuit are used for the brackets for the new circuit. The instructions on removing the needle at http://www.gomog.com/allmorgan/smiths_t ... ersion.pdf were helpful.
- Needle damping is controlled by C3. Mine ended up at 1uF and I could possibly have gone a little lower. I started at 2.2uF which heavily overdamped the needle, making it slow to respond.
- I failed to duplicate Richard's LED lighting enhancement. Doing the tacho was straightforward, but doing the speedo to match was a different story. It's difficult to disassemble/reassemble so I decided not to risk destroying it at the beginning of the Summer season. Richard has a +2 and he told me that its speedo was straightforward to disassemble/reassemble. Instructions on disassembling the speedo can be found here: http://mgaguru.com/mgtech/dash/st200.htm From the little that I could see inside my speedo it didn't quite match the description, but the web page provides a good hint of the fun to be had.
- During the project I discovered an interesting gauge repair/supply website that I've not seen before: http://www.gaugeguys.com/ (No connection or anything, but it seems worth noting somewhere in this forum. Usefully, they sell instrument bezels individually.)
Lastly, many thanks to Richard for his original post, and for answering a number of PMs that I sent him while doing this project.
Nick
-

elanner - Fourth Gear

- Posts: 547
- Joined: 14 Sep 2010
Salut Nick
Great write-up and info - merci.
@+
Vernon
Great write-up and info - merci.
@+
Vernon
-

vernon.taylor - Fourth Gear

- Posts: 678
- Joined: 05 Nov 2010
So it looks like this guy has gone into business supplying circuit boards to convert Smiths Tachometers from RVI to RVC - https://www.spiyda.com/magento/index.php/smiths-rvi-rvc-conversion-board.html
He also has a eBay store - http://stores.ebay.com/Spiyda?_trksid=p2047675.l2563
40 Pounds including the calibration cable seems reasonable, especially to someone like myself with minimal electrical skills
At his Spiyder site he will even do the mod for you if you're in the UK. I'm going to pick up one of the boards over the weekend & do the work myself when I get back to the US.
Phil Harrison
1972 Elan Sprint 0260K
1972 Elan Sprint 0260K
-

pharriso - Coveted Fifth Gear

- Posts: 3193
- Joined: 15 Sep 2010
I have just ordered one of these.
How did you get on, did you order it? Did it work? Any hints on what to do or avoid?
How did you get on, did you order it? Did it work? Any hints on what to do or avoid?
-

Bruce Crowthorne - Second Gear

- Posts: 219
- Joined: 30 Aug 2005
29 posts
• Page 1 of 2 • 1, 2
Total Online:
Users browsing this forum: No registered users and 6 guests

