Is there a black-restore product for rocker switches?
35 posts
• Page 2 of 3 • 1, 2, 3
Meguigar's do a good plastic restorer called "Ultimate Black". It's a white cream, ironically. I have just put some on my switches and they came up OK but the plastic is sort of rough in texture and may need a clean first. I've used it on other black plastics and it works well. Not as greasy to the touch as Armor-all and thicker. Apply with a cloth (no temptation to spray it with Armor-all and get spots of it everywhere).
http://www.halfords.com/motoring/car-cl ... lack-355ml
Not cheap but worth it.
http://www.halfords.com/motoring/car-cl ... lack-355ml
Not cheap but worth it.
-

JonB - Coveted Fifth Gear

- Posts: 2357
- Joined: 14 Nov 2017
I've done some testing on my grey rocker switches with various products.
So basically, scratch those expensive products from the list.
I wasn't able to test DOT-5 as none of my cars use the stuff so I haven't got any. It's looking more and more like I will have to buff with rouge as mentioned in another thread on the subject.
- Megiar's Ultimate Black gave OK results but faded quickly.
- Armor-all Glossy, Matt and Tyre foam again was OK but soon faded to grey.
- T-cut, buffing, sanding didn't seem to do much (but then I didn't persevere for long).
So basically, scratch those expensive products from the list.
I wasn't able to test DOT-5 as none of my cars use the stuff so I haven't got any. It's looking more and more like I will have to buff with rouge as mentioned in another thread on the subject.
-

JonB - Coveted Fifth Gear

- Posts: 2357
- Joined: 14 Nov 2017
Gentle rub down with fine wet and dry to remove finger grease and dirt avoiding rounding the corners and edges. Then a couple of coats of satin black aerosol paint, job done and will last years and look really good too. No need for expensive and non lasting solutions.
Steve
Silence is Golden; Duct Tape is Silver
Silence is Golden; Duct Tape is Silver
-

elanfan1 - Coveted Fifth Gear

- Posts: 1720
- Joined: 13 Jan 2004
For info, having worked in the plastics industry for too many years I can confirm that the whitening phenonenum that you see is actually micro cracking on the surface of the plastic due to uv degradation.
It is similar to the effect of shattering of an old fashioned toughened windscreen. It looks white but is in reality not. When you smear an oil over the surface it fills in the microcracks such that the appearance returns to how it was originally. I.e. the colour has not faded but surface scattering of the light due to the microcracks has made it look as if it has faded.
If you can remove the surace layer that has the microcracks it will return to its original colour.
Hope this helps
Steve
- Mudmouse
- First Gear

- Posts: 16
- Joined: 15 May 2019
So the other Steve's suggestion of painting the surface with satin black should work? It'll keep the UV away - won't it?
All I need to do now is work out a way of spraying them in situ
All I need to do now is work out a way of spraying them in situ
Stuart Holding
Thame UK / Alpe D'Huez France
69 S4 FHC
Honda GoldWing 1800
Honda CBX1000
Kawasaki H1 500
Yamaha XS2
Thame UK / Alpe D'Huez France
69 S4 FHC
Honda GoldWing 1800
Honda CBX1000
Kawasaki H1 500
Yamaha XS2
- 69S4
- Coveted Fifth Gear

- Posts: 1124
- Joined: 23 Sep 2004
Something I have just thought of but not tried - black boot polish. That is soft enough to be pressed into the surface then polished off.
It should work and be easy to reapply if needed. Does anyone have a spare switch they could try it on?
Steve S
It should work and be easy to reapply if needed. Does anyone have a spare switch they could try it on?
Steve S
- Mudmouse
- First Gear

- Posts: 16
- Joined: 15 May 2019
I may have found a solution from my mates in the retro computing fraternity.
Take a look:
So the best things about using a mineral oil are that its easy to apply, even in situ and it won't mark the dashboard or your fingers in use because it is clear. Of course, it may wear off or evaporate but so far it's looking promising.
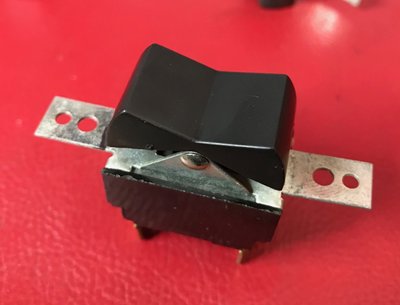
- Clean all traces of dirt from the rocker. I use hot water and detergent then brake cleaner. The plastic will come up quite white after this.
- Rub a mineral oil into the plastic. For example, baby oil seems to work well.
- Rub some more in, then buff with a clean cloth. Repeat until satisfied.
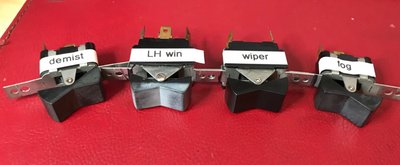
Take a look:
- demist = as it came out of the car
- LH win = after cleaning with detergent then brake cleaner
- wiper = after treatment with baby oil
- fog = after three goes with black boot polish
So the best things about using a mineral oil are that its easy to apply, even in situ and it won't mark the dashboard or your fingers in use because it is clear. Of course, it may wear off or evaporate but so far it's looking promising.
-

JonB - Coveted Fifth Gear

- Posts: 2357
- Joined: 14 Nov 2017
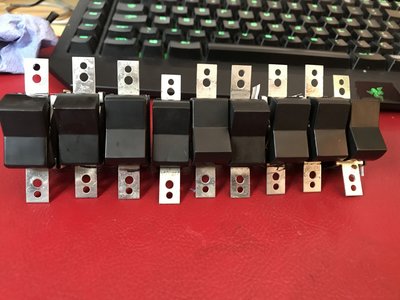
The switches have still got some patina, which is nice, depending on your point of view. New switches are ?30 a pop
(BTW I did try some toothpaste with a cloth but it didn't really help. With a Dremel there is a better chance if you don't mind the stuff getting everywhere.)
-

JonB - Coveted Fifth Gear

- Posts: 2357
- Joined: 14 Nov 2017
Looking good, and they still haven't greyed.
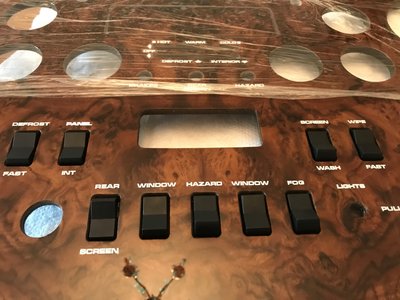
That's the new dashboard. I've done the switches, fusebox and heater controls. Tricky. Measure twice, drill once. I'll put the rear brackets on next, then the various other bits that are hidden, and finally the glovebox and lid. It's going to look epic.
That's the new dashboard. I've done the switches, fusebox and heater controls. Tricky. Measure twice, drill once. I'll put the rear brackets on next, then the various other bits that are hidden, and finally the glovebox and lid. It's going to look epic.
-

JonB - Coveted Fifth Gear

- Posts: 2357
- Joined: 14 Nov 2017
35 posts
• Page 2 of 3 • 1, 2, 3
Total Online:
Users browsing this forum: No registered users and 12 guests


