Wiper Switch from Ray Dent
18 posts
• Page 1 of 2 • 1, 2
I have recently purchased one of Ray Dent's windscreen wiper switches and it seems to be different to the original switch. The original one has 4 connections, one in each corner, but the new switch has 6 contacts. Has anyone else fitted one of these switches and in which case could you tell me which colour wire goes to which contact? Alternatively, is this switch wrongly manufactured?
- William2
- Fourth Gear

- Posts: 921
- Joined: 20 Jan 2013
The chap's name is Ray Psulkowski, and the company is R.D. Enterprises Ltd. I understand how you got mixed up - I did too at first!
The switch looks more like a light switch. I don't have an S4 Elan, but I do have a Europa TC with rocker switches and it only has 4 wires to the wiper switch.
I have a suggestion though - why not email, or better still, phone Ray? He is a really nice guy and very, very helpful.
The switch looks more like a light switch. I don't have an S4 Elan, but I do have a Europa TC with rocker switches and it only has 4 wires to the wiper switch.
I have a suggestion though - why not email, or better still, phone Ray? He is a really nice guy and very, very helpful.
-

RogerFrench - Fourth Gear

- Posts: 536
- Joined: 01 Dec 2009
I had the same problem. I don't have the car at the house right now (being painted) and I didn't take good notes on what I did. I think I looked at one of the wiring schemes on the site and noticed that they had the wires reversed, left to right, I believe, so I tried it and it worked. Check the archives. I think I posted what I did. Dan
-

collins_dan - Coveted Fifth Gear

- Posts: 1102
- Joined: 09 Jan 2006
Hi
I had a wiper switch from Ray Dent. Friend of mine picked it up while in the US and it works fine but may have different terminal layout.
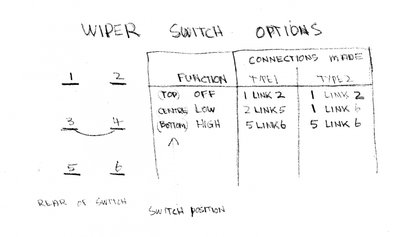
As I remember there are two possible switches that look the same but will work fine with the Lucas two speed motor
I have attached a note on the two possible layouts as it was 3 years ago I dont remember which switch I got from RD but it worked OK after I checked the switching actions with a multil-meter and then wired it up to match
hope this helps best of luck
Bob
- bob_rich
- Fourth Gear

- Posts: 555
- Joined: 06 Aug 2009
The Ray Dent switches are also wider across the pivot pin than the originals, it's likely that you will have to judiciously relieve the rear of the dash in order for the switch to mount correctly.
I had a chat with Sue Miller about the original switches last year, apparently the company that made the OEM rocker switches is still in business, but they have a 6,000 switch minimum order. Group buy anyone?
I had a chat with Sue Miller about the original switches last year, apparently the company that made the OEM rocker switches is still in business, but they have a 6,000 switch minimum order. Group buy anyone?
Phil Harrison
1972 Elan Sprint 0260K
1972 Elan Sprint 0260K
-

pharriso - Coveted Fifth Gear

- Posts: 3186
- Joined: 15 Sep 2010
There are quite a few variations of the switches made by Arrow used by Lotus at the time on their cars. Not sure anyone would go for buying 6000 of each 
However in 45 years working on these car electrics and owning 17 Lotus' I can honestly say I have never had to actually change the whole switch.
I do have quite a few in my stock that car owners purchased and gave me as they were unused and other times I have just removed the trip over contacts where a component fault burnt the contacts.
The replacement switches are real shiny plastic finger pushes and sharp edges and not quite as nice as the originals especially if just changing the odd one.
The switches are really easy to pull apart and clean even for me with big hands and roughed knuckles. The hardest part is getting them unscrewed out of the facia in the beginning
Main thing is the switches usually fail because the contacts have just got dirty and a simple clean up is all that is needed.
Once out of the facia/dash on a clean work surface gently just prise the four retaining tabs up enough to clear the rear body.
The switch must then gently be parted and MUST be done with the rear lucar contacts facing down. I will explain why later***. The switch finger push can then be lifted out and should retain the springs and pins but don't worry if they do drop out.
Keeping the Lucar contacts part still facing down observe the orientation inside of the metal switch over contacts.(*** had you opened the switch the wrong way these would have dropped out and left you scratching your head which way they went. These can be flipped end to end and as such fitted opposite ways or the same way depending on the intended function of the switch. Also note which side is which way round relative to the rear Lucar connection so the original wiring remains the same. If the contact arms can't be removed or just one even welded together at the contacts then the base of the switch is no good. You may want to still use your finger push part to keep the old plastic looking the same on all switches though. (personal choice)
If free then remove the metal strips and turn over to reveal the contacts on the arms and at the base of the inside of the switch.
With a small needle file or nail fail clean all the contacts and with some 'spirits' Gin or Whiskey/Whisky will do I use 'panel wipe' or a good electrical cleaner clean the base and contacts thoroughly. Place the contacts back in the correct orientation.
With the finger switch part now these are just pins and springs which sometimes get sticky as the lubricant has age dried out. Just push up and down the pins to ensure they are free or better still take them out thoroughly clean if any Gin left. I then just use Vaseline or a quality electrical grease just to lubricate the pin shafts and a little on the tips where they ride over the contact arms. Be sparing though you do not want it to get grease all over the contacts. Some like to use some dialectic grease that is OK but keep WD40 well away.
The Vaseline also help reassemby now as it will retain the springs and pins into the finger trigger part which should be dropped into the contact body of the switch from above so the contact arms do not come off the side retaining spigots.
Press the two parts together then bend the four retaining arms back down.
The switch should now be fine
From what I recall the switches 20 years ago were around ?15 so not sure what they would cost now.
This may not be much help if switches already purchased but hopefully useful if anyone has an 'iffy' switch and is well worth trying before spending out unnecessarily.
All the best
Steve
PS....apologies for dirty grubby fingers I have been doing a few big horrible dirty jobs lately which included rubbing all the laquer off my alloy wheels. My wife says I do scrub up well though
However in 45 years working on these car electrics and owning 17 Lotus' I can honestly say I have never had to actually change the whole switch.
I do have quite a few in my stock that car owners purchased and gave me as they were unused and other times I have just removed the trip over contacts where a component fault burnt the contacts.
The replacement switches are real shiny plastic finger pushes and sharp edges and not quite as nice as the originals especially if just changing the odd one.
The switches are really easy to pull apart and clean even for me with big hands and roughed knuckles. The hardest part is getting them unscrewed out of the facia in the beginning
Main thing is the switches usually fail because the contacts have just got dirty and a simple clean up is all that is needed.
Once out of the facia/dash on a clean work surface gently just prise the four retaining tabs up enough to clear the rear body.
The switch must then gently be parted and MUST be done with the rear lucar contacts facing down. I will explain why later***. The switch finger push can then be lifted out and should retain the springs and pins but don't worry if they do drop out.
Keeping the Lucar contacts part still facing down observe the orientation inside of the metal switch over contacts.(*** had you opened the switch the wrong way these would have dropped out and left you scratching your head which way they went. These can be flipped end to end and as such fitted opposite ways or the same way depending on the intended function of the switch. Also note which side is which way round relative to the rear Lucar connection so the original wiring remains the same. If the contact arms can't be removed or just one even welded together at the contacts then the base of the switch is no good. You may want to still use your finger push part to keep the old plastic looking the same on all switches though. (personal choice)
If free then remove the metal strips and turn over to reveal the contacts on the arms and at the base of the inside of the switch.
With a small needle file or nail fail clean all the contacts and with some 'spirits' Gin or Whiskey/Whisky will do
With the finger switch part now these are just pins and springs which sometimes get sticky as the lubricant has age dried out. Just push up and down the pins to ensure they are free or better still take them out thoroughly clean if any Gin left. I then just use Vaseline or a quality electrical grease just to lubricate the pin shafts and a little on the tips where they ride over the contact arms. Be sparing though you do not want it to get grease all over the contacts. Some like to use some dialectic grease that is OK but keep WD40 well away.
The Vaseline also help reassemby now as it will retain the springs and pins into the finger trigger part which should be dropped into the contact body of the switch from above so the contact arms do not come off the side retaining spigots.
Press the two parts together then bend the four retaining arms back down.
The switch should now be fine
From what I recall the switches 20 years ago were around ?15 so not sure what they would cost now.
This may not be much help if switches already purchased but hopefully useful if anyone has an 'iffy' switch and is well worth trying before spending out unnecessarily.
All the best
Steve
PS....apologies for dirty grubby fingers I have been doing a few big horrible dirty jobs lately which included rubbing all the laquer off my alloy wheels. My wife says I do scrub up well though
-

Plus 2 - Second Gear

- Posts: 150
- Joined: 30 Jan 2014
Thanks for the info Steve. Very useful.
I got a quick reply from Ray and the answer is you connect it up exactly as the original switch and ignore the centre 2 contacts.
On the subject of fitting these copy switches, very little of the dash needs to be relieved to make the switch fit. Just a small amount from the rear face. The switches look great to my eye and they are less than half the price of original version!
- William2
- Fourth Gear

- Posts: 921
- Joined: 20 Jan 2013
And the man's name is NOT Ray Dent!
It's Ray Psulkowski.
It's Ray Psulkowski.
-

RogerFrench - Fourth Gear

- Posts: 536
- Joined: 01 Dec 2009
pharriso wrote:This article should be in the "any year now..." wiki
Controversial!
Do we need a wiki? Everything is already in the Archive!
Plus 2 wrote:However in 45 years working on these car electrics and owning 17 Lotus' I can honestly say I have never had to actually change the whole switch.
17 Lotuses - That is a lot of dodgy electrics!
- AHM
- Coveted Fifth Gear

- Posts: 1258
- Joined: 19 Apr 2004
AHM wrote:Plus 2 wrote:However in 45 years working on these car electrics and owning 17 Lotus' I can honestly say I have never had to actually change the whole switch.
17 Lotuses - That is a lot of dodgy electrics!
And oil leaks HaHa
Electrics/Electronics was my core training as a Royal Navy Officer. I then went as a Guarantee Electrical engineer commissioning new unmanned ships built in Japan prior to setting up my own automotive component OE manufacturing business and being part of a team endeavouring in commonising electrical wiring colours across the British auto industry.
So to the 17 Lotus' you can add cars like Mini Cooper's, e-Types and other Jaguar, MG's, Aston Martin's and Rolls Royce that I have owned/own still.
The common factor in mostly all of these is the electrical architecture predominantly Lucas and Smith's dominated.
However the biggest improvements were the inclusion of additional fuses in the circuits and more relays.
Incredible to think many early cars often had just two 35 amp fuses and probably a single Lucas 6RA relay.
The 35 amp fuse supporting ALL circuits maybe fine if driving on a cold wet night, everything switched on. However perhaps a little high in supporting some individual components.
Part of my work then later included Techinal Observer supporting 'forensic style' teardowns for Insurance/Police/Fire where after vehicle burn outs/fires the cause was essential to try to establish.
Although we joke (especially guys across the pond) about the old vehicle electrics, in the majority of cases causes can be more often established to DIY owners and in some case even garage mechanics inexperience.
One of the biggest issues though used to be not understanding simple things like the +ve /-ve earth of the vehicles and the number of times I have seen ammeters put in cars by DIY'wirers' just tapping into a regular circuit wiring and one of the latest is using the cigarette lighter on these old cars to charge powerful modern battery devices.
Not sure what the synopsis was on the Lotus pictured below but deep radios poorly fitted have also been a source of issue on the Lotus. Obviously a classic British car fan as that looks like an early XJS on the left, but just look at the thickness of that wire coming out of the cigarette lighter
Now if someone can just help me with my little drips and puddles, I will gladly take on the easier role and look after their electrics
Regards
Steve
-

Plus 2 - Second Gear

- Posts: 150
- Joined: 30 Jan 2014
bob_rich wrote:Hi
I had a wiper switch from Ray Dent. Friend of mine picked it up while in the US and it works fine but may have different terminal layout.
As I remember there are two possible switches that look the same but will work fine with the Lucas two speed motor
I have attached a note on the two possible layouts as it was 3 years ago I dont remember which switch I got from RD but it worked OK after I checked the switching actions with a multil-meter and then wired it up to match
hope this helps best of luck
Bob
Just found this post from Bob 14th August 2014. I had occasion to dismantle my wiper switch last week, and put up a post on 7th July under topic "Plus 2 wiper arc" which compliments Bob's post above. I think it is better filed in this topic.
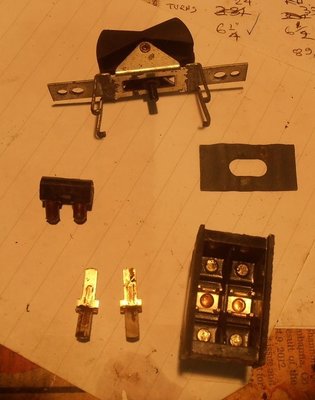
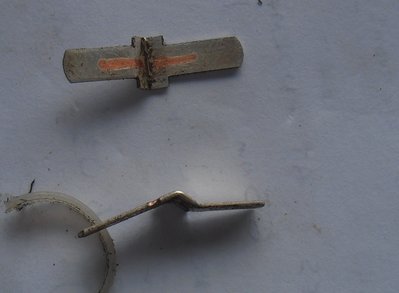
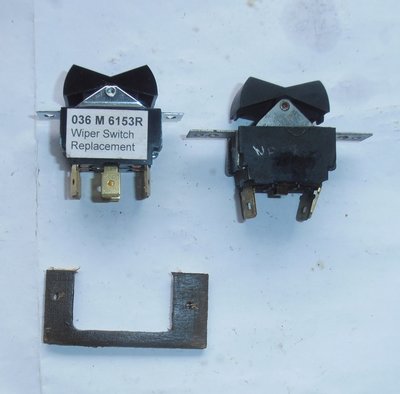
I have just received a new wiper switch from Paul Matty 036 M 6153R. It has 6 terminal instead of the original 4. The 2 extra terminals are on the centre bridge contacts, and possibly offer further combinations of switching. Text of my post and pics below:
Foxie wrote:I had another look in daylight, I see how it works, and it's very clever ! ! The two rocking contact bars are asymmetrical, and mounted in opposite directions. When the double plungers are over the bottom or 'off' contacts, they are connected through the middle 'bridge' contacts. When the switch is moved to mid or 'low' one bar stays in the same position, but the other one rocks over, connecting low speed terminal to the powered contact, i.e. lower left to top right. When the switch is moved to 'high' the second bar rocks over, connecting the top two contacts through the bridge.
Quite simple really
68 Elan +2, 70 Elan +2s
-

Foxie - Coveted Fifth Gear

- Posts: 1210
- Joined: 20 Sep 2003
Great thread.
When I did my dashboard the interior light switch was completely seized up and I pondered taking it apart. But I decided to start by giving it a good clean with WD40 and, hey presto, it was immediately restored to perfect operation. It's been Ok ever since. But if I'd known the switches were readily fixable I probably would have taken it apart for a proper cleaning.
Anyway, these days I make sure that I operate all the switches regularly to remind them of their role.
As mentioned earlier, the new switches are a little sharper and glossier than the originals, so changing just one in the line of original switches would look a little strange. It's probably best to do them all, although expensive. I was heading down this path but fortunately fixed my seized switch first.
Nick
-

elanner - Fourth Gear

- Posts: 546
- Joined: 14 Sep 2010
William2 wrote:Thanks for the info Steve. Very useful.
I got a quick reply from Ray and the answer is you connect it up exactly as the original switch and ignore the centre 2 contacts.
On the subject of fitting these copy switches, very little of the dash needs to be relieved to make the switch fit. Just a small amount from the rear face. The switches look great to my eye and they are less than half the price of original version!
I was not sure what relieving had to be done until I came to fitting the switch, then it became obvious. The replacement switch has a lower trunnion, and so needs to go deeper into the rear of the dash. This is easily acheived by carefully cutting and prising away the 4mm plywood frame under the original switch.
68 Elan +2, 70 Elan +2s
-

Foxie - Coveted Fifth Gear

- Posts: 1210
- Joined: 20 Sep 2003
18 posts
• Page 1 of 2 • 1, 2
Total Online:
Users browsing this forum: No registered users and 8 guests


