Crankshaft Rope Seal
15 posts
• Page 1 of 1
Can someone please measure the diameter of the rope seal sealing surface of the four-bolt crankshaft and post it here. All my engines are assembled and installed in their cars at this time. The reason I'm interested is I'm going to look into adapting the viton ones that BOP Engineering is selling now. I'll call them for advice when I have the info. Thanks!
<a href='http://www.bopengineering.com/' target='_blank'>http://www.bopengineering.com/</a>
-Keith
<a href='http://www.bopengineering.com/' target='_blank'>http://www.bopengineering.com/</a>
-Keith
- type26owner
- Coveted Fifth Gear

- Posts: 1246
- Joined: 18 Sep 2003
Pulled out an old destroyed Laystall crankshaft I forgot we had under the bench and measured the seal journal at 2.3". It's occured to me that a one piece lipseal will possibly fit into the available space. Just need a split ring adapter which clamps onto the crank seal journal that accepts a repair sleeve which just slips over the flywheel flange and gets glued to the adapter. The rope seal plate which fastens to the block needs to be replaced with a custom designed plate which interfaces and seals with RTV against with the enlarged radius and narrowed portion of the rope seal feature in the oilpan. The new plate would accept the stationary lip seal. Guessing I could do the first prototype in a single weekend's work. Piece of cake!
The only downside with this solution is there would be a low point pocket behind the seal that will fill up with oil and it can't drain away. Could be okay though. I'll have to run that by a specialized seal engineer.
-Keith
The only downside with this solution is there would be a low point pocket behind the seal that will fill up with oil and it can't drain away. Could be okay though. I'll have to run that by a specialized seal engineer.
-Keith
- type26owner
- Coveted Fifth Gear

- Posts: 1246
- Joined: 18 Sep 2003
The pocket behind the seal is not a problem since it will self empty when the crankshaft spins. Best to provide a scrapper in the lipseal mount to divert any oil swept along by the crank away from the seal area. If there's room I'll provide a way to load a second unused seal so if the first one fails it can be cut away and the second fitted in situ with little fuss and bother.
-Keith
-Keith
- type26owner
- Coveted Fifth Gear

- Posts: 1246
- Joined: 18 Sep 2003
Identified a couple of Speedi-Sleeves which are titanium nitrided and fluorocarbon seals which might fit nicely in the available space. Only have about 1-1/8" between the block and the flywheel though. Piece of cake!
-Keith
-Keith
- type26owner
- Coveted Fifth Gear

- Posts: 1246
- Joined: 18 Sep 2003
Changed my mind and have realized the better place to mount the rotating sealing surface for the lipseal is directly onto the flywheel. It just needs to be a steel cylinder that accepts the repair sleeve and where the end face butts against the backside of the flywheel. A bolt circle array of capscrews through the flywheel will clamp it securely. This leaves the crankshaft alone with no mods necessary. The lipseal I've chosen has an ID of 4". This should work with no major problem that I can foresee. :rolleyes:
-Keith
-Keith
- type26owner
- Coveted Fifth Gear

- Posts: 1246
- Joined: 18 Sep 2003
It appears I've been able to retrofit into the available space a viton lipseal onto the rear main seal of a ropeseal crank. Here's some pictures of the pieces and how it's to be done. Look in the folder named 'Rear_Main_Lipseal_Upgrade'.
<a href='http://briefcase.yahoo.com/[email protected]' target='_blank'>http://briefcase.yahoo.com/[email protected]</a>
-Keith
<a href='http://briefcase.yahoo.com/[email protected]' target='_blank'>http://briefcase.yahoo.com/[email protected]</a>
-Keith
- type26owner
- Coveted Fifth Gear

- Posts: 1246
- Joined: 18 Sep 2003
Find I don't have any steel stock to make the cylindrical piece which fastens onto the flywheel and have been pondering if using aluminum would be suitable. Only drawback with making it with aluminum is it's higher CTE and whether it will destroy the repair sleeve by rupturing it. Wonder how hot the flywheel actually does get when subjected to worst case racing conditions? 200C seems like a good guess. Suppose I need to consult with the application engineer at Chicago Rawhide on this one.
Think the OD on the flywheel flange of the crankshaft is a precision true running surface? Would they true this surface to optimize the balance? Suppose I'll need to take the time to chuck the crank up in the lathe and measure the damn thing. If so I can use the flange OD to make a location clearance class 1 fit with the ID of the sleeve mount.
The hard part is to minimize the risk and still keep it simple. BTW, I already called DB Engineering and confirmed that ropeseal used oilpans are still available just incase. :blink: It's the oilpans for the lipseal cranks that are very rare.
-Keith
Think the OD on the flywheel flange of the crankshaft is a precision true running surface? Would they true this surface to optimize the balance? Suppose I'll need to take the time to chuck the crank up in the lathe and measure the damn thing. If so I can use the flange OD to make a location clearance class 1 fit with the ID of the sleeve mount.
The hard part is to minimize the risk and still keep it simple.
-Keith
- type26owner
- Coveted Fifth Gear

- Posts: 1246
- Joined: 18 Sep 2003
Two of the four 5/16" threaded holes in the block to fasten the original potmetal ropeseal mount on are now partially hidden underneath the lipseal and can't be used for the new seal mounting plate. Lucky there is another 5/16" hole which is not used and close by just below the freeze plug. The fourth hole I'm going to have to drill and tap into the block myself. It's the one shown to the extreme right in the picture I've provided. No way around having to do this it seems and still have it button up synthetic oil tight. I have a face sealing gasket situation between the seal mount and the new flange on the oilpan. If I didn't have silicone RTV gasket adhesive to seal this area I'd be doomed for sure.
-Keith
-Keith
- type26owner
- Coveted Fifth Gear

- Posts: 1246
- Joined: 18 Sep 2003
So far so good. Got the flywheel modified with the new precision surface for the lipseal to run against. Also completed the modification to the oilpan though I got the flange on a little crooked. It's not quite square to the oilpan flange by about .09" across it's width. Next time I'll shim that truer ahead of time. I could unsolder it but it's not worth the effort, bottomline is I just need it to seal leaktight. I'll just cut the mating surface on the aluminum lipseal mount plate so it's parallel and keep the gap to fill with silicone RTV so it's anywhere from .03" to .09" wide. On the BRM drysump oilpan with repaired holes from connecting rods puncturing through it WILL be square. Practice makes perfect. B)
Will post pictures later.
-Keith
Will post pictures later.
-Keith
- type26owner
- Coveted Fifth Gear

- Posts: 1246
- Joined: 18 Sep 2003
Hi Keith
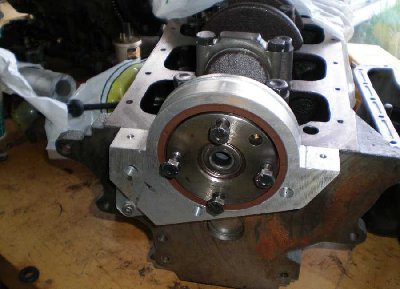
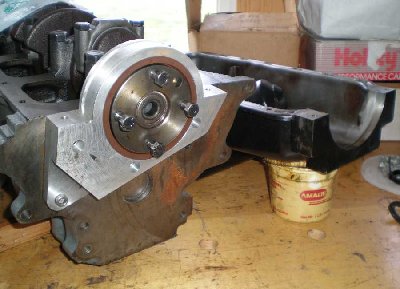
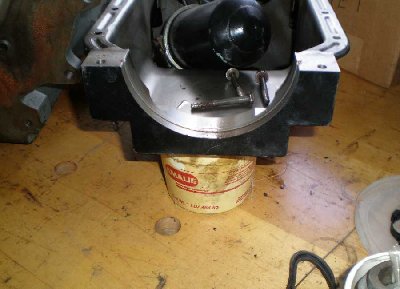
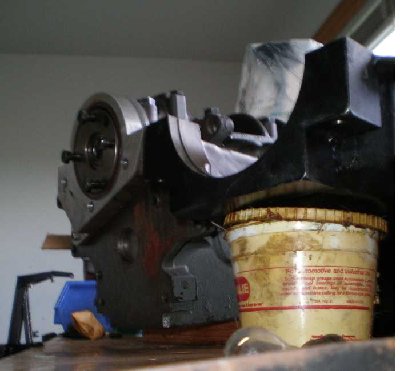
I might as well be the first to reply. I have a twincam that was modified to replace the rope seal withe a large diameter lipseal. I purchased it with a Elan Coupe that I got from Canada. The engine came from a Cortina and has what looks to be a stock crank with the seal riding on the od of the rear flandge (approximately 3 5/8"). The seal itself is held in a 2 piece holder, one is a machined piece of steel welded to the oil pan and the other is a block of aluminum slightly less than 1 1/4" thick that is machined on a rotory table and bolted to the stock rope seal tapped holes in the block. These two pieces, aluminum machined block and steel portion welded to the oil pan mate and are bolted together. The seal o.d. appears to be 4 1/4". I will try and get some photos of this and get them posted somewhere. This looks like some one did a lot of thinking and even more machining to get this idea to work, I havn't had it running so I don't even know if it did work, but at least someone has broken the ground before you.
Gary
-

garyeanderson - Coveted Fifth Gear

- Posts: 2634
- Joined: 12 Sep 2003
Hi Gary,
Love to see another flavor of this conversion. I thought of running it on the flywheel flange OD but when I looked into it there was not enough room to fit the type of seal which will guarantee to not leak for each 50k mile twincam rebuild interval. The other aspect that made me nervous was how to assemble that configuration essentially pushing it together going the wrong direction without harming the seal by having the fragile spring dislodged or folding back the lip and nibbing off a piece or tearing it. The flange was not wide enough for a large lead-in chamfer and still leave room for the seal to run against. My design has the male shaft inserted last from the outside going in the way it's intended to be done to ensure the seal is not damaged. Next is an o-ring sealed false dipstick to cap off the tube in the engine. I'll carry the real dipstick in the boot.
Yesterday didn't go so smoothly since I had to make a second aluminum bracket for mounting the lipseal to the engine engine when the first one would not center on the crankshaft. I made a rookie mistake and overlooked the fact the crankshaft centerline does not coincide with the block's oilpan flange surface. The main bearing caps are recessed below that surface by .10" and so is the centerline. Doh! Oh well, it'll be worth the effort when I have my Elan finally not mark it's spot. Looking forward to cleaning up once an for all the oily mess from the entire underside of the chassis.
-Keith
- type26owner
- Coveted Fifth Gear

- Posts: 1246
- Joined: 18 Sep 2003
Took plenty of pictures. Go here to see them and look in the folder 'Rear_Main_Seal_Upgrade'. Made one modification which does not show in the pictures and that is the old ropeseal flange on the oilpan stuck out too far for the pan to load into the space between the lipseal mount and the rear main bearing cap so I sanded it to be thinner. It's almost flush now with the new flange I added on the pan. On assembly the pan can be the last item glued into place but when trying to disassemble it will not be possible to shear through that much silicone adhesive on the flange face seam so the lipseal mount will have to be pried away first.
<a href='http://briefcase.yahoo.com/[email protected]' target='_blank'>http://briefcase.yahoo.com/[email protected]</a>
-Keith
<a href='http://briefcase.yahoo.com/[email protected]' target='_blank'>http://briefcase.yahoo.com/[email protected]</a>
-Keith
- type26owner
- Coveted Fifth Gear

- Posts: 1246
- Joined: 18 Sep 2003
It's completely leak free now.  Get to wash the slick oil spot off my driveway now.
-Keith
-Keith
- type26owner
- Coveted Fifth Gear

- Posts: 1246
- Joined: 18 Sep 2003
The leak free condition ended a couple of weeks ago and it started gushing out oil the last few days. Pulled the engine out yesterday to find the lipseal had come loose and backed out of the aluminum mounting block finally chaffing through where the elastomer is bonded to the steel frame. Pleased to identify and recognize the problem. Pissed off to find this problem is with the design of the seal itself. The seals' steel frame outside diameter had a coating called Bore-Tite on it which appears to be a green soft plastic substance that makes it seal up oil tight and assists in holding the seal in firmly supposedly. I installed it dry as per the instructions making note that the interference measured was .004" and figured I was good to go, it would never come loose. Trouble is the CTE difference of aluminum versus steel is 1E-5 X 5 inches = 5E-5 X 100C = .005". Hey whatda ya know, the interfernce fit at room temperature loosen up completely at 100 degrees centigrade. If I'd done the calculation at the beginning of the project this would have been apparent from the start. Thanks Chicago Rawhide, for not mentioning any operating temperature range restriction for the interference fit. Suppose I should not have made the assumption that the permissable temperature range of the elastomer and the installation fit were the same. Guess my lack of experience utilizing large diameter seals is evident, ouch! :angry:
The new custom made teflon seal installed yesterday has .008" interference at room temperature. Loctited it in too. Upgraded the Speedi-Sleeve with one which is titanium nitride coated (that gold coating on drill bits). It's fairly close to being diamond-like in hardness. Trying it again. :blink:
Oh hey! Just remembered I've got pictures to share. Go here and look in the folder named Damaged_Lipseal. Included some pictures of the new spring-loaded PTFE (teflon) seal, titanium nitrided sleeve and the new Romac harmonic balancer too.
<a href='http://briefcase.yahoo.com/[email protected]' target='_blank'>http://briefcase.yahoo.com/[email protected]</a>
-Keith
- type26owner
- Coveted Fifth Gear

- Posts: 1246
- Joined: 18 Sep 2003
this topic is 2 1/2 years old but I just got the camera and thought I would post the photos. I would like to know if anyone has ever seen a modified pan and rear seal holder such as this. The story I got when I purchased an Elan Coupe 36/6292 was that this engine was removed from a Lotus Cortina in Canada, somewhere in the Toronto area.
-

garyeanderson - Coveted Fifth Gear

- Posts: 2634
- Joined: 12 Sep 2003
15 posts
• Page 1 of 1
Total Online:
Users browsing this forum: No registered users and 4 guests


