Remove and re-use original chrome windscreen trim?
21 posts
• Page 1 of 2 • 1, 2
Hi
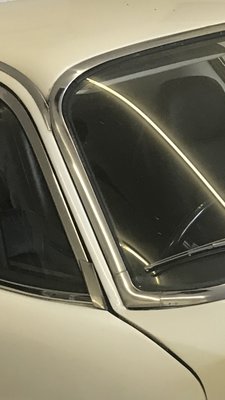
I?d ideally like to respray my Plus 2. The roof is particularly bad! Also I really need to replace the headlining. One of the things stopping me, is I have a perfectly presentable windscreen in the car, along with the original chrome trim. Though it does leak around the seal! I?m not overly enthused by the idea of fitting one of the after market chrome trims by PM or SGS. So I?m wondering, has anyone removed and then re-used the original chrome trim? In fact is it even possible?
Appreciate any information/advice.
Very many thanks.
Andy
Where, then, lies the answer? In choice. Which shall it be: bankruptcy of purse or bankruptcy of life?
Plus 2S
BLL 315H in white.
Plus 2S
BLL 315H in white.
- EPC 394J
- Third Gear

- Posts: 225
- Joined: 07 Feb 2014
Not sure what Plus 2 you have here and what you mean by the chrome trim?
If you have an early car, it has a rubber seal with a chrome insert in. These are easy to remove and replace. All the rear screens, early and late have the same arrangement.
However, if you have a late car with a bonded screen, then that is quite different.
I would be in the same boat as you here, my screen is bonded with a new (previously unavailable) chrome strip surround.
As understand it you will ruin the strip and probably break the screen removing both.
Unless others on this forum can tell me otherwise.
Regards
Jeff 72+2
-

jeff jackson - Third Gear

- Posts: 365
- Joined: 31 May 2004
I?m sorry.
Mine?s a ?69 S. You?re absolutely right, I should have been more specific. I have the original Cortina trim. So much of the car is original I?m loathe to disturb it if I can?t save it. But it does really need a respray and headlining.
I have removed and replaced the rear screen myself. That was very straightforward, and of course looks totally original.
Where, then, lies the answer? In choice. Which shall it be: bankruptcy of purse or bankruptcy of life?
Plus 2S
BLL 315H in white.
Plus 2S
BLL 315H in white.
- EPC 394J
- Third Gear

- Posts: 225
- Joined: 07 Feb 2014
Andy.
I did complete nuts and bolts restoration of my 1968 +2, including a re-spray and roof lining replacement.
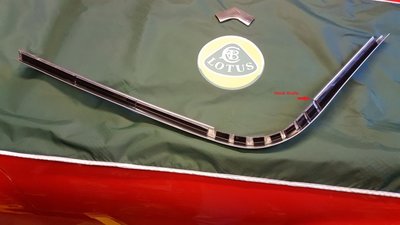
My Chrome strip was actually Stainless Steel and can be removed with a little care; I used a plastic trim tool.
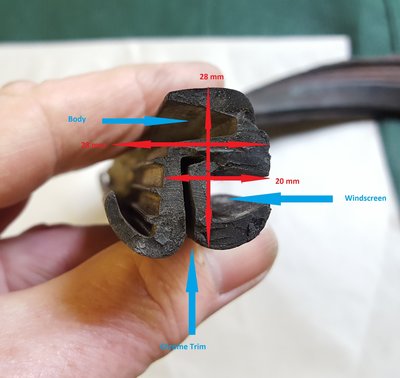
Hopefully your rubber seal is in reasonable condition; mine was not and had to be replaced. They can be difficult to get. I got mine off EBay as it was original old stock of the correct profile.
First slide the top central clip to one side so that the strip can start to be removed, use the trim tool to ease the strip from the rubber, noting the ?angle hook? position to push to one side before lifting progressively out. When you come to the bottom corner you can pull the strip out off the corner clip.
Then do the other side strip and finally the bottom strip.
That was my method and was removed without damage. I marked up my strip on the inside to ensure correct replacement.
Sorry, not the best photo to show the "hook", Its a 90 degree bend, may need to zoom in.
Trevor
1968 Elan +2 50/0173
1968 Elan +2 50/0173
-

TeeJay - Fourth Gear

- Posts: 540
- Joined: 30 May 2007
I think you can get a new seal from Ford Classic/Capri forum
Alan
Alan
Alan.b Brittany 1972 elan sprint fhc Lagoon Blue 0460E
- alan.barker
- Coveted Fifth Gear

- Posts: 3754
- Joined: 06 Dec 2008
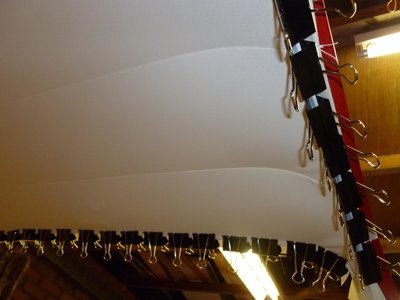
My 51mm Fold Back Clips I got from Amazon with free next day delivery and used appox 70 off
I could have used less and used a slightly smaller size but back in 2012, 100 off were on offer.
Here is a link:- https://www.amazon.co.uk/Pack-50-51mm-F ... =8-2-fkmr1
I could have used less and used a slightly smaller size but back in 2012, 100 off were on offer.
Here is a link:- https://www.amazon.co.uk/Pack-50-51mm-F ... =8-2-fkmr1
Trevor
1968 Elan +2 50/0173
1968 Elan +2 50/0173
-

TeeJay - Fourth Gear

- Posts: 540
- Joined: 30 May 2007
EPC 394J wrote:Where did you get all the bulldog clips?
A bag of 30 small ones was all I needed. Purchased at the local office-supply shop.
1970 Elan Plus 2 (not S) 50/2036
2012 BMW R1200GS
"It just wouldn't be a complete day if I didn't forget something!" -Me
2012 BMW R1200GS
"It just wouldn't be a complete day if I didn't forget something!" -Me
-

The Veg - Coveted Fifth Gear

- Posts: 2185
- Joined: 16 Nov 2015
JimE wrote:I re-used my original windscreen trim on my Europa Special with no issues.
I think the Europa trim is the plastic chrome one stuck in place not the same.
On the 69/70 +2S it was the Ford Classic /Capri trim from the 60s in stainless steel.
Or at least the 1970 +2S that i owned years ago was
Alan
Alan.b Brittany 1972 elan sprint fhc Lagoon Blue 0460E
- alan.barker
- Coveted Fifth Gear

- Posts: 3754
- Joined: 06 Dec 2008
alan.barker wrote:JimE wrote:I re-used my original windscreen trim on my Europa Special with no issues.
I think the Europa trim is the plastic chrome one stuck in place not the same.
On the 69/70 +2S it was the Ford Classic /Capri trim from the 60s in stainless steel.
Or at least the 1970 +2S that i owned years ago was.
Alan
You're right Alan. My Europa trim is very similar to that on my late 130/5, not the earlier +2s.
- JimE
- Third Gear

- Posts: 349
- Joined: 22 Jan 2017
Very interested in this thread. I have a 69 +2S, with the stainless steel trim, and have the screen out at the moment. I bought a replacement rubber seal from a firm in Australia, from memory it was the Capri Classic seal, and it is a very close replacement. I also made some clips which fit in the bottom corners to hold the corner-pieces in place - the originals were reduced to dust!
My issue is - getting it back in. Fitting the screen into the car and then attempting to put the trim in is very risky - the trim bends easily and I don't think this approach is possible. At the Classic Car show I spoke with some Consul OC guys, who assured me that you have to assemble the trim, rubber and screen, and then insert the whole unit into the car using the normal string + washing up liquid technique.
Has anyone done this, and can you confirm this is the correct method?
- andywatts
- First Gear

- Posts: 34
- Joined: 08 Jul 2010
Hi Andy
The process you have just described is exactly the way it reads in the consul/capri workshop manual.
I?m not quite there myself yet, but I?d be sure nterested in how it goes.
Regards
Andy
The process you have just described is exactly the way it reads in the consul/capri workshop manual.
I?m not quite there myself yet, but I?d be sure nterested in how it goes.
Regards
Andy
Where, then, lies the answer? In choice. Which shall it be: bankruptcy of purse or bankruptcy of life?
Plus 2S
BLL 315H in white.
Plus 2S
BLL 315H in white.
- EPC 394J
- Third Gear

- Posts: 225
- Joined: 07 Feb 2014
My 2 pence worth.
I did a lot Google searches and research for fitting an early Lotus +2 (Capri) windscreen.
Many results were returned.
Firstly as many know, there is a lot of information on this subject on this Forum; but the search engine on the forum is not the best; but a google search on a main browser always returns much improved results particularly for the forum.
A simple summary suggested the main methods used were to fit the seal to the body then the glass and the other; as you have noted; to fit the seal to the glass and then fit the unit to the body.
As my seal was a single length (not joined) and that I would be fitting it single handed, my choice was to fit the seal to the body, then fit the glass then the St.St. trim.
Carefully check the rubber seal for burrs and the trim groove to ensure that it?s all open, so that the ?hooked angle? will fit in it. I read somewhere that someone was at the point of fitting the St.St. trim and found some part of the grove was sealed. They had to start again.
The first seal length fitted ran along the bottom of the body aperture, with the correct angle cut at each end, with a very sharp broad blade tool. This was cut approx 15 mm longer than required, as it is known that the rubber will shrink with age.
Then I cut a length that ran from the bottom corner around the sides and top and back to the bottom. Again with accurate cutting of the mating angles and approx 20 mm longer than required.
The rubbers were pushed firmly into the body aperture particularly around the corners and carefully checked then the angles were glued with a Loctite rubber adhesive. This was then left for 2 days.
Then using a silicon spray (or liquid soap or baby powder) liberally applied to the rubber I started to fit the glass.
Firstly along the bottom ensuring it was equal both sides, using a slight angled trim tool I pushed the glass into the rubber.
Next I went approx 2 thirds up one side, then fully up to the top on the other side. The last third up the side and finally along the top of the seal. The glass went into the seal with little difficulty, just a firmer hand on the corners.
Finally the St.St. Trim was fitted.
Before fitting the bottom piece I used a trim tool slightly larger than the thickness of the "angled trim" to run along the bottom of the grove for the trim, to ensure that the weight of the glass had not pushed too low into the seal.
Applied silicone spray liberally into the groove, then I pushed in the bottom trim.
Then the 2 bottom corner clips were pushed onto the bottom trim. Silicone spray into the grove and 1 side top trim pushed into the groove. A right angled trim tool was useful especially in the corners to fit into the groove to pull the rubber to allow the trim to be pushed into the rubber. Also a wood batten placed on the trim and rubber mallet to gently persuade the trim in.
The top centre clip was pushed onto the fitted trim passed the centre joint, the other side / top trim was fitted and the centre clip tapped into position.
It all worked for me.
Trevor
1968 Elan +2 50/0173
1968 Elan +2 50/0173
-

TeeJay - Fourth Gear

- Posts: 540
- Joined: 30 May 2007
Thanks for that great write up TeeJay, once I?ve fitted my new headlining that?s my next job and I?ve sort of been putting it off, but now feel much more confident about doing it.
Change is inevitable, except from a vending machine!
- Bigbaldybloke
- Fourth Gear

- Posts: 889
- Joined: 16 May 2017
21 posts
• Page 1 of 2 • 1, 2
Total Online:
Users browsing this forum: jebracing and 33 guests


