Repairing this body damage
16 posts
• Page 1 of 2 • 1, 2
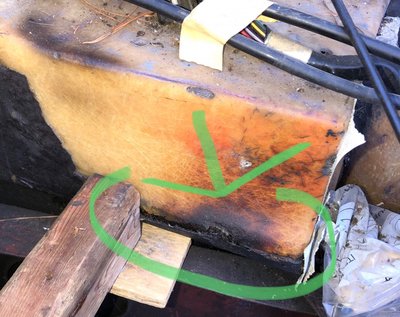
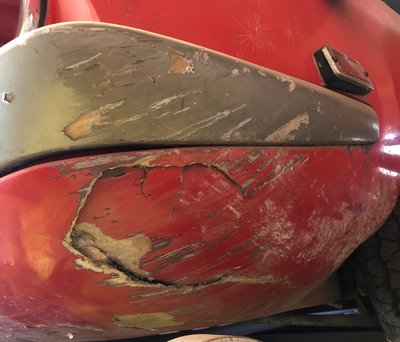
OK then, now that I have the Elan at hand I was hoping to get some coaching on how to go after these two issues with the body. Overall the car is quite good, if dusty, but these two areas stand out as needed attention.
My goal is to preserve the car, keep it strong and prevent futher damage, rather than making it perfect or a show car.
In the engine comparent on the US driver side looks like there was a fire.
My goal is to preserve the car, keep it strong and prevent futher damage, rather than making it perfect or a show car.
In the engine comparent on the US driver side looks like there was a fire.
SoCal
1969 Elan DHC
1969 Elan DHC
- tdskip
- Third Gear

- Posts: 428
- Joined: 13 Sep 2012
It may not have been a fire as such in the engine bay. The exhaust headers get pretty hot and can damage the bodywork.
Turning to the rear end I notice some star crazing above the bumper. Is this localised?
The bumper comes off easily enough with bolts inside the trunk.
Others may give you chapter and verse on glass fibre repairs but laying in some more mat to replace or reinforce is not too difficult.
Turning to the rear end I notice some star crazing above the bumper. Is this localised?
The bumper comes off easily enough with bolts inside the trunk.
Others may give you chapter and verse on glass fibre repairs but laying in some more mat to replace or reinforce is not too difficult.
- MarkDa
- Coveted Fifth Gear

- Posts: 1116
- Joined: 15 Apr 2017
Thanks @MarkDa
The rest the body looks pretty good, there?s not much cracking,
The damage in the second picture (below the bumper) looks better already because I was able to just press the damaged area back down, so I think I?ll be able to reinforce it from inside the trunk to get it nice and strong again.
Good catch that it may have simply been exhaust heat that damage the area in the engine compartment. I?m assuming putting some heat shielding there would not be a bad idea?
SoCal
1969 Elan DHC
1969 Elan DHC
- tdskip
- Third Gear

- Posts: 428
- Joined: 13 Sep 2012
I am having my headers (exhaust manifold) ceramic coated at the moment, this is supposed to reduce heat transfer. Expensive,so I hope it works.
Richard Hawkins
Richard Hawkins
- RichardHawkins
- Coveted Fifth Gear

- Posts: 1277
- Joined: 05 Jul 2008
if you don't have one already you should get a workshop manual - it also includes a section on fiberglass repair, which will give you a basic roadmap for small repairs such as these : e.g. rather than just reinforcing from the back, it's not a whole lot more work to feather out the crack over an inch or so, so that the repair can be done without extra material. It is important to make sure the edges of the crack are perfectly aligned so that the outer surface can be restored easily: one can do that by screwing straight clamps regularly along the crack, then glass over the clamps area in a second pass. These damages do not seem critical, you should be able to repair them just fine.
good luck !
good luck !
S4SE 36/8198
-

nmauduit - Coveted Fifth Gear

- Posts: 2000
- Joined: 02 Sep 2013
MarkDa wrote:A heatshield is a good idea - however there's not much clearance from the header at the rear so don't set it more than a few mm off the footwell.
Will also help stop your leg getting grilled!
Thanks Mark, let me research what areas to do. Now would be the time since the engine is out.
Thanks!
SoCal
1969 Elan DHC
1969 Elan DHC
- tdskip
- Third Gear

- Posts: 428
- Joined: 13 Sep 2012
nmauduit wrote:if you don't have one already you should get a workshop manual - it also includes a section on fiberglass repair, which will give you a basic roadmap for small repairs such as these : e.g. rather than just reinforcing from the back, it's not a whole lot more work to feather out the crack over an inch or so, so that the repair can be done without extra material. It is important to make sure the edges of the crack are perfectly aligned so that the outer surface can be restored easily: one can do that by screwing straight clamps regularly along the crack, then glass over the clamps area in a second pass. These damages do not seem critical, you should be able to repair them just fine.
good luck !
You means I?m supposed open and read the manual that came with the car - Cripes man, so demanding! Ha.
Thanks for the suggestion, will do that and make sure to do it right. Great tip on the clamps.
Thanks for the encouragement.
SoCal
1969 Elan DHC
1969 Elan DHC
- tdskip
- Third Gear

- Posts: 428
- Joined: 13 Sep 2012
I believe you need to do a lot of cleaning on the inside. Then roughing up the glass/gel, sandpaper etc.
Get the red paint and primer off so the glass will adhere, best to not expose the fibres.
I would only go about an inch overlap on the inside with medium mat. The outside angel hair over the crack.
Get the red paint and primer off so the glass will adhere, best to not expose the fibres.
I would only go about an inch overlap on the inside with medium mat. The outside angel hair over the crack.
Born, and brought home from the hospital (no seat belt (wtf)) in a baby!
Find out where the limits are, and start from there
Love your Mother
Earth
Find out where the limits are, and start from there
Love your Mother
Earth
-

h20hamelan - Coveted Fifth Gear

- Posts: 1968
- Joined: 25 Sep 2010
h20hamelan wrote:I believe you need to do a lot of cleaning on the inside. Then roughing up the glass/gel, sandpaper etc.
Get the red paint and primer off so the glass will adhere, best to not expose the fibres.
I would only go about an inch overlap on the inside with medium mat. The outside angel hair over the crack.
Thanks.
Any ideas on how to go after the hear damage up front?
SoCal
1969 Elan DHC
1969 Elan DHC
- tdskip
- Third Gear

- Posts: 428
- Joined: 13 Sep 2012
Those fiberglass repairs will be easy, even if you have never done it before. Just take your time and follow the instructions on the box. The most important consideration is to follow the curve of the body.
For the engine bay, repair the area that is damaged with fiberglass and use self adhesive heat shield and paint it black with high temp paint to blend in with rest of the engine bay. That is what I did 5 years ago and you can?t tell it?s there unless looking very hard. Keeps the foot well at a decent temp on long drives.
I also had my TTR headers ceramic coated. Well worth the money spent as the engine bay temp reduced by 20 degrees or more.
Good luck!
Glen
05 Elise - Back where I started
65 Elan S2 - 26/4055
72 Europa - 74/2358R
69 Elan S4 - 45/7941
64 Elan S1 - 26/0379
12 Colin 30 - Lotus Racing Kart
07 Exige S - Wicked Road/Track Car
07 Exige S - Fast Road/Track Car
06 Elise - Track pack
05 Elise - Back where I started
65 Elan S2 - 26/4055
72 Europa - 74/2358R
69 Elan S4 - 45/7941
64 Elan S1 - 26/0379
12 Colin 30 - Lotus Racing Kart
07 Exige S - Wicked Road/Track Car
07 Exige S - Fast Road/Track Car
06 Elise - Track pack
-

Certified Lotus - Coveted Fifth Gear

- Posts: 1076
- Joined: 04 Aug 2014
Thanks Glen.
Will call around locally to get the ceramic coating going on the exhaust manifold,
Reinforcing that area and the covering with a heat shield sounds like a good plan, I did some searching last night a lots of good ideas on that have been discussed here.
I take it that the engine bay should be flat black but most use satin black to make it easier to clean?
Hope everyone had a good weekend, appreciate all of the help on this and my other topics.
Last edited by tdskip on Mon Sep 02, 2019 6:59 pm, edited 2 times in total.
SoCal
1969 Elan DHC
1969 Elan DHC
- tdskip
- Third Gear

- Posts: 428
- Joined: 13 Sep 2012
tdskip wrote:h20hamelan wrote:I believe you need to do a lot of cleaning on the inside. Then roughing up the glass/gel, sandpaper etc.
Get the red paint and primer off so the glass will adhere, best to not expose the fibres.
I would only go about an inch overlap on the inside with medium mat. The outside angel hair over the crack.
Thanks.
Any ideas on how to go after the hear damage up front?
One trick that usually works for me, is to clean the area overly well. Glass Fiber if heated which it looks like it is. Fails with heat. Because it is an exothermic process. You can get a high heat epoxy, doubt it maters.
The trick involves covering the area you dont want glass on with packing tape or even thick poly plastic. Just make sure it wont move.
Using a slightly larger piece of poly than the patch, laying the cloth and mat (fiber) on the poly. Wetting out the cloth and or mat and or both. Laying the plastic over the crack.
The tough part looks like will be the cleaning and prep of the area. I suspect a few cans of alcohol spray or electric switch contact cleaner might work.
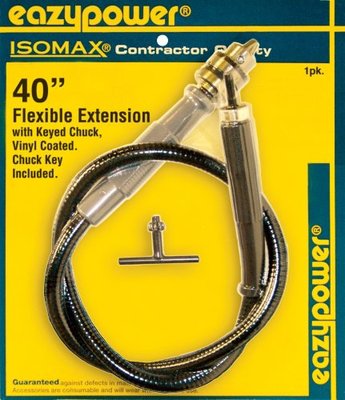
You might be able to add a flap sanding head
Once the oil/chemicals are off it wont matter too much
Born, and brought home from the hospital (no seat belt (wtf)) in a baby!
Find out where the limits are, and start from there
Love your Mother
Earth
Find out where the limits are, and start from there
Love your Mother
Earth
-

h20hamelan - Coveted Fifth Gear

- Posts: 1968
- Joined: 25 Sep 2010
about tools making the prep work easy, I find an electric sanding file is the best if access is available... one just need to go easy, marking lines to clearly identify till where to feather out the crack, as it digs very fast.
S4SE 36/8198
-

nmauduit - Coveted Fifth Gear

- Posts: 2000
- Joined: 02 Sep 2013
16 posts
• Page 1 of 2 • 1, 2
Total Online:
Users browsing this forum: vstibbard and 35 guests


