Cutting and polishing new cellulose paint
5 posts
• Page 1 of 1
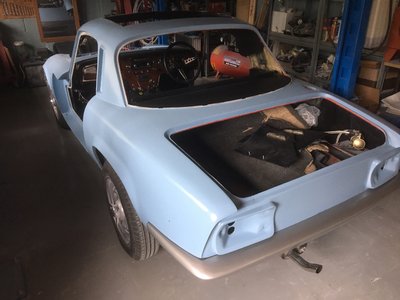
Hi I'm looking for a little advice again. I have finished spraying the wedge wood blue and am quite please with the result which is basic cellulose
I don't want the finish to be too glossy because I know the under lying body has filler and matting over stress cracks and don't want it to eventually show through, I also don't want to use the electric buffer
Conventional methods suggest 1500 wet and dry, rubbing compound then polish,
Is it essential to use wet and dry or can you go straight on with a t cut and polish
Here's how she looks now
- Concrete-crusher
- Third Gear

- Posts: 386
- Joined: 09 Jun 2013
Try t-cutting an area that's covered (behind the rear lights is the usual place) and see if your happy with the results. (if you use t-cut get the original stuff with ammonia in it) if you decide to colour sand try some fine compound, i'd recommend farecla g3 premium. Stay away from the new Farecla 360 compound (way to aggressive for Cellulose) and the old G3 is too messy. 3m Green top is also good stuff but the g3 premium is better (depends what you can get hold of for sensible money).
One of the advantages of Cellulose is it drys quite flat so if it's a clean job you can get away without colour sanding. Just experiment a bit with area's not seen and see what your happy with. If you do colour sand i'd recommend denibbing locally with 1200's then go over the whole panel with 1500's then 2000's wet also use quality paper (3m or Mirka etc) as the cheap stuff is twice as much work. (make sure to take it easy on the edges and sharp corners/body lines)
Just make sure you have your weetabix that morning, you will sleep well that day if your doing it by hand.
Chris
-

Grizzly - Coveted Fifth Gear

- Posts: 1862
- Joined: 13 Jun 2010
Thanks is a week long enough for it to dry? And do you suggest any particular wax after the t cut?
After spending weeks maybe months prepping and finally spraying I'm becoming paranoid about messing it up now at the last stage
Steve
After spending weeks maybe months prepping and finally spraying I'm becoming paranoid about messing it up now at the last stage
Steve
- Concrete-crusher
- Third Gear

- Posts: 386
- Joined: 09 Jun 2013
I would leave waxing until I was sure I didn't need to do any localised repairs. And take care along edges where the paint is likely to be thinner. I usually colour sand away from the edges towards the centre of the panel. If you have put enough paint on - 8-10 coats - you should be ok. Any of the compounds mentioned will work but we like Farecla G10 and t-cut none coloured.
1970 S4SE/1760cc big valve/SA-AX block, L2s, 45DCOEs, 1978 Jensen GT, 1962 AH Sprite, Alfa-Romeo 159, 1966 Bristol Bus, 1947 AEC Regal bus.
- nigelrbfurness
- Third Gear

- Posts: 373
- Joined: 04 Apr 2008
5 posts
• Page 1 of 1
Total Online:
Users browsing this forum: No registered users and 43 guests

