Plus 2 A pillar trim
15 posts
• Page 1 of 1
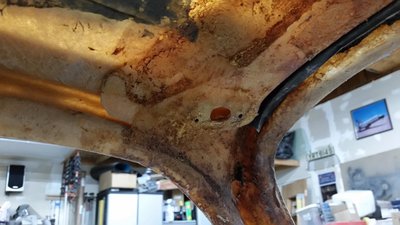
Can anyone confirm how the A pillars are trimmed, it looks like it just has some of the headlining material stretched around it before fitting the screen and door seals. Is this correct for an early Plus two or should there be something to back up or support the material. The A pillars themselves are sort of a V shape on the inside, has anyone filled these in to strengthen and reinforce them, if so what have you used? Would filling them with expanding foam help support the covering material?
Thanks in anticipation!
Thanks in anticipation!
Change is inevitable, except from a vending machine!
- Bigbaldybloke
- Fourth Gear

- Posts: 889
- Joined: 16 May 2017
Not an early +2, but mine had dense rubber foam inserts (black) running from top to bottom and flat across the face of the pillar. They were crumbling and I tossed them. If I saved a photo, I'll find and post it.
I'll make some replacements to put in when the time comes.
Note: I didn't have a picture of the insert for the A pillar, but I did find this one showing the same type of filler strip going across the top from pillar to pillar. The pillar insert was similar but shaped and sized to fit.
I'll make some replacements to put in when the time comes.
Note: I didn't have a picture of the insert for the A pillar, but I did find this one showing the same type of filler strip going across the top from pillar to pillar. The pillar insert was similar but shaped and sized to fit.
Bud
1970 +2S Fed 0053N
"Winnemucca - says it all really!!"
1970 +2S Fed 0053N
"Winnemucca - says it all really!!"
- Bud English
- Fourth Gear

- Posts: 942
- Joined: 05 Nov 2011
The RHS has the interior light cables running up it (within a sleeve).
mine originally had a thin foam material [yellow dust actually] stretched across with the headliner material stretched over this... A similar material was also positioned above the headliner along the front 1/3rd of the roof.
this gives a plusher look. Can be easy to crease the headliner A-post when gluing it in place due to the foam.
There wasn't any block of material as such, but I can imagine it could give an improved finish / noise insulation
1968 Elan plus 2 - project
2007 Elise S2 [modified with a Hethel 70th sticker (yellow)]
2000 Elise S1 - Sold
2007 Elise S2 [modified with a Hethel 70th sticker (yellow)]
2000 Elise S1 - Sold
- wotsisname
- Third Gear

- Posts: 452
- Joined: 24 Jun 2015
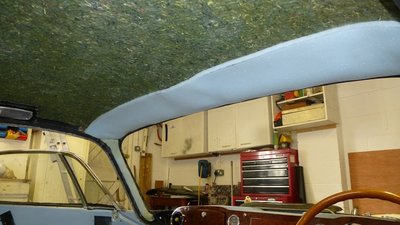
There was that thin yellow soft foam (powder) glued to the pillar trim part of the headliner on my car as well. I also had the half inch thick softer foam glued to the roof over what shows on my picture, extending about eight inches front to back. It had the same treatment at the rear window.
Bud
1970 +2S Fed 0053N
"Winnemucca - says it all really!!"
1970 +2S Fed 0053N
"Winnemucca - says it all really!!"
- Bud English
- Fourth Gear

- Posts: 942
- Joined: 05 Nov 2011
I think mine had the dusty remain of foam at front but not rear. I didn't bother replacing the foam when I installed a new headlining and it looks just fine. FWIW, my federal car has the wiring for the ceilng light running up the left side rather than the right/
1970 Elan Plus 2 (not S) 50/2036
2012 BMW R1200GS
"It just wouldn't be a complete day if I didn't forget something!" -Me
2012 BMW R1200GS
"It just wouldn't be a complete day if I didn't forget something!" -Me
-

The Veg - Coveted Fifth Gear

- Posts: 2188
- Joined: 16 Nov 2015
Thanks all, you?ve highlighted that I?ve forgotten to put in the wiring for the interior lamp, but still time to do it!
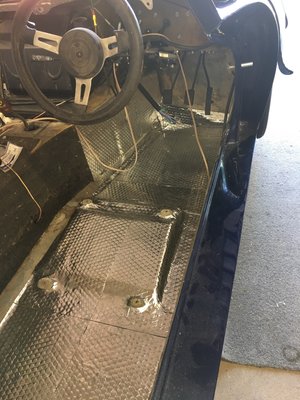
As for the pillars I think I?m going to try a squirt of expanding foam like they use around replacement house windows to fill the gaps, then trim it off to suit before fitting the headlining. I?ve also fitted Dodo mat insulation around the rest of the interior and am thinking of doing the roof too, has anyone done that?
As for the pillars I think I?m going to try a squirt of expanding foam like they use around replacement house windows to fill the gaps, then trim it off to suit before fitting the headlining. I?ve also fitted Dodo mat insulation around the rest of the interior and am thinking of doing the roof too, has anyone done that?
Change is inevitable, except from a vending machine!
- Bigbaldybloke
- Fourth Gear

- Posts: 889
- Joined: 16 May 2017
Interesting!
My UK Jan 1968 +2 also has the ceiling light cables running up from the left hand side same as the Veg federal car.
When I recently replaced my roof lining there was nothing on the roof or pillars. I did have the yellow dust, which was foam on my door cards.
Before fitting the new roof lining I did fit 3mm thick closed cell foam on the roof; as used under wooden flooring; but not the pillars.
In hindsight I wish I had fitted it on the pillars as it would have improved the appearance.
The foam was cut close to the edge, but leaving a clear area for the door seal to fit fully.
Trevor
1968 Elan +2 50/0173
1968 Elan +2 50/0173
-

TeeJay - Fourth Gear

- Posts: 540
- Joined: 30 May 2007
I rolled up a sausage of the same felt I applied to the roof and pushed it tight into the upright, followed by the blue foam which was glued on an the edges tapered with sharp scissors
The headlining then stretched over it provide a nice 'cushion' - it's still good 5 years later.
It's what Lotus should have done really (together with the layer of deadening on the roof)
The headlining then stretched over it provide a nice 'cushion' - it's still good 5 years later.
It's what Lotus should have done really (together with the layer of deadening on the roof)
- jono
- Coveted Fifth Gear

- Posts: 1861
- Joined: 17 May 2007
Bigbaldybloke wrote:I?ve also fitted Dodo mat insulation around the rest of the interior and am thinking of doing the roof too, has anyone done that?
I've put some EZ-Cool insulation in the roof, as well as covering almost every bit of the interiour with it. It's 3/16" closed-cell polyethylene with a very thin aluminium foil on both sides, which claims to be excellent for both thermal and acoustic insulation. I cannot report on results as I have yet to drive the car, so before or after comparison. But as there was nothing in the roof before, I think there will be at least some small improvement over how it was before. Thermal insulation is what I most hope it provides in the roof, as I live in a region where the sun is brutal.


1970 Elan Plus 2 (not S) 50/2036
2012 BMW R1200GS
"It just wouldn't be a complete day if I didn't forget something!" -Me
2012 BMW R1200GS
"It just wouldn't be a complete day if I didn't forget something!" -Me
-

The Veg - Coveted Fifth Gear

- Posts: 2188
- Joined: 16 Nov 2015
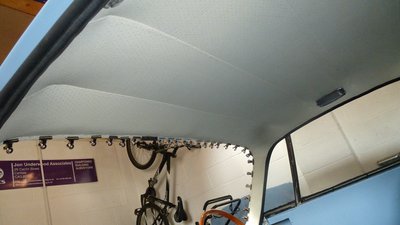
Jon, your second pic showed what I was ineptly trying to convey regarding the foam on the roof, front and back. I jumped back to your posts on your headlining install. I can only hope for results like that with that task rapidly approaching. Nicely done.
BBB, I like the idea of using the expanding insulation foam in the pillars, and will blatantly follow your lead. I want add thermal insulation to the roof for the same reason that you have, but have had second thoughts about adhesive failure due to heat.
Quite a few threads have suggested that Weldwood contact cement was up to the task. My experiences with it have been spotty at best. I've been using their general purpose contact cement. I recently found information on DAP 00233, Weldwood Contact Cement Landau Top & Trim HHR Solvent Type and ordered some. This is the right stuff. HHR= High Heat Resistant. Although it's made to be sprayed, it can be applied with a brush or roller. Huge difference.
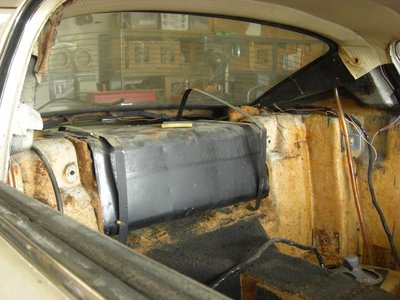
BTW, the layout of the harness on my LHD +2S has the interior light wiring going to the lights from the rear of the car up through the C pillars on each side, just visible in this photo.
Bud
1970 +2S Fed 0053N
"Winnemucca - says it all really!!"
1970 +2S Fed 0053N
"Winnemucca - says it all really!!"
- Bud English
- Fourth Gear

- Posts: 942
- Joined: 05 Nov 2011
I used dynamat ( the lighter weight variant) across the whole roof, down the A-pillars and various other places. I used an additional strip to secure the overhead tank vent pipe which has also a couple of strips of extra strength duct tape (I have fitted a single original id piece and fed a narrower pipe through that - to do the tank vent mod). To early to report if effective [still a work in progress].
I realise that this additional weight would offend some, ACBC in particular.. but i plan to do some longer trips in the car and hope to hear the radio
I fitted the roof gutters and used a blob of sealant on each screw before fitting the headliner.
Front lamp has three wires (don't forget the earth, to get the full functionality)...
I stuck the foam material over the top of this in the same places as before.
BBB are you planning to stick soft foam over the top of the spray foam ? might we worth a test using say an old bit of kitchen waste pipe / plastic bottle.. you may prefer a plusher softer feel that the foam should give
hopefully we'll park side by side sometime soon... I think our cars are fairly similar in colour
Adrian
1968 Elan plus 2 - project
2007 Elise S2 [modified with a Hethel 70th sticker (yellow)]
2000 Elise S1 - Sold
2007 Elise S2 [modified with a Hethel 70th sticker (yellow)]
2000 Elise S1 - Sold
- wotsisname
- Third Gear

- Posts: 452
- Joined: 24 Jun 2015
I?ve used Dodomat on the floor areas, and bonnet but so far not the roof as I?ve seen comments about the self adhesive glue failing in hot temperatures. But I?ve decided to go ahead and do the roof with it. Good point about three wires to the interior light, thanks. I?ll also try the additional foam on the A pillars.
Just about to get stuck into the car again now it?s getting warmer and the evenings getting lighter!
Just about to get stuck into the car again now it?s getting warmer and the evenings getting lighter!
Change is inevitable, except from a vending machine!
- Bigbaldybloke
- Fourth Gear

- Posts: 889
- Joined: 16 May 2017
The dynamat adhesive seemed pretty strong..fingers X'd. I used headliner contact adhesive from martrim.. everywhere else. . Bud English rearmost part looks tighter to the inner vent fibreglass part than I achieved.. I have a 4 rod set up , possibly the difference?..and wasn't really sure how it should be finished, the rear panels seem to keep it all in place.
Oh.. a tip. Trial fit the mirror, light back and visor brackets to check the screw holes are all good. I also fixed a paper template on the roof that would fold back inside the car and marked the locations of all the holes for these.. made it so much easier to find the visor holes.
Adrian
Oh.. a tip. Trial fit the mirror, light back and visor brackets to check the screw holes are all good. I also fixed a paper template on the roof that would fold back inside the car and marked the locations of all the holes for these.. made it so much easier to find the visor holes.
Adrian
1968 Elan plus 2 - project
2007 Elise S2 [modified with a Hethel 70th sticker (yellow)]
2000 Elise S1 - Sold
2007 Elise S2 [modified with a Hethel 70th sticker (yellow)]
2000 Elise S1 - Sold
- wotsisname
- Third Gear

- Posts: 452
- Joined: 24 Jun 2015
That picture is one of my before shots. It's the original headliner install.
I tried to take as many pictures as I could during the tear down. As with most people, I should have taken more, including some of the A pillars. The Photo Gallery comes in very handy to fill in those blanks.
I tried to take as many pictures as I could during the tear down. As with most people, I should have taken more, including some of the A pillars. The Photo Gallery comes in very handy to fill in those blanks.
Bud
1970 +2S Fed 0053N
"Winnemucca - says it all really!!"
1970 +2S Fed 0053N
"Winnemucca - says it all really!!"
- Bud English
- Fourth Gear

- Posts: 942
- Joined: 05 Nov 2011
15 posts
• Page 1 of 1
Total Online:
Users browsing this forum: No registered users and 22 guests

