Interior trim
10 posts
• Page 1 of 1
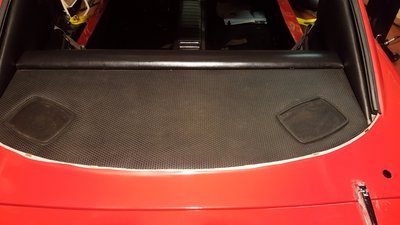
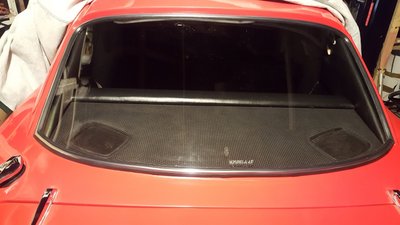
Hi all, bought my +2 130 in boxes. Trying to figure out the interior fittings. Got most of it figured out. Each side of the parcel shelf in the rear there are rear quarter panel trims. As the glass is out there is an inch gap between the trim panel and the rubber lip for the glass. (the trim and the body of the car) Is there anything in that gap, or is it just hidden by the glass and rear screen rubber? Looking at the pic in the gallery of BGU470G it is difficult to tell if there is any infill between the trim panel and the bodywork. Cheers.
- jasper2347
- Second Gear

- Posts: 142
- Joined: 24 Sep 2018
That gap is intentional. It allows air to sweep across the rear screen and exit through the vents in the side of the roof. The gap is effectively shielded by the rubber glass trim as you have suspected.
Bud
1970 +2S Fed 0053N
"Winnemucca - says it all really!!"
1970 +2S Fed 0053N
"Winnemucca - says it all really!!"
- Bud English
- Fourth Gear

- Posts: 942
- Joined: 05 Nov 2011
Excellent, one problem solved. Cheers.
Wish I'd bought a car rather than a kit!!
Wish I'd bought a car rather than a kit!!
- jasper2347
- Second Gear

- Posts: 142
- Joined: 24 Sep 2018
The quarter panel on the early cars ( I suspect is same on S model ) has a small return edge that also helps to hide the gap. This seems to partially clip over and the rear shelf forces it to remain in place.
1968 Elan plus 2 - project
2007 Elise S2 [modified with a Hethel 70th sticker (yellow)]
2000 Elise S1 - Sold
2007 Elise S2 [modified with a Hethel 70th sticker (yellow)]
2000 Elise S1 - Sold
- wotsisname
- Third Gear

- Posts: 452
- Joined: 24 Jun 2015
Thanks very much for that Trevor. I notice the rubber only goes to the bottom of the side panel. Is the rubber in separate bits rather than normal cars would be all in one lump? Don't seem to have any rear screen fitting bits at all, but told available from Mr Lotus? Oddly there are a few bits of screen rubber which I thought were samples, these may be the new bits for the car. Hopefully the next car will be easier? Should have bought a car rather than a kit!!
Thanks again, Rob
Thanks again, Rob
- jasper2347
- Second Gear

- Posts: 142
- Joined: 24 Sep 2018
Hi Rob.
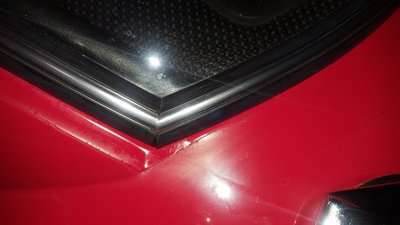
I purchased my rear screen rubber and plastic chrome infill from Sue Miller, in the UK; they both came in one length.
Having researched how to best fit both the rubber and infill, I choose the 2 piece method.
So one long piece starts from the left lower corner and goes up, round the top and back down to the right lower corner.
The other piece runs corner to corner along the bottom.
I measured the angle in the corners and cut the compound angle with my Cross cut saw, with a fine blade fitted. Had a bit of trial and error to get best fit with the angles.
It is important to fit the rubber pushed in very tightly, in particular around the top corners and then it has 5 to 8 mm extra on each piece at the joints. This is required as the rubber will shrink over time.
Having positioned the long rubber on the body, leaving the lower rubber to fit, I used a Loctite 406 Super Glue for plastic and rubber on the joints when fitting lower rubber.
The same technique was used on the infill, but with only 3 mm extra on the lengths at the joints. So each piece was 6 mm longer on the length to ensure a good fit.
Very pleased with the results.
Last edited by TeeJay on Thu Oct 18, 2018 7:29 pm, edited 1 time in total.
Trevor
1968 Elan +2 50/0173
1968 Elan +2 50/0173
-

TeeJay - Fourth Gear

- Posts: 540
- Joined: 30 May 2007
Ah, that explains the many pieces of trim in the boot. Will have a bit of a look at the weekend. Trying to get the present project Mini 1275GT finished so I can get started on with the Lotus. Just trying to get ahead of the game so to speak. Seems to be a lot of helpful people on here, so the trepidation has gone away a bit. Have built many cars from boxes before, just not one of these, always fancied one though. Have found a guy building a +2 sprint car, so maybe some surplus bits for the interior there, we'll see?
Thanks again.
Thanks again.
- jasper2347
- Second Gear

- Posts: 142
- Joined: 24 Sep 2018
There is a debate (elsewhere on this forum) about whether to mitre the infill. there's also a good discussion about fitting the rear screen (the credit card approach worked for me- and I don't mean splash the cash  ) TeeJays result looks excellent, I chose to use a single piece and am happy with the result. My original fit [possibly factory, possibly not] for the infill was with a join in the centre at the bottom of the screen.
Whichever approach - the tool with the diamond wire works a treat. My view is that the infill is stretched during this process.. I forced as long a length as possible (force the infill back into the bends) into the rubber seal, so it''s a very tight fit at the bottom..only time will tell how much this shrinks. Don't forget to fit the supports for the parcel shelf before the infill goes in [possible to fit after the rubber, but probably better done first]. I got my seal & infill from SJ sportscars.
Whichever approach - the tool with the diamond wire works a treat. My view is that the infill is stretched during this process.. I forced as long a length as possible (force the infill back into the bends) into the rubber seal, so it''s a very tight fit at the bottom..only time will tell how much this shrinks. Don't forget to fit the supports for the parcel shelf before the infill goes in [possible to fit after the rubber, but probably better done first]. I got my seal & infill from SJ sportscars.
1968 Elan plus 2 - project
2007 Elise S2 [modified with a Hethel 70th sticker (yellow)]
2000 Elise S1 - Sold
2007 Elise S2 [modified with a Hethel 70th sticker (yellow)]
2000 Elise S1 - Sold
- wotsisname
- Third Gear

- Posts: 452
- Joined: 24 Jun 2015
Fitting glass is a job I usually leave to other people, especially laminated stuff. I will tackle the rest no problems, hence the questions about the rear screen. Guy just fitted the new laminated screen in the classic rally Mini and it shows how things vary car to car. On the Mini the rubber is all one lump and jointed at the bottom. The infill joint is at the top in the centre. Our man is an moonlighting employee of a windscreen outfit, so I presume he knows what he's about. Never broke one yet! I have noticed he sometimes puts the rubber on the car and the screen in from the outside, yet on other cars the rubber goes round the glass and he fits it from the inside.
Think I'll ask around locally to find an owner of a +2 so I can hopefully have a look at how things fit and where once I get started on the car in December. I have a feeling the glass is only the beginning? Thanks for your help so far.
Think I'll ask around locally to find an owner of a +2 so I can hopefully have a look at how things fit and where once I get started on the car in December. I have a feeling the glass is only the beginning? Thanks for your help so far.
- jasper2347
- Second Gear

- Posts: 142
- Joined: 24 Sep 2018
10 posts
• Page 1 of 1
Total Online:
Users browsing this forum: No registered users and 24 guests


