S4 dashboard
16 posts
• Page 1 of 2 • 1, 2
Chris,
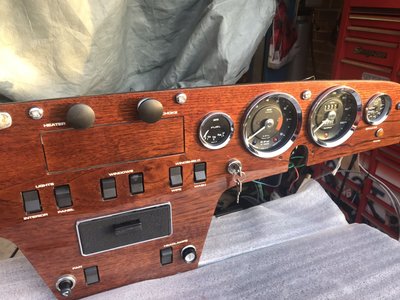
I have a dash from Sue, made by City Polishers, and all the holes for switches and instruments are too large. I used cardboard wrapped around the instruments to centralise them. The switches as you say are more tricky, I stuck black velvet ribbon inside the rectangular holes. I don't think it is noticeable.
Richard Hawkins
- RichardHawkins
- Coveted Fifth Gear

- Posts: 1277
- Joined: 05 Jul 2008
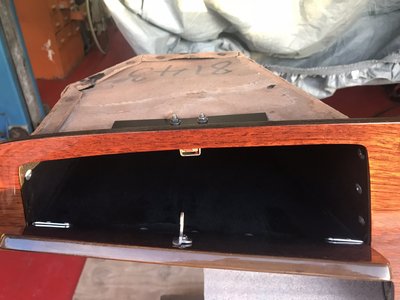
The dash came from Ian classic dash , second dash board I?ve had from him and really pleased with the quality , more than the sh.. quality, over priced glove box hinges from Matty . Spent ages relieving the dash to allow the hinges to fit . The flocking came fro a kit on amazon
- shaun
- Third Gear

- Posts: 233
- Joined: 30 Nov 2008
Thats really interesting yours was made by some one else because comparing it to my Sue Miller dash it's identical (same colour, similar grain and slightly too big switch holes) i didn't ask her who made my dash but i assumed it was City Polishers (i just know i had it on order for over a year).
Richard, i used an old switch with masking tape wrapped tightly round it you get the switch centered, i ended up pulling my dash back out to do some thing with the gap round the switches as it looked dodgy at night (was getting back lit from things like the lighter which made the gaps look huge) so i filled them in with some gauge bezel foam tube seal i had left over which did the trick.
Strangely the one thing i struggled with the most was getting the glove box door to sit in the center once it was fitted to the car, for some reason my dash bobbins mustn't be perfectly level and it slightly flexed the dash making the glove box door stick...... i spent a few hours on that one.
Chris
-

Grizzly - Coveted Fifth Gear

- Posts: 1862
- Joined: 13 Jun 2010
deebee....... Draw diagrams of the back of each switch pictures are good (take loads anyway) but lots of diagrams are better (what colour and position wires are placed) plus how the wires are routed also mark which way up the switches go on the switches, take each one apart clean contacts and re-grease with contact grease (for how easy it is to do there is nothing worse than finishing your dash to find one switch isn't working or the wrong way up, i suggest a cable tie round the switch legs too when resembling) while the switches are apart it's worth flatting the black part carefully with 1200's being careful not to take the edges off, light coat of plastic adhesion promoter and then a nice thin coat of some quality satin or mat black (i spent ages trying different types of aerosol Satin black to get the right Bakelite gloss level and turns out MOTIP satin was closest for me) just make sure any silicon back to black type product has been removed first.
Also i fitted a separate ground for my rvc rev counter and a solid state voltage stabilizer (i was getting interference from things like indicators) don't forget to get fresh gauge gaskets too.
Make sure you drill the holes for the lower black trims from a masking tape template from the old dash.... they can be done once the dash is fitted but it's easier to get the drill parallel with the dash off the car.
Don't forget to either fit a new anti theft switch or take the opportunity to remove the wiring.
Last thing off the top of my head is check the wiper wheel boxes for play, with the dash out it's a five minute job to take the wiper assembly to bits re-grease etc it's a nightmare with the dash in place.
Chris
-

Grizzly - Coveted Fifth Gear

- Posts: 1862
- Joined: 13 Jun 2010
When I replaced my dash, I created a spreadsheet detailing every connection along with re-wiring the dash to take quick disconnect molex connectors.
You can see the spreadsheet here in this post: http://www.lotuselan.net/forums/post300971.html#p300971
For understanding the wiring, I found the colour code description useful: http://www.dimebank.com/LucasColours.html
Paul.
You can see the spreadsheet here in this post: http://www.lotuselan.net/forums/post300971.html#p300971
For understanding the wiring, I found the colour code description useful: http://www.dimebank.com/LucasColours.html
Paul.
Paul Carew
Austin,Texas,USA
1967 Lotus Elan S3SE Right Hand Drive, FHC 36/7152 BOO 758F
Austin,Texas,USA
1967 Lotus Elan S3SE Right Hand Drive, FHC 36/7152 BOO 758F
-

pcarew - Second Gear

- Posts: 166
- Joined: 30 Nov 2005
Something helpful that I did was to use a P-Touch label maker, not only to make a label for each switch, but to include on the label which end is the top as installed in the dashboard before removal- notice the 'T' on the labels:


1970 Elan Plus 2 (not S) 50/2036
2012 BMW R1200GS
"It just wouldn't be a complete day if I didn't forget something!" -Me
2012 BMW R1200GS
"It just wouldn't be a complete day if I didn't forget something!" -Me
-

The Veg - Coveted Fifth Gear

- Posts: 2188
- Joined: 16 Nov 2015
Depending on where in the world you are, my Dash came from Prestige Autowood http://www.prestigeautowood.com/
Expensive, but 1st rate quality and hand built.
Expensive, but 1st rate quality and hand built.
Paul Carew
Austin,Texas,USA
1967 Lotus Elan S3SE Right Hand Drive, FHC 36/7152 BOO 758F
Austin,Texas,USA
1967 Lotus Elan S3SE Right Hand Drive, FHC 36/7152 BOO 758F
-

pcarew - Second Gear

- Posts: 166
- Joined: 30 Nov 2005
16 posts
• Page 1 of 2 • 1, 2
Total Online:
Users browsing this forum: Evante and 20 guests


