
Door hinge question
![]() Post by: bluesbrother30 » Sun Jan 29, 2012 6:15 pm
Post by: bluesbrother30 » Sun Jan 29, 2012 6:15 pm
Mike
- bluesbrother30
- Second Gear

- Posts: 172
- Joined: 28 Oct 2003
![]() Post by: garyeanderson » Sun Jan 29, 2012 7:21 pm
Post by: garyeanderson » Sun Jan 29, 2012 7:21 pm
Here is a photo, quality sucks but it the thought right?
The flat washers are thick wall - .125
The diameter is 1 1/4 I think, and there are two bolts 5/16 unc x 1 1/4 and two 1 1/2 long with a 5/16 lock washer.
One of the thick wall washers has a flat so that you can get a 3/4 socket on the jam tube that prevents the nylon pivot from backing out with each opening and closing of the door.
- Attachments
-
-
-
 Viewed 2041 times")
 Viewed 2041 times")
 Viewed 2041 times")
-

garyeanderson - Coveted Fifth Gear

- Posts: 2634
- Joined: 12 Sep 2003

![]() Post by: alexblack13 » Sun Jan 29, 2012 7:36 pm
Post by: alexblack13 » Sun Jan 29, 2012 7:36 pm
Height is via the hemispherical nylon pivots screwed into the Ali and locked with the lock-tube mentioned. There is a 1/4" square mortise into the nylon pivot that accepts a square drive down through the lock-tube allowing one to 'jack' the door up or down and adjust the fit to take out any 'rock' Carefully set up these work very well. Make sure the nylon pivots are nice and free turning before you fit to the door. Give them a coat of copperslip or similar to aid lubrication and stop seizure.
Best of luck and I hope we have answered your question..
Alex B.....
Now Sprintless!!
-

alexblack13 - Coveted Fifth Gear
- Posts: 2076
- Joined: 17 Oct 2007

![]() Post by: garyeanderson » Sun Jan 29, 2012 7:45 pm
Post by: garyeanderson » Sun Jan 29, 2012 7:45 pm
Don't take the 1/2 bolts out, end of story. Save your self some work. door adjustment with the new door seals will make you be very drunk and then it get worse...
elan-f14/elan-door-removal-don-mess-with-the-inch-bolts-t19282.html
-
garyeanderson - Coveted Fifth Gear
- Posts: 2634
- Joined: 12 Sep 2003
![]() Post by: alexblack13 » Sun Jan 29, 2012 8:34 pm
Post by: alexblack13 » Sun Jan 29, 2012 8:34 pm
Great advice again, but I suspect maybe to late..
I had no choice but remove the bottom hinge / holder, as the nylon bobbins were goosed and would not come out.
Bu***r that was.
Good timely and worth repeating advice from Gary there....
Al' ....
Now Sprintless!!
-
alexblack13 - Coveted Fifth Gear
- Posts: 2076
- Joined: 17 Oct 2007
![]() Post by: garyeanderson » Sun Jan 29, 2012 8:50 pm
Post by: garyeanderson » Sun Jan 29, 2012 8:50 pm
alexblack13 wrote::lol:
Great advice again, but I suspect maybe to late..Hope not..
I had no choice but remove the bottom hinge / holder, as the nylon bobbins were goosed and would not come out.
Bu***r that was.
Good timely and worth repeating advice from Gary there....
Al' ....
Maybe for Mike but not others that may have missed the post in the link. There a restoration or paint job started every month (a guess) and if I can save folks the aggravation of resetting the gaps of the doors then its worth being the most hated broken record on elan.net
ps - I would drill out the nylon pivot first before ever taking out the hinges again. That said many have been disassembled in the past and lost the "factory" alignment. How many did those guys do? Thousands? they were pros we are all rookies!
-
garyeanderson - Coveted Fifth Gear
- Posts: 2634
- Joined: 12 Sep 2003
![]() Post by: alexblack13 » Sun Jan 29, 2012 9:02 pm
Post by: alexblack13 » Sun Jan 29, 2012 9:02 pm
Option 1 redid mine. I supplied some new parts all fitted up into the hinges.. They reset the doors up of course onto the old door seals.
Add 1 new door seal and ........... Here we go again. Nightmare to get anywhere near correct ...
Do what the man says Guys..
Good idea re making certain bits of info into a sticky Gary.. Can it be done? OR... How about a top tips cat' ..?
Alex....
Now Sprintless!!
-
alexblack13 - Coveted Fifth Gear
- Posts: 2076
- Joined: 17 Oct 2007
![]() Post by: garyeanderson » Sun Jan 29, 2012 9:07 pm
Post by: garyeanderson » Sun Jan 29, 2012 9:07 pm
alexblack13 wrote:
Good idea re making certain bits of info into a sticky Gary.. Can it be done?
Alex....
When are you signing up to be a moderator
-
garyeanderson - Coveted Fifth Gear
- Posts: 2634
- Joined: 12 Sep 2003
![]() Post by: alexblack13 » Sun Jan 29, 2012 9:12 pm
Post by: alexblack13 » Sun Jan 29, 2012 9:12 pm
Better give the man his Thread back !!
Al' ....
Now Sprintless!!
-
alexblack13 - Coveted Fifth Gear
- Posts: 2076
- Joined: 17 Oct 2007
![]() Post by: gjz30075 » Sun Jan 29, 2012 9:20 pm
Post by: gjz30075 » Sun Jan 29, 2012 9:20 pm
I welded a small length of rod to a socket to make things easy.
Greg Z
45/0243K Sprint
45/7286 S3 SE DHC
-

gjz30075 - Coveted Fifth Gear
- Posts: 3022
- Joined: 12 Sep 2003

![]() Post by: alexblack13 » Sun Jan 29, 2012 9:37 pm
Post by: alexblack13 » Sun Jan 29, 2012 9:37 pm
HSS stock about 60MM long and had a socket on the top of that. The steel was also all the way into the mortise & the bugger still didn't shift!! Just rounded off the square hole as easy as you like. Pain in the a*se... New balls please! & more money!! I began to think it would never stop....
Happy days. Great advice again Greg ....
Al' .....
Now Sprintless!!
-
alexblack13 - Coveted Fifth Gear
- Posts: 2076
- Joined: 17 Oct 2007
![]() Post by: garyeanderson » Sun Jan 29, 2012 9:48 pm
Post by: garyeanderson » Sun Jan 29, 2012 9:48 pm
gjz30075 wrote:Another suggestion on the nylon bobbins: do not use a 1/4" drive extension to adjust the bobbin. You just can't get it deep enough and the detent ball on the extenstion spreads the nylon. Get a proper 1/4" square rod to fit in the hole. The hole is quite deep and allows for good 'drive'.
I welded a small length of rod to a socket to make things easy.
Greg Z
If you want to maintain the decent fit that you have (if its still good). If its already been messed with well it probably doesn't matter much. Every one pulls the doors off the easy way by unscrewing the 1/2 inch hex headed cap screws. This looses the acceptable factory fit and then when you add fat new door seals, the doors really look like crap. Here are some more photos of the tool and shows how it needs to be inserted fully to be effective.
The tool is 1/4 inch square tool stock, Not 6 mm is too loose a fit and may turn inside of the nylon pivot ball.
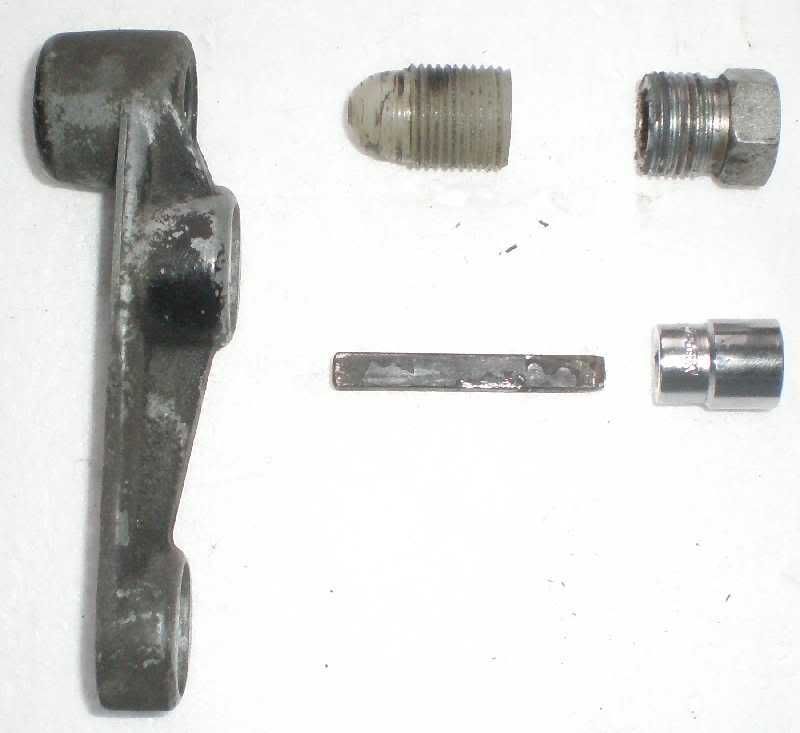
Tool is fully bottomed in the nylon pivot ball, this is around 3/4 inch (19mm) engagement so it should turn all but the most difficult ones.
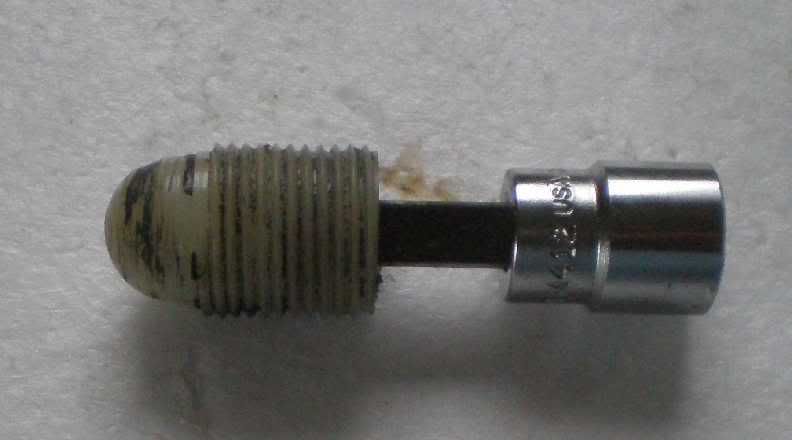
Sockets on the right of picture are a 5/16" twelve point 3/8 drive and a 1/4 inch drive by 3/8 inch square socket that I use with a 3/8" rachett

ready to engage, just touching.

engaged and fully bottomed.
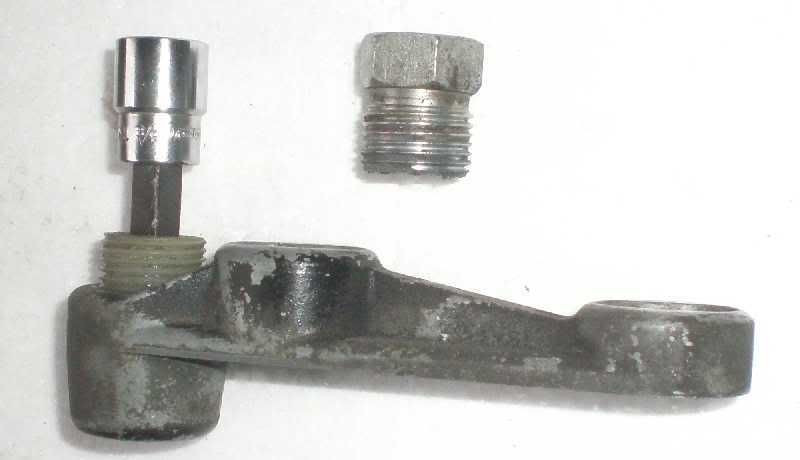
Start on the bottom hinge, first remove the jam nut with a 3/4 inch socket. Once you have access to the Nylon pivot ball then insert the 1/4 inch bit of square tool stock and then the socket over that.If the nylon ball doesn't turn left try to the right initially, you are just trying to loosen it first, use a light oil on the nylon threads but, try not to get it in the 1/4 inch square hole in the nylon pivot. Once it's loose work it back and forth untill the nylon ball is nearly flush with the bottom of the door and pull out at the bottom. The door should come away and start to drop. Set the first door aside and start on the other. If I am lucky enough to get both doors off like this I leave the both Alloy hinge castings bolted in place and I never even touch the top pivot at all. A little masking tape over them for painting is all.
Gary
If I am going to be a broken record I might as well repeat myself
-
garyeanderson - Coveted Fifth Gear
- Posts: 2634
- Joined: 12 Sep 2003
![]() Post by: alexblack13 » Sun Jan 29, 2012 9:55 pm
Post by: alexblack13 » Sun Jan 29, 2012 9:55 pm
AB..
Now Sprintless!!
-
alexblack13 - Coveted Fifth Gear
- Posts: 2076
- Joined: 17 Oct 2007
![]() Post by: bluesbrother30 » Sun Jan 29, 2012 11:02 pm
Post by: bluesbrother30 » Sun Jan 29, 2012 11:02 pm
Yea, coulda, woulda, shoulda...........read posts before tackling a job. I do now. But then again, my hinges have been a plastic bag for several years. At least I kept all the parts together. I have one door back on the car and will have the second as soon as the wife returns to assist. Gary, I can see why you really dont want to take the hinges themselves out.............oh my gawd. Going to someone way better than me to help with the "correct" adjustment. The plastic adjustment screws are a bit lopsided. New ones to be ordered in the morning. I did not have a piece of the 1/4 inch stock on hand so I used a 1/4 drive extension. But I can see Alex that if you do not get it "snapped" all the way into the adjusters, then you have other troubles. Hardware store in the morning.........what are you using for a "socket" on the end of of the 1/4 stock? Do they make a something with a "square" hole??
mike
- bluesbrother30
- Second Gear
- Posts: 172
- Joined: 28 Oct 2003
![]() Post by: garyeanderson » Sun Jan 29, 2012 11:58 pm
Post by: garyeanderson » Sun Jan 29, 2012 11:58 pm
The sockets are (on the right) a 5/16 inch 12 point that gives a sloppy fit on the 1/4 key stock (think pulley or sheave). The other (on the left) socket is a 1/4 inch drive 3/8 inch 8 point (for pipe plugs). The tool stock in my case was a letter punch that was in a machinist tool chest I picked up, I ground away most of the taper so it fit nicely.
Once they are loose I use a 1/4 inch extension for re-assembly where the nylon pivot will spin with your fingers.
- Attachments
-
 Viewed 1960 times")
-
garyeanderson - Coveted Fifth Gear
- Posts: 2634
- Joined: 12 Sep 2003
Total Online:
Users browsing this forum: lotusfan and 11 guests