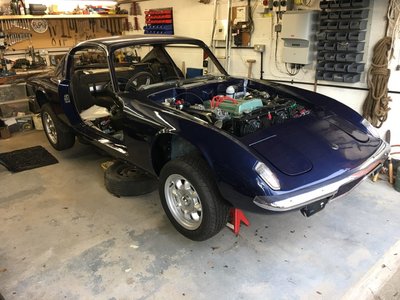
Remove and re-use original chrome windscreen trim?
21 posts
• Page 2 of 2 • 1, 2
Bigbaldybloke wrote:Thanks for that great write up TeeJay, once I?ve fitted my new headlining that?s my next job and I?ve sort of been putting it off, but now feel much more confident about doing it.
Your very welcome, hope your windscreen fitting goes as well as mine did.
How far away are you from completion, mine only took 7 years.
Trevor
1968 Elan +2 50/0173
1968 Elan +2 50/0173
-

TeeJay - Fourth Gear

- Posts: 540
- Joined: 30 May 2007
35 years and counting! Complete nut and bolt rebuild with house and job moves chucked if for good measure. Mostly back together now, engine runs, all electrics except rev counter working. Small leak on clutch slave cylinder and a weep on the fuel tank connection to fix them it?s only the trimming to go!
Change is inevitable, except from a vending machine!
- Bigbaldybloke
- Fourth Gear

- Posts: 889
- Joined: 16 May 2017
That is just looking great; it?s a good feeling reaching that stage of a complete nuts and bolts restoration.
BUT, as you say ?it's only the trimming to go!?
Yes I was at that stage and ended up making a new rear parcel shelf, two door cards, panel at rear of fuel tank and two heater valance cards. (Both sides of tunnel), before fitting new felt, carpets etc.
It was all good, because each item replaced just added to the finished appearance.
All the best in your progress to completion.
My apologies to the OP for the Topic drift.
Trevor
1968 Elan +2 50/0173
1968 Elan +2 50/0173
-

TeeJay - Fourth Gear

- Posts: 540
- Joined: 30 May 2007
I’d just like to report back via this thread on (partial) success in replacing my 1969 +2S windscreen with the stainless steel trim. I got a replacement seal from the Ford Classic and Capri Owners Club who have a source in Australia and supplied a seal very quickly. On examination the replacement seal seemed very high quality and identical to the old seal. However I found it quite impossible to fit the screen with the new rubber, and eventually had to revert to the original (which fortunately was in a reasonable state if a bit hard).
I tried a number of things to try to make the screen fit with the new rubber (using the original screen). After the body was re-surfaced and re-sprayed, the lip of the body aperture had grown slightly and was irregular, so I went round and filed back the edges to no more that 10mm (including head lining) (pic 1). In some places the edge of the aperture was quite thick, so again I went round and reduced it to max around 2mm. I also found that it was necessary to ensure that the rubber seal and the trim were precisely symmetrical, as with a new flexible seal it is quite possible to get quite a bit of misalignment (pic 2). To do this I marked the centre of the windscreen aperture on the bodywork with a piece of masking tape, and marked centre line and position of the bottom corners on the screen (pic 3). This enabled the screen + rubber + trim assembly to be as accurate as possible. The trim also should be checked as, although it is very strong, it could make things difficult if it is distorted.
However still no success on trying to fit the screen, I could get the internal lip of the rubber to lap over the headlining and screen aperture, but only just. Despite extensive wiggling and applying a lot of pressure on the screen it would still not drop into place, leaving me with a screen which would pop out if I slammed the door. I could get the screen in place with the new rubber without the trim, but inserting the trim with the screen in place was impossible.
On reverting to the old rubber seal it fitted first time using the trusty string method. Having spent months trying various approaches I’m going to leave it as it, for the moment.
My conclusion is that either the new rubber seal is not an exact match, or that re-surfacing of the car body has changed the shape of the windscreen aperture. Measuring up the two seals seems to indicate that the new rubber is slightly thicker, so a bit tighter between the screen and the body aperture, and re-surfacing may have made this worse.
- andywatts
- First Gear

- Posts: 34
- Joined: 08 Jul 2010
On TVR "M" series cars the Windscreen is the same from ford Capri/Classic.
What many people do is use 4 pieces of rubber Seal to temporary put the Screen in place. That way you can see if the aperture in the Body needs trimming for example in the corners. Also some times the width of the seal is correct but the groove for the Glass or Body is not deep enough. This means the rubber in the middle between the edge of body and edge of glass is too big.
Alan
Alan.b Brittany 1972 elan sprint fhc Lagoon Blue 0460E
- alan.barker
- Coveted Fifth Gear

- Posts: 3754
- Joined: 06 Dec 2008
Just refitting my +2S windscreen for the 4th time. The first time ( long time ago) I fitted the screen and rubber, and then fitted the chrome trim. That was very difficult and ended up putting slight dents in the curved chrome surface. But it kept well sealed for years. When I refitted this screen again after a respray I fitted the chrome before fitting the complete assembly to the opening, and used a sash chord to pull in the seal lip, but no sealing compound. Also sealed well.
I did the same when fitting a replacement screen recently ( due to de-lamination ) Very shortly it popped out on one side, possible fitted off-centre. I am now going to take Andywatts's tip and mark the centres.
I found out the the curve on the SS trims did not match the glass edges, so a few more 'V' notches and slight bending was required.
I use 3 concrete blocks on the windscreen when fitting to put some weight on it, with some carpet to protect the glass from being scratched.
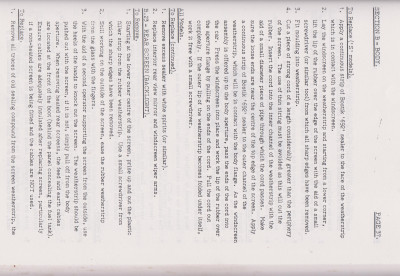
So I've been searching the lotuselan.net for any tips to do this job better. I took out the Factory Manual which describes fitting the chrome trim first. Also recommends using Bostik '692' sealer on the lip in contact with the outside of the opening. I'd say this could be messy if using a sash chord.
I have attached the page from the Workshop ManuaI as I have not seen it quoted before.
I would welcome any further updates or tips.
68 Elan +2, 70 Elan +2s
-

Foxie - Coveted Fifth Gear

- Posts: 1209
- Joined: 20 Sep 2003
21 posts
• Page 2 of 2 • 1, 2
Total Online:
Users browsing this forum: jebracing and 26 guests


