Gear knob restoration
44 posts
• Page 2 of 3 • 1, 2, 3
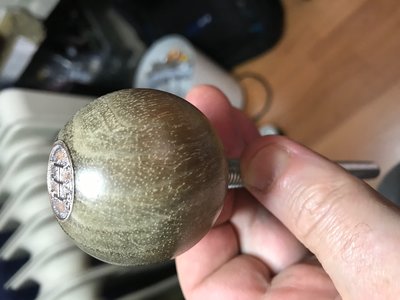
It looks like this now:
The colour is coming back as the meths dries, and it has got a shine (nothing to do with polish). I might try that boiling water trick as it could dislodge some of the fine sanding dust from the grains. I guess those little white dots are the ends of the grains (which should disappear when it is stained).
The colour is coming back as the meths dries, and it has got a shine (nothing to do with polish). I might try that boiling water trick as it could dislodge some of the fine sanding dust from the grains. I guess those little white dots are the ends of the grains (which should disappear when it is stained).
-

JonB - Coveted Fifth Gear

- Posts: 2358
- Joined: 14 Nov 2017
I would not stain, but would use BLO or, preferably, pure tung oil to bring out the color and make the grain pop. Not sure what your standing process has been, but to get to your point I would have started with 120 or 240 and progressed grit by grit through at least 600, probably 1000. At each grit I would have started across the grain then finished with the grain before progressing to the next. This would leave a uniform, visible scratch free surface, as yours appears to be in the photo.
I prefer pure tung oil (be careful, things labeled tung oil in the hardware store are often not tung oil but more like Danish oil, a mixture of linseed and varnishes) because it does naturally harden (linseed oil doesn't on its own) and is a bit less yellowing. Like linseed oil, it is a penetrating oil, and it does take time to cure fully. Tung oil likes to be rubbed in, warmth from friction a benefit, so my application would be to wetsand with tung oil starting at the highest grit used dry sanding and progressing through a couple more grits. Allow the knob to drip and start to flash dry after each grit (probably 30 minutes or so), then wipe off the excess and allow to dry for 24 hours before next coat and grit. The final (3rd or 4th) "coat" can be wiped in with a lint free cloth, with the same drying process. Pure tung oil will be dry to the touch within hours, ready for next oiling in 12-24 hours, and fully cured between 15 and 30 days depending on temp and humidity. Naturally has a beautiful low sheen that is water resistant and can be renewed in the future with another coat (I use it for duck calls that get a lot of exposure), but once fully cured could be topped with a high gloss finish if that is your preference.
I prefer pure tung oil (be careful, things labeled tung oil in the hardware store are often not tung oil but more like Danish oil, a mixture of linseed and varnishes) because it does naturally harden (linseed oil doesn't on its own) and is a bit less yellowing. Like linseed oil, it is a penetrating oil, and it does take time to cure fully. Tung oil likes to be rubbed in, warmth from friction a benefit, so my application would be to wetsand with tung oil starting at the highest grit used dry sanding and progressing through a couple more grits. Allow the knob to drip and start to flash dry after each grit (probably 30 minutes or so), then wipe off the excess and allow to dry for 24 hours before next coat and grit. The final (3rd or 4th) "coat" can be wiped in with a lint free cloth, with the same drying process. Pure tung oil will be dry to the touch within hours, ready for next oiling in 12-24 hours, and fully cured between 15 and 30 days depending on temp and humidity. Naturally has a beautiful low sheen that is water resistant and can be renewed in the future with another coat (I use it for duck calls that get a lot of exposure), but once fully cured could be topped with a high gloss finish if that is your preference.
Henry
69 Elan S4
65 Seven S2
69 Elan S4
65 Seven S2
- SENC
- Coveted Fifth Gear

- Posts: 1017
- Joined: 30 Dec 2015
So far I have resisted the temptation to oil the knob because I am worried that sweat and dirt would get pressed into it in use; this is why I am thinking of doing what Serge did in his video (spray with clear coat after staining) . He's achieved an impressive, super shiny finish that I reckon will go well with my impressive, super shiny dashboard (once it's fitted, but that is another story). But as he is not using it yet, we do not know how durable it is in daily use.
About sanding - I started with 200 grade and spun the knob in a slow drill. there are scratches but they're out of sight at the bottom of the ball. I then progressed to a much finder wet&dry (not sure the grade but it is very fine) and this seems to have done the trick. In the picture the finish looks very grey but in practice it is much more natural.
I'm a bit wary of sanding it too much as I do not want to damage the shift gate indicator on the top. It has nice shiny copper letters at the moment, if I strike through that layer with too much sanding it'll be ruined.
-

JonB - Coveted Fifth Gear

- Posts: 2358
- Joined: 14 Nov 2017
I used oxalic acid, would bleach, to get the color consistent in terms of the griminess and all and with this I think you don?t risk getting the white powder in the grain and I don?t know if you could reverse a little and go back to that at this point but after that then it was a matter of just coming forward with the various sandpaper grains and the final finish and no staining involved yet still getting the final grain and color to it Gordon Sauer
- Gordon Sauer
- Fourth Gear

- Posts: 608
- Joined: 20 Aug 2004
John,
I had a similar experience to Grizzly, I drilled through from the gear stick side, and full of trepidation, pushed the badge out and was amazed how easily the badge came out. I used Vaughtons (Birmingham) to refinish the badge, I also used a local wood turner to make new knob. In the end I chose to use the old knob, as it seemed more appropriate with the age of the car.
Richard Hawkins
- RichardHawkins
- Coveted Fifth Gear

- Posts: 1268
- Joined: 05 Jul 2008
Gotcha.
Yes, you are seeing end grain. One warning, end grain absorbs more stain and finish, so you may get some different color tones/intensity. This is a little easier to deal with on flat wood, you can simply sand the end grain more to burnish it and keep it from absorbing as much. You could attempt to progressively do the same on your knob. Alternatively, you can use a sanding sealer as appropriate for your finish.
A final note, since you wetted the knob you almost certainly raised the grain. You can knock that back with a light sanding, finishing with the grain. If your stain/finish is water-based it will likely raise the grain again, though less so - if it does, you can lightly sand after first finish, being careful not to sand through that coat.
Henry
69 Elan S4
65 Seven S2
69 Elan S4
65 Seven S2
- SENC
- Coveted Fifth Gear

- Posts: 1017
- Joined: 30 Dec 2015
Little off the subject, but is the LOTUS colored emblem available for the shift knob? Mine has gone wandering.
Greg
Greg
'67 s3 SS
'72 +2 S130
'72 +2 S130
- Greg Foster
- Second Gear

- Posts: 219
- Joined: 15 Sep 2003
Greg Foster wrote:Little off the subject, but is the LOTUS colored emblem available for the shift knob? Mine has gone wandering.
Greg
Haven't seen the shift pattern badge for sale, but this https://www.ebay.co.uk/itm/Lotus-Elan-2-Europa-NOS-Original-Gear-Knob-BADGE1966-1969/192930597781?hash=item2ceb8f4b95:g:ubgAAOSw8BRc7Cwg might do.
Phil Harrison
1972 Elan Sprint 0260K
1972 Elan Sprint 0260K
-

pharriso - Coveted Fifth Gear

- Posts: 3186
- Joined: 15 Sep 2010
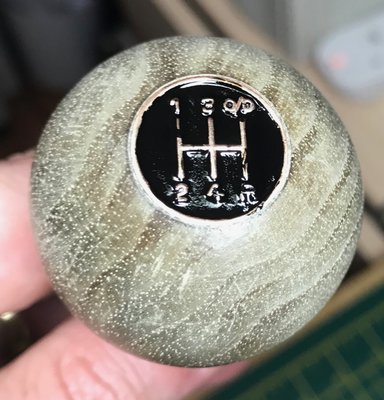
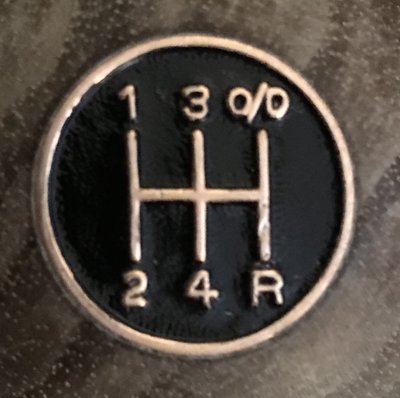
I'm fairly happy with the wood now, so let's try to restore the shift pattern badge. I took a rattle can of Plasti-kote black enamel and sprayed some of it into the tin's cap, then used a dental pick to apply it to the badge. This doesn't work too well with the tip of the pick, but laying the curved bit down on the badge results in a good deposit of paint, which can then be spread into the nooks and crannies.
This picture is before the paint has dried and I will be cleaning it up to reveal the partially obscured parts. I'm quite pleased with the black / copper colour scheme. Oh, what the heck - I had a little go with the pick while the paint was still soft.. it will be improved but for now the paint must cure as it is too easy to damage when soft and you are scraping around with a hand tool.
Once all this is done and the wood is stained, it'll be several coats of clear coat as Serge's video shows (including over the shift pattern).
-

JonB - Coveted Fifth Gear

- Posts: 2358
- Joined: 14 Nov 2017
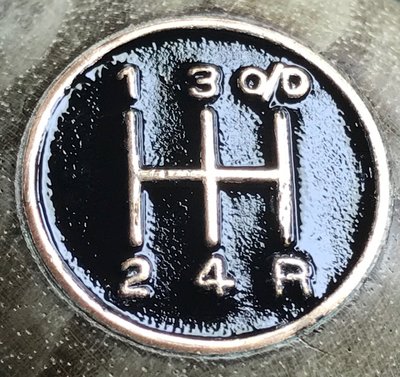
After a night in the airing cupboard, the paint is dry. I've been able to clean up the excess paint quite a bit and the top looks like this now.
I think this is good enough - any more fettling and I am bound to damage the paint. Don't be fooled by the reflections and close up blemishes; it looks great to the naked eye.
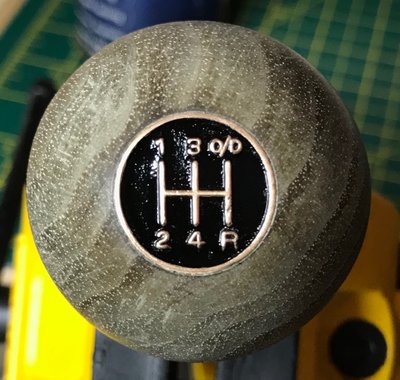
Actually - here's a better picture.
Next up: dye and lacquer the wood.
I think this is good enough - any more fettling and I am bound to damage the paint. Don't be fooled by the reflections and close up blemishes; it looks great to the naked eye.
Actually - here's a better picture.
Next up: dye and lacquer the wood.
-

JonB - Coveted Fifth Gear

- Posts: 2358
- Joined: 14 Nov 2017
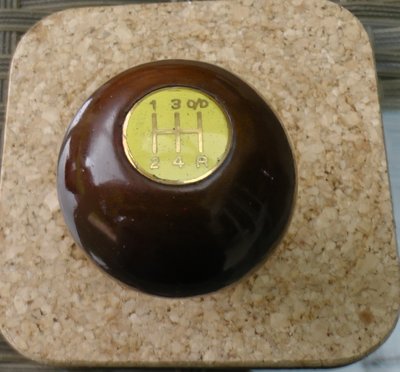
Just to confuse things - the background on my gearknob is yellow.
- vincereynard
- Coveted Fifth Gear

- Posts: 1071
- Joined: 12 Jan 2015
elanfan1 wrote:You need to get that looked at pronto!
I was wondering who would be the first......
- vincereynard
- Coveted Fifth Gear

- Posts: 1071
- Joined: 12 Jan 2015
JonB wrote:vincereynard wrote:Just to confuse things - the background on my gearknob is yellow.
Yours has a Lotus logo on it, not a gate pattern, no? And it is an aftermarket aluminium part, IIRC..
That would just be being facetious, I would never do that!
The ali. one is just a spare I was playing with - to see if it made any difference.
- vincereynard
- Coveted Fifth Gear

- Posts: 1071
- Joined: 12 Jan 2015
44 posts
• Page 2 of 3 • 1, 2, 3
Total Online:
Users browsing this forum: No registered users and 24 guests

