Attaching the bonnet
7 posts
• Page 1 of 1
Hi,
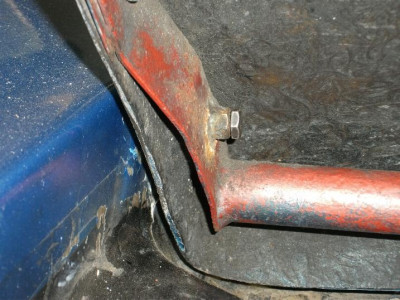
Many years ago the mid nose section of my car was replaced and whoever did the work wasn't through. It looks like they just drilled the shell, ran the bonnet bolt into the holes and hoped for the best. Over time the holes have grown and the bonnet is not secured properly; see attached picture.
My question is how should the bonnet be correctly secured to the body? I think there should be bobbins in the shell and the bonnet bolts secured in and hoping the group can confirm this or provide the answer.
If the answer is bobbin, what size 7/16, 5/8 or ? and any recommendations on where to get the necessary bits from.
Many thanks
Brian
- bg109685a
- New-tral
- Posts: 5
- Joined: 18 Aug 2023
The original fitting was a 7/16" UNC bolt which was threaded through the tapped bonnet and shell bobbins. Like the headlamp pods, the bobbins soon wore down badly.
I brazed a 7/16 UNC nut in the bonnet reinforcing metal frame. A 7/16 bolt from this goes through the bonnet bobbin into the shell bobbin, which was filled and drilled to compensate for wear. It does not need to be tapped, as the bolt is secured by tightening into the brazed nut.
I originally did both sides, but later fitted a spring loaded plunger on one side. I now can remove and refit the bonnet in seconds.
68 Elan +2, 70 Elan +2s
-

Foxie - Coveted Fifth Gear

- Posts: 1209
- Joined: 20 Sep 2003
Thank you both for the responses.
@Foxie, I like what you have done and may opt for something similar.
Have ordered some bobbins and will be reinstating the body bobbins when they arrive.
Back to trying to strip the bitumen paint smothering the engine bay
Brian
@Foxie, I like what you have done and may opt for something similar.
Have ordered some bobbins and will be reinstating the body bobbins when they arrive.
Back to trying to strip the bitumen paint smothering the engine bay
Brian
- bg109685a
- New-tral
- Posts: 5
- Joined: 18 Aug 2023
Foxie wrote:Also a P-clip to secure the bonnet stay rather than a nut.
The threads of both the stud and the nut on my car are so full of crud that I can twist the nut on by hand and it'll stay put, and also easily remove it by hand. The best of both worlds!
1970 Elan Plus 2 (not S) 50/2036
2012 BMW R1200GS
"It just wouldn't be a complete day if I didn't forget something!" -Me
2012 BMW R1200GS
"It just wouldn't be a complete day if I didn't forget something!" -Me
-

The Veg - Coveted Fifth Gear

- Posts: 2185
- Joined: 16 Nov 2015
7 posts
• Page 1 of 1
Total Online:
Users browsing this forum: No registered users and 16 guests

