Bobbins
10 posts
• Page 1 of 1
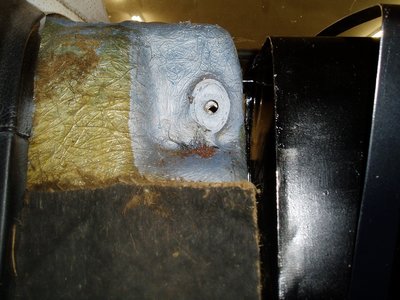
I was about to reinstall the brace behind the rear seat and find that the bobbin seems to be out of alignment. I removed the brace some time ago but haven t touched anything in the bobbin area. I tried to move it with a punch but no luck. Being unfamiliar with the bobbin concept, I've no idea what's wrong.
Tom
Tom
- TomMull
- Second Gear

- Posts: 120
- Joined: 01 Oct 2018
The bobbin is simply a round or oval bit of alloy with a grooved outer edge and a hole (threaded in this case) in the middle. They are glassed into the body - IIRC the workshop manual shows how to fit them. Does yours move if you wiggle the hole with punch? If so it looks to have become loose in the glass fibre. If not its just glassed in at a bit of an angle - there should be a bit of wiggle room when bolting in the brace.
Matthew Vale - Classic Motoring Author
1968 Plus 2 - Somewhat cosmetically and mechanically modified
1969 Plus 2S - Currently undergoing nut and bolt restoration
Visit me on matthewvale.com
1968 Plus 2 - Somewhat cosmetically and mechanically modified
1969 Plus 2S - Currently undergoing nut and bolt restoration
Visit me on matthewvale.com
-

Matt Elan - Fourth Gear

- Posts: 604
- Joined: 27 Oct 2011
That looks to be a +2 rear brace/body mount bobbin? If so it doesn?t have threads but the hole in the chassis behind it does. Looks like you need to jiggle the body a little to re- align the the holes. You could use something round like a punch to put through the holes and lever them about but, be careful not to damage the threads!
- vxah
- Third Gear

- Posts: 380
- Joined: 08 Nov 2012
vxah wrote:That looks to be a +2 rear brace/body mount bobbin? If so it doesn?t have threads but the hole in the chassis behind it does. Looks like you need to jiggle the body a little to re- align the the holes. You could use something round like a punch to put through the holes and lever them about but, be careful not to damage the threads!
Yup, it is a Plus 2 and I came to the same conclusion after I posted. It seems to be quite happy in its new configuration though and the tapered punch hasn't yet worked. I'll continue to coax the body a bit. I wasn't smart enough to put the bolt back in when I removed the brace (the other side when in without trouble). Thanks for the reply.
Tom
- TomMull
- Second Gear

- Posts: 120
- Joined: 01 Oct 2018
If the brace is off for a while things can settle a bit. I found that a little careful upward pressure on the jacking-points brought the holes back into alignment.
1970 Elan Plus 2 (not S) 50/2036
2012 BMW R1200GS
"It just wouldn't be a complete day if I didn't forget something!" -Me
2012 BMW R1200GS
"It just wouldn't be a complete day if I didn't forget something!" -Me
-

The Veg - Coveted Fifth Gear

- Posts: 2188
- Joined: 16 Nov 2015
I would drill the clearance a bit bigger in the Bobbin. Then when you refit the Brace the Body there will be no stress.
BUT thinking about it how is your Car supported at the moment, evenly i hope and not jacked up on one side only


Alan
BUT thinking about it how is your Car supported at the moment, evenly i hope and not jacked up on one side only
Alan
Alan.b Brittany 1972 elan sprint fhc Lagoon Blue 0460E
- alan.barker
- Coveted Fifth Gear

- Posts: 3757
- Joined: 06 Dec 2008
I built a couple of metal beams that are shimmed at the rusty jacking points and at the chassis when the car was on its wheels, and the car, with those beams, is on a lift. Still got some movement apparently.
I'll be fitting a new chassis in the near future so would rather not enlarge the holes in the body.
Thanks for the replies.
Tom
I'll be fitting a new chassis in the near future so would rather not enlarge the holes in the body.
Thanks for the replies.
Tom
- TomMull
- Second Gear

- Posts: 120
- Joined: 01 Oct 2018
Thanks to all I managed to fit the beam. The vertical alignment was relatively easy as I could move it by jacking the body under it. The horizontal was not so easy requiring significant force on a tapered punch as I could find no way to jack the body side to side. I dressed the threads with a tap afterward. Seems ok.
All this does make fitting the new chassis (this winter's project) a bit more daunting than I'd hoped.
Tom
All this does make fitting the new chassis (this winter's project) a bit more daunting than I'd hoped.
Tom
- TomMull
- Second Gear

- Posts: 120
- Joined: 01 Oct 2018
10 posts
• Page 1 of 1
Total Online:
Users browsing this forum: No registered users and 20 guests

