Gear knob restoration
44 posts
• Page 1 of 3 • 1, 2, 3
Not sure this is the right area in the forum, but here goes...
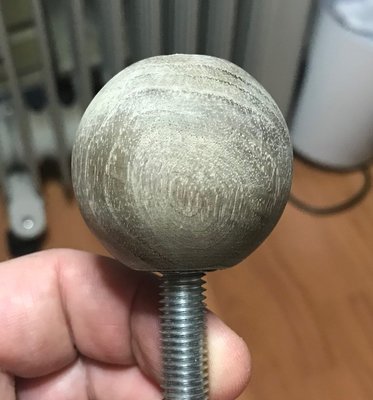
The wooden gearshift knob on my Plus 2 is looking a bit sorry for itself. About half of the lacquer has worn off the top and the wood is ingrained with dirt and sweat.
It's quite sticky (yuck!) so I decided to try and fix it. I've been following a restoration series on YooooTooob by a guy called Serge Sleurs who has an Europa and in this video he shows how he restored his gear knob.
https://www.youtube.com/watch?v=A1ykpfB-tks
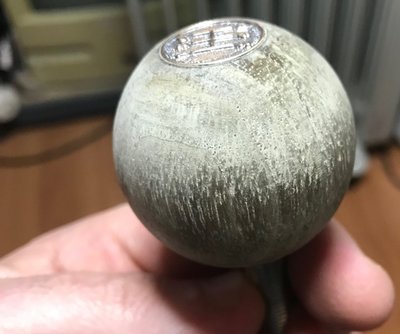
I thoght I'd give it a try. So far I sanded all the old varnish off and cleaned the knob with a kitchen cleaner that contains bleach (about three times, letting the wood dry off between successive scrubbings). Finally, finishing the prep work with fine grade wet & dry (used dry of course) to leave a nice smooth finish which feels very tactile. As Serge found, the wood goes a bit grey so I will do what he has done and use a water based light oak wood stain to bring out the grain.
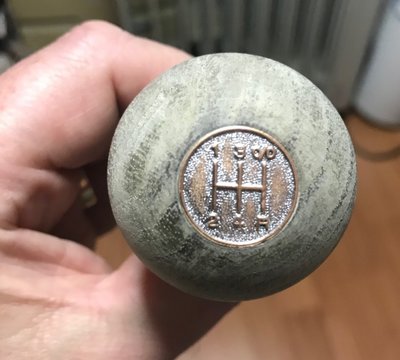
The problem is the little metal badge on the top. It looks to be some sort of plated metal, possibly copper. I cannot see a way to remove it without damaging the surrounding wood (it's a very close fit as you can see).
I thought I could attempt to fill the recessed parts of the decal with black paint using a syringe as Serge does with the ELAN badges in another video, but this would not look original. Problem is, it's copper coloured now so not original anyway.
Any other options?
-

JonB - Coveted Fifth Gear

- Posts: 2358
- Joined: 14 Nov 2017
JonB wrote:I thought I could attempt to fill the recessed parts of the decal with black paint using a syringe as Serge does with the ELAN badges in another video, but this would not look original. Problem is, it's copper coloured now so not original anyway.
Any other options?
that is what I did to mine, the original one having been "lost" by a usual suspect in charge of the overhaul: I don't think the copper color would show all that much when the black is applied, but if most of the silver plating has gone and you want a silver lettering you should be able to take the badge out for chroming or other metal deposition (possibly even painting but not as durable, and when you've gone to that trouble...) then apply black paint in the recess. It took me a fine sewing needle to pull the paint into the small corners, I'm not sure I could have done it with a needle (then depending on the paint used one should be able to clean up small details before it fully cures).
S4SE 36/8198
-

nmauduit - Coveted Fifth Gear

- Posts: 1998
- Joined: 02 Sep 2013
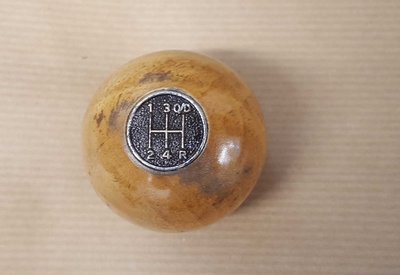
I used a black permanent marker and a silver metallic marker to get the gate pattern insert looking more original. then lacquered over the whole thing.
Kindest regards
Alan Thomas
Alan Thomas
-

Spyder fan - Coveted Fifth Gear

- Posts: 2019
- Joined: 11 Jun 2009
Yes, that's correct. This gear knob was first used on the +2S 130/5, subsequently on other models that used the 5 speed box.
Kindest regards
Alan Thomas
Alan Thomas
-

Spyder fan - Coveted Fifth Gear

- Posts: 2019
- Joined: 11 Jun 2009
Really easy to remove the badge, Turn it over (badge down) then drill a 2mm hole in the bottom of the threaded brass insert with a old blunt drill bit (so the hole is under the badge) and as soon as you feel it go through the soft wood stop, usually the drill bit just pushes the badge off at that point anyway but if it doesn't you just use a small screw driver etc to push it via the small hole and it will come off surprisingly easily thanks to the 40+ year old glue holding it on. The metal plate on the top is recessed at least 2mm into the wood (it's like a coin when you remove it).
It's worth taking it off if only to use fresh glue to hold it down.
It's worth taking it off if only to use fresh glue to hold it down.
Chris
-

Grizzly - Coveted Fifth Gear

- Posts: 1862
- Joined: 13 Jun 2010
Alan, yours looks better than mine - I presume that picture is before lacquering? The wood seems very light. Mine is quite dark (when wet, so likely to be similar when sprayed with clear coat) but that is OK as my new dashboard is likewise very dark. The old dash is much lighter but I imagine the ageing effects of the sun had a lot to do with it.
So was the gate shift decoration having a black background to begin with?
@Grizzly - I thought about drilling it but wasn't sure how easily it'd come out. I'm not sure I could be bothered with getting it plated again.. Alan's looks OK to me. There's another alternative and that is to leave the lettering as copper (I agree it is a plating artefact), clean it up and drag paint into all the nooks and crannies, then clear coat the lot.
-

JonB - Coveted Fifth Gear

- Posts: 2358
- Joined: 14 Nov 2017
You could send the emblem to Fattorini in Birmingham to replace and finish but would probably be cost prohibitive. I found the wood really hard, I was screwing a screw into mine and it was so tough I was putting a lot of effort in then slipped and gouged my hand. 2 weeks of antibiotics and still got the scar 
Before putting any stain on that I?d give it a good wipe over with something like methylated spirit as the white is almost certainly ingrained dust.
Before putting any stain on that I?d give it a good wipe over with something like methylated spirit as the white is almost certainly ingrained dust.
Steve
Silence is Golden; Duct Tape is Silver
Silence is Golden; Duct Tape is Silver
-

elanfan1 - Coveted Fifth Gear

- Posts: 1720
- Joined: 13 Jan 2004
JonB wrote:@Grizzly - I thought about drilling it but wasn't sure how easily it'd come out. I'm not sure I could be bothered with getting it plated again.. Alan's looks OK to me. There's another alternative and that is to leave the lettering as copper (I agree it is a plating artefact), clean it up and drag paint into all the nooks and crannies, then clear coat the lot.
When i did mine the badge was quite worn, the brass had started coming through round the edge so painted it all black then flatted the rest of the chrome off the letters with 2000's (so it was all brass).
Chris
-

Grizzly - Coveted Fifth Gear

- Posts: 1862
- Joined: 13 Jun 2010
elanfan1 wrote: I found the wood really hard, I was screwing a screw into mine and it was so tough I was putting a lot of effort in then slipped and gouged my hand. 2 weeks of antibiotics and still got the scar
Using a screw risks cracking the gear knob (ask how i know that
When i did mine i spent ages flatting it the first time, second time i stuck the threaded bar in a drill and spun it wile sanding (took about a minute to fully sand it) just don't go mad.
Also first time i used 2k car clear and to be honest it chipped really easy (especially if you wear rings), i then went to a brush on Rustins 2 part Urethane (recommended by the guy we use for re-veneering) and although the finish looks a bit plastic it's really tough.
Chris
-

Grizzly - Coveted Fifth Gear

- Posts: 1862
- Joined: 13 Jun 2010
A little trick for bringing out the grain is to quickly pour some boiling water over it, let it dry, which will be pretty quick. This 'fluffs up' the grain and it will feel slightly rough again. then give it another sand, i use 320 then water and sand again until it stays smooth after the boiling water. I go down to 500 grit with this process.
Made lots of canoe paddles with this process with an excellent finish. Also did my gearknob and steerin wheel (motolita) and used boiled linseed oil applied in maybe 5 coats with fine wire wool which works it in, wipe off the excess after applying otherwise it goes sticky.
My gearknob is very dark, so not much graining is visible, but it feels lovely, better than varnish or laquer in my opinion, very tactile.
- pptom
- Second Gear

- Posts: 116
- Joined: 31 May 2018
44 posts
• Page 1 of 3 • 1, 2, 3
Total Online:
Users browsing this forum: No registered users and 32 guests


