Plus 2 Dashboard
12 posts
• Page 1 of 1
Hi
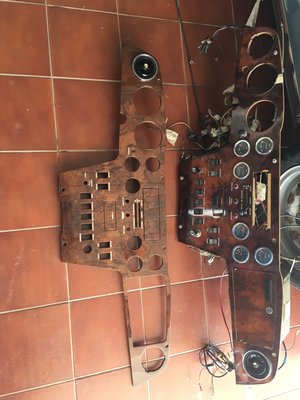
I have a new Dashboard for my plus 2, but the new Dashboard don?t have the hole for the Bonnet cable.
I have 2 options:
- make a new hole. This is the best option but I can damage the dashboard.
- look for a new place for the bonnet cable.
Has someone the same Problem?
Regards
Diego
I have a new Dashboard for my plus 2, but the new Dashboard don?t have the hole for the Bonnet cable.
I have 2 options:
- make a new hole. This is the best option but I can damage the dashboard.
- look for a new place for the bonnet cable.
Has someone the same Problem?
Regards
Diego
- Dieschelan
- Second Gear

- Posts: 217
- Joined: 07 May 2015
Earlier cars (Pre S130?) had the bonnet release below the dash. I asked a similar question recently because I intend to use the S130 position for the ignition switch.
lotus-chassis-f36/dash-options-t43233.html?hilit=dash#p306050
I would drill carefully. Do you have a pillar drill? In any case, I would probably clamp a thin piece of ply over the dash and drill through both to avoid any damage by slipping and get a clean edge to the hole. Obviously you have to be careful with positioning the hole too.
- mikealdren
- Coveted Fifth Gear

- Posts: 1194
- Joined: 26 Aug 2006
TVR from same era used a bracket bolted to the steering colum mount bolt for the choke cable. Hidden under dash you would never notice if you did the same for the bonnet release
-

LaikaTheDog - Third Gear

- Posts: 306
- Joined: 29 Oct 2003
The three examples shown in the manual are all mounted on a bracket below the dash board. That does not mean it's correct but!
The non S early car (RHD) is to the right of the column.
The RHD S is to the left of the column.
The federal LHD just to the right of the column.
If you want a copy of the pages PM me your email add.
Cheers
John
The non S early car (RHD) is to the right of the column.
The RHD S is to the left of the column.
The federal LHD just to the right of the column.
If you want a copy of the pages PM me your email add.
Cheers
John
- elanman999
- Fourth Gear

- Posts: 500
- Joined: 12 Nov 2005
Drilling the dash is definitely a heart in mouth moment, however not so bad as you imagine. I did my glovebox lid lock which is glossy both sides. A pilot hole and cut from both sides. I clamped wood as well. The oe 68 +2 has a bracket which is easy to make ..
1968 Elan plus 2 - project
2007 Elise S2 [modified with a Hethel 70th sticker (yellow)]
2000 Elise S1 - Sold
2007 Elise S2 [modified with a Hethel 70th sticker (yellow)]
2000 Elise S1 - Sold
- wotsisname
- Third Gear

- Posts: 452
- Joined: 24 Jun 2015
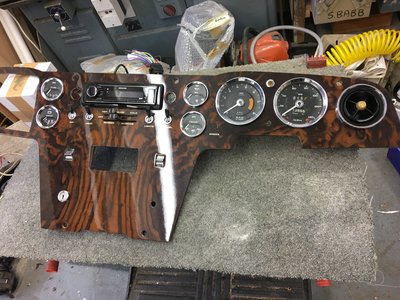
My early plus 2 replacement dash came with a couple of holes missing one of which was indeed the bonnet release hole. I was very nervous about drilling them but in the end it was quite easy. I used the original dash as a template to mark out where the holes should be. I then used a piece of scrap alloy sheet to make a protective template, this had a hole of the correct size drilled in it. Next I covered the area of the new dash with masking tape so the alloy template wouldn?t scratch the varnish on the dash. This varnish / lacquer is very brittle and if you just drill it bits at the edge of the hole can splinter off which you don?t want. My method involved clamping my alloy drilling template over the place I wanted the hole and then carefully using a small grind stone in my Drexel, I ground away the varnish back to the wood. The main reason for the alloy was to guide the dremel and protect the surrounding area should I slip. You end up with an area of the correct size with no varnish on it. Once through to the wood I used a new four flute wood drill of the correct size to drill carefully through the wood. You can drill part way from the front and again from the back to minimise splitting at the back if you want to, but with a new sharp drill and going slowly I didn?t have any problems. You could always have a practice on the old dash if you are going to scrap it. If you look carefully at the photo you can just see the tiny pilot hole I drilled to mark the location between the speedo and the air vent about level with the warning lights in the speedo, this is the location of the bonnet release on my early car.
Change is inevitable, except from a vending machine!
- Bigbaldybloke
- Fourth Gear

- Posts: 889
- Joined: 16 May 2017
wotsisname wrote:Drilling the dash is definitely a heart in mouth moment, however not so bad as you imagine. I did my glovebox lid lock which is glossy both sides. A pilot hole and cut from both sides. I clamped wood as well. The oe 68 +2 has a bracket which is easy to make ..
Just as long as you have the glove box lid the right way round when you drill.
In a moment of madness I hadn?t checked and I now have a lovely hole on the face to remind me of my carelessness!
1968 +2 BRM
- Peter +2
- Third Gear

- Posts: 270
- Joined: 26 May 2010
I too made a cockup.. the bit where you trim back the lacquer to rebate for the lock. Spent an age marking, measuring twice...onto masking tape. Cut and scraped the lacquer with a scalpel. Terrific job if I'd done the inside face. Good news is that you can make a near invisible repair...
1968 Elan plus 2 - project
2007 Elise S2 [modified with a Hethel 70th sticker (yellow)]
2000 Elise S1 - Sold
2007 Elise S2 [modified with a Hethel 70th sticker (yellow)]
2000 Elise S1 - Sold
- wotsisname
- Third Gear

- Posts: 452
- Joined: 24 Jun 2015
Hi Diego,
i suggest you make a Bracket for the Choke it's much safer than taking a risk with the lovely new dashboard.
If you want to drill the hole USE A CORRECT WOOD DRILL which has a small point. The price for a new Wood Drill is better than taking a risk and it will make a perfect hole.
Good luck
Alan
i suggest you make a Bracket for the Choke it's much safer than taking a risk with the lovely new dashboard.
If you want to drill the hole USE A CORRECT WOOD DRILL which has a small point. The price for a new Wood Drill is better than taking a risk and it will make a perfect hole.
Good luck
Alan
Alan.b Brittany 1972 elan sprint fhc Lagoon Blue 0460E
- alan.barker
- Coveted Fifth Gear

- Posts: 3757
- Joined: 06 Dec 2008
Phil, there isn't enough space in this box for all of the  icons that I truly deserve.
I took a few days off from working on the car to beat my head with a brick after that.
I would second the bracket approach. The earlier +2 is possibly easier as the dash edge trim fits closer to the dash. Mine is not in the factory position but is screwed to the back of the dash to the left of the steering wheel (as per a PO) as I will have a couple of extra switches where it should be.
Peter +2, if you don't fancy repairing it then some of the World Championship winner badges look quite smart.
Adrian
1968 Elan plus 2 - project
2007 Elise S2 [modified with a Hethel 70th sticker (yellow)]
2000 Elise S1 - Sold
2007 Elise S2 [modified with a Hethel 70th sticker (yellow)]
2000 Elise S1 - Sold
- wotsisname
- Third Gear

- Posts: 452
- Joined: 24 Jun 2015
alan.barker wrote:Hi Diego,
i suggest you make a Bracket for the Choke it's much safer than taking a risk with the lovely new dashboard.
If you want to drill the hole USE A CORRECT WOOD DRILL which has a small point. The price for a new Wood Drill is better than taking a risk and it will make a perfect hole.
Good luck
Alan
Good advice Alan.
I also read (on here, somewhere) that you should use a small grinding stone with a pointed end (it is sort of bullet shaped) on the end of a Dremel to get through the lacquer before drilling, otherwise you risk cracking it.
-

JonB - Coveted Fifth Gear

- Posts: 2359
- Joined: 14 Nov 2017
12 posts
• Page 1 of 1
Total Online:
Users browsing this forum: No registered users and 28 guests


