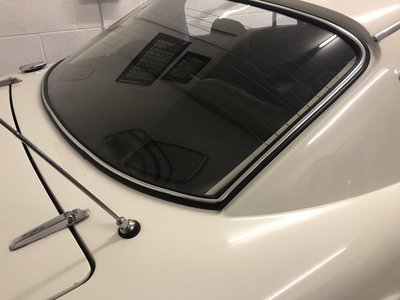
+2 rear screen rubber corner joint
32 posts
• Page 1 of 3 • 1, 2, 3
Have tried googling images without success. If anyone has a couple of minutes to spare, would you mind uploading a photo of the bottom corner of the +2 rear screen rubber with the chrome infill. Mine was probably removed when the car was painted about 20 years ago, and whoever refitted it I don't think did a great job, it looks a proper hash and has been known to leak on occasions. If any of you gents has a photo of how it should look, it will be greatly appreciated. Many thanks.
ZARDE the 130/5.
-

M.J.S - Second Gear

- Posts: 149
- Joined: 21 May 2008
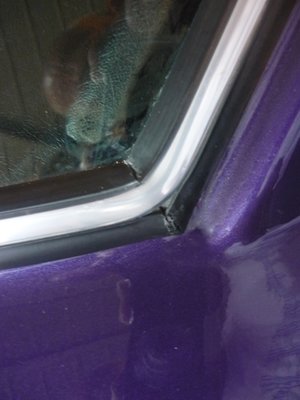
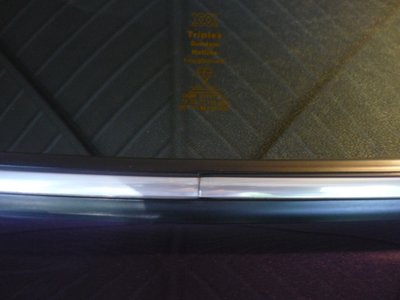
Not with my car at the moment. I have recently done my rear screen. I can tell you that originally the rubber was mitred in the two bottom corners. The silver (chrome?) infill is a continuous length, with a ?join? only in the centre bottom of the screen.
I managed to do mine this way, relatively easily.
Andy
I managed to do mine this way, relatively easily.
Andy
Where, then, lies the answer? In choice. Which shall it be: bankruptcy of purse or bankruptcy of life?
Plus 2S
BLL 315H in white.
Plus 2S
BLL 315H in white.
- EPC 394J
- Third Gear

- Posts: 225
- Joined: 07 Feb 2014
i replaced mine about 6 months ago. All one piece with just the joining ends at bottom center. It was tight in the bottom corners, but patience and a warm day helped. Still looks like new.
Rob Walker
26-4889
50-0315N
1964 Sabra GT
1964 Elva Mk4T Coupe (awaiting restoration)
1965 Ford Falcon Ranchero, 302,AOD,9",rack and pinion,disc,etc,etc,etc
1954 Nash Healey LeMans Coupe
Owning a Lotus will get you off the couch
26-4889
50-0315N
1964 Sabra GT
1964 Elva Mk4T Coupe (awaiting restoration)
1965 Ford Falcon Ranchero, 302,AOD,9",rack and pinion,disc,etc,etc,etc
1954 Nash Healey LeMans Coupe
Owning a Lotus will get you off the couch
- prezoom
- Coveted Fifth Gear

- Posts: 1176
- Joined: 16 Mar 2009
I?ll take a picture of mine when I get chance.
There are indeed many ways to achieve a tidy result. I just replaced mine in the way it had originally been fitted. I like it. Just don?t forget the loctite glue wherever the rubber joins!
The tool is very useful for the chrome infil. The rubber was relatively easy to fit. Just fit it to the body, as best you can. Taping it loosely around the top of the opening in the body. (Making sure the headlining is secure under the rubber!) Then sit the screen in the bottom channel and start from there. Lots of soapy water and old credit cards gets the screen in easy!
It?s a really satisfying job to complete, as it pretty much transforms the rear aspect of the car!
Enjoy!
Last edited by EPC 394J on Mon Jun 11, 2018 4:09 pm, edited 2 times in total.
Where, then, lies the answer? In choice. Which shall it be: bankruptcy of purse or bankruptcy of life?
Plus 2S
BLL 315H in white.
Plus 2S
BLL 315H in white.
- EPC 394J
- Third Gear

- Posts: 225
- Joined: 07 Feb 2014
On mine the rubber has been cut and mitred, which looks okay, but the chrome has also been cut and mitred, and that looks amateurish. I presumed both rubber and chrome would be on one long piece shaped into the curves and joined either top or bottom.
ZARDE the 130/5.
-

M.J.S - Second Gear

- Posts: 149
- Joined: 21 May 2008
Just to add to my previous post. If you do mitre the rubber, it?s not a 90* join! It?s also a kind of a compound slice. Since usually you?ll have a couple of extra feet of rubber, I would recommend a practice join on a spare 6? strip first, and sit it in the corner of the opening. Then you?ll see what I mean!
Especially with the infil. Do be sure to keep it slightly longer than you think you?ll need. Then work hard to shoehorn as much length in as you can. It will shrink as it beds in over time, and you really don?t want a gap opening up to spoil your hard work!
Especially with the infil. Do be sure to keep it slightly longer than you think you?ll need. Then work hard to shoehorn as much length in as you can. It will shrink as it beds in over time, and you really don?t want a gap opening up to spoil your hard work!
Where, then, lies the answer? In choice. Which shall it be: bankruptcy of purse or bankruptcy of life?
Plus 2S
BLL 315H in white.
Plus 2S
BLL 315H in white.
- EPC 394J
- Third Gear

- Posts: 225
- Joined: 07 Feb 2014
Following this with great interest as I expect to be removing my glass soon to install a new headlining. I can't post a pic for a few days as I'm traveling right now. I do recall though that my painfully-original infill has shrunk enough that it has a gap of at least three inches!
1970 Elan Plus 2 (not S) 50/2036
2012 BMW R1200GS
"It just wouldn't be a complete day if I didn't forget something!" -Me
2012 BMW R1200GS
"It just wouldn't be a complete day if I didn't forget something!" -Me
-

The Veg - Coveted Fifth Gear

- Posts: 2185
- Joined: 16 Nov 2015
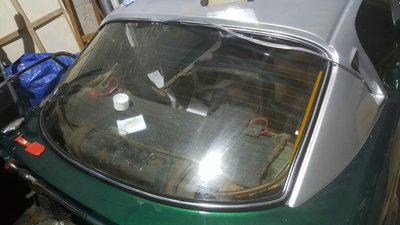
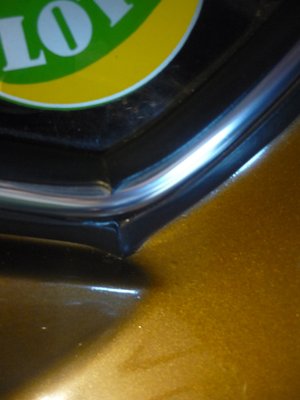
Here are some photos to guide you. The rubber on the Sprint is the original one and on the +2 a replacement done recently. The chrome insert was never mitred and I wouldn't because in time it will shrink and show a gap and worst still let in water. Plus I think it looks naff but other's who like will disagree I'm sure. If you want to keep the insert absolutely original then keep it as a continuous strip and make the join at the bottom of the screen in the middle. Jim
- JimE
- Third Gear

- Posts: 349
- Joined: 22 Jan 2017
This job is on my to do list, have to admit that I was planning on cutting the filler strip in the corners!
Personally I don't like the curve of the strip in the nice straight seal. Currently it been installed as from factory and has a 3" gap and the corners just look messy with the filler strip trying to fight its way out. A nicely mitred chrome strip that matched the sharp angles of the seal would look better to me, whether it would stay looking better over time v factory method I am not so sure. So will take another look at this see which way i should go.
At least the filler strip can be bought and replaced separately so it not the end of the world to redo it.
'73 +2 130/5 RHD, now on the road and very slowly rolling though a "restoration"
- mbell
- Coveted Fifth Gear

- Posts: 2643
- Joined: 07 Jun 2013
I cut my filler strip at the bottom corners, I didn't like the way it looked with it forced around the corners. [my car is rough anyway so I guess it matters even less]
- AussieJohn
- Third Gear

- Posts: 440
- Joined: 10 Jun 2007
Yes, I certainly think there are a number of ways to do this. Different people prefer different methods, so it?s not possible to say there?s a ?right? way.
But it sounds as though there?s a consensus as to what was the original way? For some that may be important. For others, less so?
Here?s mine: Mitred rubber. Non mitred infill.
But it sounds as though there?s a consensus as to what was the original way? For some that may be important. For others, less so?
Here?s mine: Mitred rubber. Non mitred infill.
Where, then, lies the answer? In choice. Which shall it be: bankruptcy of purse or bankruptcy of life?
Plus 2S
BLL 315H in white.
Plus 2S
BLL 315H in white.
- EPC 394J
- Third Gear

- Posts: 225
- Joined: 07 Feb 2014
32 posts
• Page 1 of 3 • 1, 2, 3
Total Online:
Users browsing this forum: No registered users and 22 guests

