Jacking holes
12 posts
• Page 1 of 1
Dear All
Can anyone help? Have just visited a 69/70 Plus2 and the car is a little cracker (see other posts) but the jacking points seem to have been glassed over prior to its respray....opinions?...drill the holes as they are needed to jack the car properly?...leave them as they are it looks better? etc....
Thanks
John
-

john.p.clegg - Coveted Fifth Gear

- Posts: 4533
- Joined: 21 Sep 2003
Terry
Sorry,back home now,but may be seeing it again shortly?
John
P.S.
not only that but the "Dyno tape" chassis number seems to have been glassed over also....and no drain hole in the front(but no goldfish)...
Sorry,back home now,but may be seeing it again shortly?
John
P.S.
not only that but the "Dyno tape" chassis number seems to have been glassed over also....and no drain hole in the front(but no goldfish)...
-

john.p.clegg - Coveted Fifth Gear

- Posts: 4533
- Joined: 21 Sep 2003
Hi. As I'm sure you know, the jacking points are metal collars welded to the ends of the sills. If they're glassed over it may be worth checking the condition of the sills. I'd leave them accessable. I sometimes jack mine on these jacking points using a small metal bar pushed into the hole which is mounted on a block so that I can get a hydraulic jack under easily. I was wondering whether a more robust version would be worth leaving in the boot in case the car ever ended up in a garage and they wanted to jack it up - just avoids any damage underneath by your average spanner monkey.
Sean.
Sean.
- alaric
- Coveted Fifth Gear

- Posts: 1062
- Joined: 07 Apr 2005
Hi,
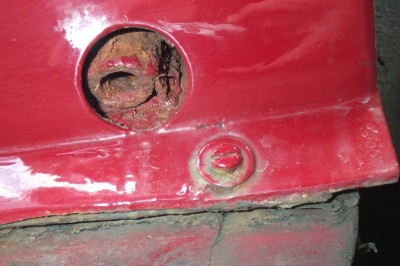
The said car is mine and attached is a picture. I am hoping to get the wheels off this weekend to have a look and see whats going on from the inside.
Rebecca
The said car is mine and attached is a picture. I am hoping to get the wheels off this weekend to have a look and see whats going on from the inside.
Rebecca
- becksell2001
- New-tral
- Posts: 4
- Joined: 18 May 2009
Hi, the sill holes (which work very well with the Custom Plus 2 jack) are there primarily to provide a wheel changing facility "on the side of the road". Without the holes, it would be very inconvenient at best to get under the vehicle with a low profile trolley jack, plus wood to spread the load, in order to change a flat tyre.
The previous comments about checking the state of the sills seems appropriate, if someone has seen fit to glass over the holes. Remove the closing plates inside the wheel arches, and armed with a torch check them out. Remember that the seat belt is anchored to the metal sill members, so they need to be sound.
Regards
Gerry
- gerrym
- Fourth Gear

- Posts: 882
- Joined: 25 Jun 2006
When I purchased my +2 , the jack point holes were glassed over. The internal situation was appalling and Andy at Spyder will tell you of the battle he had to clear out the mess. Just remind him of the +2 with sills filled with resin...
With new bars in place I was always unsure about what to do about the jacking holes and eventually went for re-instating them for two reasons.. Firstly you may be able to use them for their original purpose (I never have); secondly you can always shine a torch in and check condition and it reassures any potential buyer.
I have had to change a flat tyre at the side of the road and it is difficult - I had to lift the car by hand and get my wife to pop the jack and block of wood under the car before I did myself a nasty. So perhaps I should investigate the jack adapter idea.
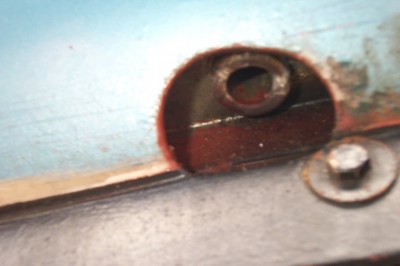
Note the different hole sizes..
Jeremy
-

JJDraper - Fourth Gear

- Posts: 923
- Joined: 17 Oct 2004
Well i have had the panel off eventually. After chipping the rust off the screws and not being able to get the wheel off - the nut is very stuck.
But it looks good no rust or anything else so i am very happy. I found the jacking point or what i think is the jacking point- it looks like a metal cyclinder? but i dont think i will reinstate it.
Tomorrow i will have a look at the head.
But it looks good no rust or anything else so i am very happy. I found the jacking point or what i think is the jacking point- it looks like a metal cyclinder? but i dont think i will reinstate it.
Tomorrow i will have a look at the head.
- becksell2001
- New-tral
- Posts: 4
- Joined: 18 May 2009
Alaric wrote:
I made up an adapter for a scissors jack to fit the jacking points. Drill the top of the jack, braze in a 5/16" UNF nut, and make up the "peg" from a 5/16" bolt, 40mm sleeve and top off by brazing on a washer to bear on the jacking point.
I sometimes jack mine on these jacking points using a small metal bar pushed into the hole which is mounted on a block so that I can get a hydraulic jack under easily. I was wondering whether a more robust version would be worth leaving in the boot in case the car ever ended up in a garage and they wanted to jack it up
I made up an adapter for a scissors jack to fit the jacking points. Drill the top of the jack, braze in a 5/16" UNF nut, and make up the "peg" from a 5/16" bolt, 40mm sleeve and top off by brazing on a washer to bear on the jacking point.
- Attachments
-
- DSCI0012.JPG (15.71 KiB) Viewed 2271 times
-
- DSCI0013.JPG (15.74 KiB) Viewed 2272 times
68 Elan +2, 70 Elan +2s
-

Foxie - Coveted Fifth Gear

- Posts: 1209
- Joined: 20 Sep 2003
I haven't HAD to jack up my S1 or +2 for several years. I've jacked them up for routine maintenance but seldom for on the road issues. I'd never jack either of my Lotuses using the forty plus year old fibre/fiberglass body. I only use chassis or suspension points.
Will we soon be reading about body crack repair originating in the wheel well areas?
Drive on ramps work well for lifting one end or the other..
Rusty sills wouldn't bother me 'cuz the body has no jacking point.
.....jacking an Elan is a trick no matter what...
Eric
Will we soon be reading about body crack repair originating in the wheel well areas?
Drive on ramps work well for lifting one end or the other..
Rusty sills wouldn't bother me 'cuz the body has no jacking point.
.....jacking an Elan is a trick no matter what...
Eric
- 1964 S1
- Coveted Fifth Gear

- Posts: 1296
- Joined: 15 Sep 2003
Hi again, a couple of points to address from previous postings:-
1/ the body design of the Elan and the Plus 2 completely differ from each other, in that the Plus 2 has an open seam along each side only held together by the fasteners through the sill. Without an adequate the sill member in place, the body has little torsional stiffness and the door apertures will not be stable.
2/ Side protection? forget it (too low).
3/ For the Plus 2, the supplied jacking points work very well (assuming the structure of the car is in good shape). If it isn't, do you really want to be driving on the road?
Overall, regardless of how you intend to jack the Plus 2, get the sill members sorted!
- gerrym
- Fourth Gear

- Posts: 882
- Joined: 25 Jun 2006
12 posts
• Page 1 of 1
Total Online:
Users browsing this forum: Elanman99 and 13 guests


