Boot Floor Fibreglass Repairs & Pop Rivets
10 posts
• Page 1 of 1
Can anyone offer any tips on repair of horizontal fibreglass sections.
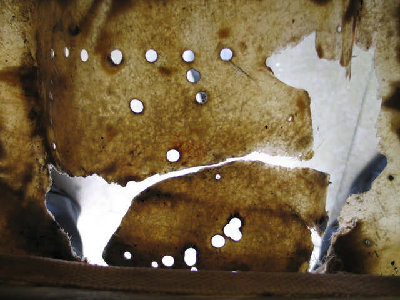
The rear of the boot floor was previously badly repaired using aluminium pop rivets, some ally sheet and a sandwich of fibreglass both sides. There was inadequate prep with some of the fibreglass applied over paint. In addition the steel mandrel (pop piece left behind in the expanded aluminium head) had rusted & spalled, forcing apart the already bad repair.
I now have removed all the above and sanded back to original glass. There are some rather large holes and missing sections. This is above the rear mount for the silencer.
My first plea is to all repairers is not to use pop rivets if they are to be permanent and incapsulated within the fibreglass. If they must be used, then at least consider all stainless or aluminium types.
Secondly, are there any recommendations as to how to form a temporary mould on the underside. This would have to support the new glass repairs.
Regards
Gerry
- gerrym
- Fourth Gear

- Posts: 882
- Joined: 25 Jun 2006
If you can get to the underside easily then a piece of melamine covered board, such as an offcut from a kitchen cupboard, screwed through from the top has worked for me as a bridge for the fibreglass.
If its waxed well with a release agent then it gives a nice flat surface that the resin wont stick to, using several pieces for more complex areas.
Not so good for really curved parts though, maybe bent ally sheet treated the same would work there.
Cheers,
Simon
If its waxed well with a release agent then it gives a nice flat surface that the resin wont stick to, using several pieces for more complex areas.
Not so good for really curved parts though, maybe bent ally sheet treated the same would work there.
Cheers,
Simon
-

SimonH - Third Gear

- Posts: 292
- Joined: 15 Sep 2004
Gerry,
having undertaken some very major repairs on several elan shells including my most recent, I have found the best way to repair the underside of the boot floor is to raise the car as high as possible on one side(at least 3 feet) and support it along the sill area, to prevent the matt from droping off as the resin cures, prop a cling film covered piece of timber against the repaired area, the resin will not adhere to the cling film, also you can create a rough mould shape with various odds n sods( I used ply, waste pipe and guttering, bits of 2x2 etc held together with gaffer tape under the cling film) to get the basic shape right. I repaired the inside first using cling film covered timber to span any large gaps.
where alignment is required across a gap or split, I self tappered either alloy or ply braces across the void, again covered in cling film to prevent the repair from falling through the hole.
I can now stand in my boot without a problem and I suffer from liking pies and beer too much!!!
If you want to talk about this, PM me and I'll send you mt number
regards
Mark
- tower of strength
- Third Gear

- Posts: 351
- Joined: 15 Mar 2005
Gerry, I recently repaired a crack running across same area in my boot. I sanded back to gell over a reasonably large area and applied matting from above with no probs - the hole in mine was a lot smaller than yours though. I did have a large hole next to the handbrake tree butting up to the chassis bolt bobbin. I had no problem spanning this hole without any support, working from inside the boot.
One thing I thought I'd mention, is that your boot hole does look quite big, and judging by how much the boot area was flexing in my car, I suspect yours is a lot worse. It's possible that it needs supporting to raise the boot to get it into the right position before you start glassing. Is there any evidence of cracking on top of the rear wings and around the rear window? Just a thought - I forgot to check for this myself on the nose and had to cut the glass and re do it - frustrating.
You should be able span most of the holes that are there by applying pieces of matting from above around the big hole and working your way in - do it in several stages letting it cure between each. Personally I think it's really important to get this area strong, and not foul anything under the car - the heat shield for the exhaust for example. I took the view that making the boot floor thicker wasn't an issue.
Hope that helps.
Sean.
- alaric
- Coveted Fifth Gear

- Posts: 1062
- Joined: 07 Apr 2005
Something else to consider -
use aluminium sheet cut in long strips ( 1.5 inches by say 12 inchs and less -
use these to span the repair area and line up the bits. I use cleco clamps to hold the stips in place , and also to remove with ease in case you need to move them around or adjust ( I clamp stips on the out side )
when you are satisfied that the shape looks close enough - you can use masking tape to seal up the hole ( this is where you will like the cleco over a rivet)
for the fist lay up think drape - use a 1oz woven cloth. carefuly apply , let cure . if you are satiisfied with form you can add some matt for reinforcment .
after it sets remove the clecos. strips and tape
apply filler , tissue, etc on out side to the make it look right .
- cabc26b
- Fourth Gear

- Posts: 903
- Joined: 21 Sep 2003
Haven't done this repair myself, but judging from the picture this is how I'd tackle it if it were my car...
1) Cut away the damaged area to leave a square or rectangular hole. Leave the corners rounded. By doing this you can achieve a more uniform material thickness than you could if you try to glass over the remnants of the old floor. The rounded corners should also help the new floor to manage internal stresses and limit the propogation of future cracks.
2) Trace the shape of the opening onto a pattern and set it aside.
3) Lay up a patch larger than the hole on a smooth, flat surface coated in a release agent (wax or mold release).
Good Luck!
Evan Carpenter-Crawford
1969 FHC
4)After the patch hardens, remove it from the "mold" surface and trace around the pattern. Trim the piece to the traced line to create a patch identical in shape to the hole in your floor.
5) Feather the top and bottom edges of both the hole and patch. By thinning these areas the material thickness should come out even when the patch is bonded in.
6) Bond-in the patch from both sides. The first side will have to be held in place with sticks or tape or whatever comes easily to hand.
7) Rough sand the whole area, then lay up one layer of mat over the whole thing. This should produce "seamless" looking repair that is both strong and blends well with the rest of the boot floor.
Evan Carpenter Crawford
1969 FHC 8624
1969 FHC 8624
- Evan Carpenter-Crawford
- First Gear

- Posts: 19
- Joined: 12 Sep 2003
Hi Gerry
This is the repair I did on Andy's S2 last summer. It had been damaged and repaired earlier by andy and broken again. There was much grinding involved to get it to where you are now. The floor was busted up in many areas and the more I got into it the worse it seemed. I contemplating cutting the whole boot floor out and bonding in a used one but the money issue raised its head and I had already spent 2 mornings and 10 pound of sweat grinding so I continued with the repair. All of the previous sugestions are good and I will add a couple.
Simple is good and there is no need to be exact in the first stages of the repair. Get things close and bond it loosely back into shape, simmilar to tack welding. Try and get the height difference between the panels to a minimum. When glassing together areas tear the matt into small patches 4 inch by 3 inch, make lots of them. Dont cut with sizzors unless you need to butt things along an edge. When glassing begins put the patches on a piece of cardboard to wet out, wet out the patch on the cardboard and add another layer of 1 1/2 oz. matt and wet that one out too. Use your wet out brush to pick up the stack of two wetted out pieces of matt and place it on the repair area. Stipple the patch to remove the air and get the patch adheared to the piece being repaired but don't over do it. If its a large area that need to be bridged, masking tape works well, tape the back side with two inch or whatever size seems to work and use more on the other side, sticky side to sticky side but do not overlap the tape onto your freshly ground glass that is being repaired. Once you get the damaged area to hold its own shape (after the patches have gone off, you may need to grind down any high spots) then you can fill in the rest of the repair.
So you are close to being half way though, now its time to grind the other side (if you have access to it) to prepare for another layer. 2 more layers of 1 1/2 matt (4 layers will yield just under an 1/8 of an inch). this goes a lot faster as you have a solid structure that you can just apply the patches sequentually with a little overlap on each.
Grinding nearly complete, the cloth was removed after this photo was taken, it really has no place in a Elan.
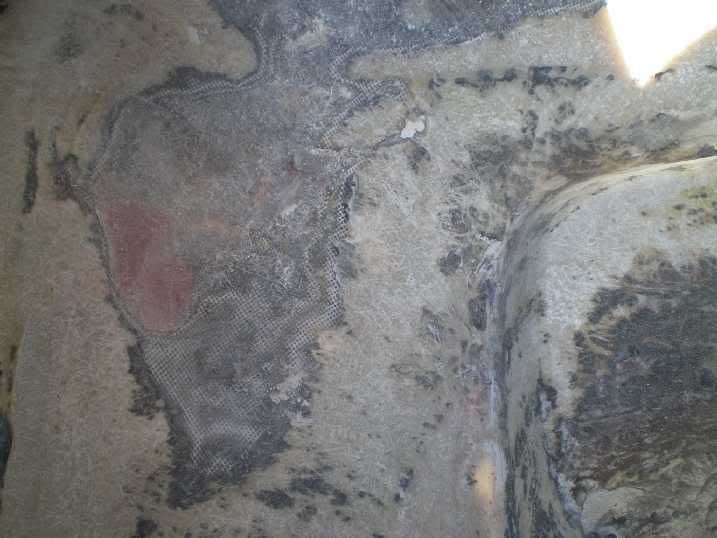
The area around the spare tire holder was just one big "flap" after I removed nearly all of the previouse repair work.
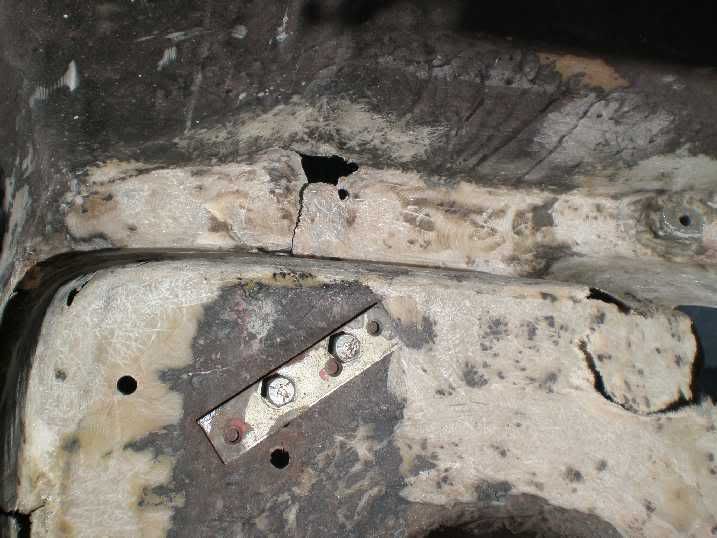
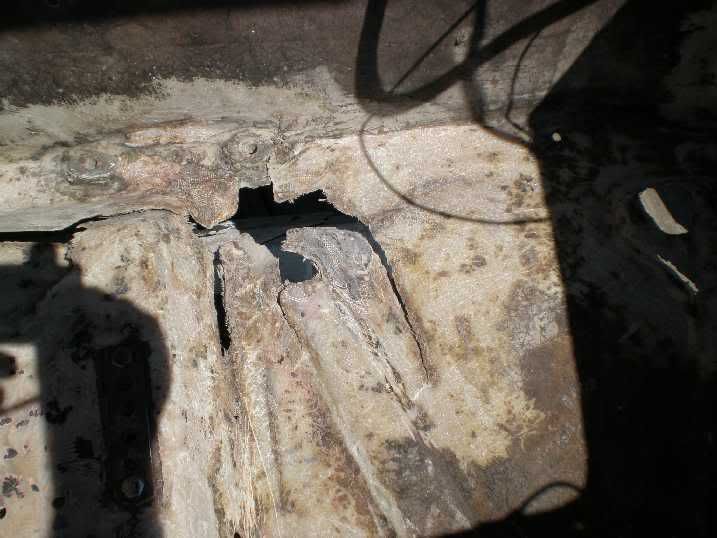
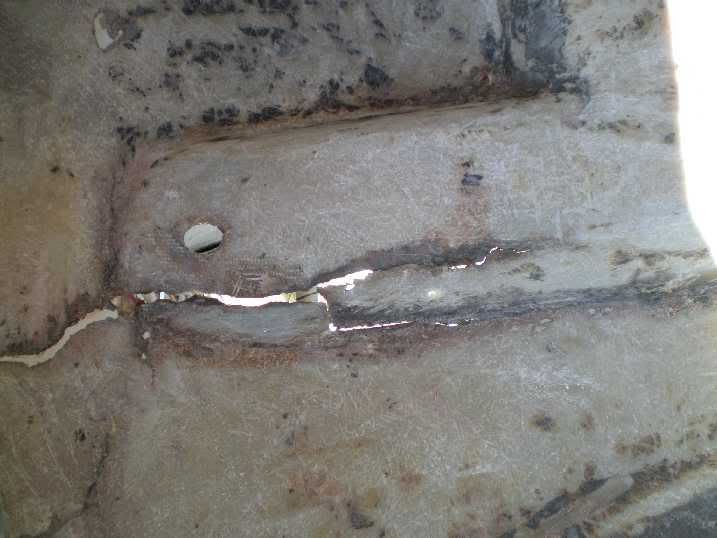
This shows that most of the "flap" has 2 layers of matt applied, its pretty strong but not really up to holding a spare tire and 10 gallons of fuel plus what ever else gets tossed in.

The next 4 photos show both sides glassed and the boot finally has most of its original strength back.
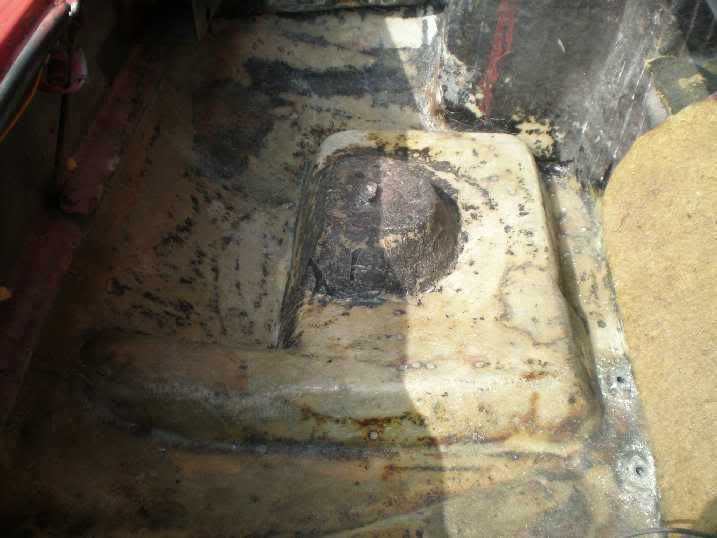


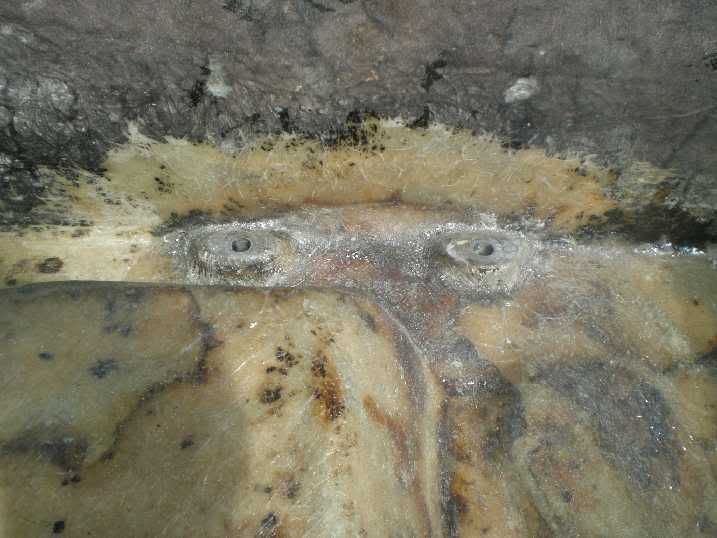
Looks like a drunken sailor put the tape on, The Elan was going through a mechanical restoration for the time being and painting the shell would be done at a later time so I didn't worry what the squirles were going to think...
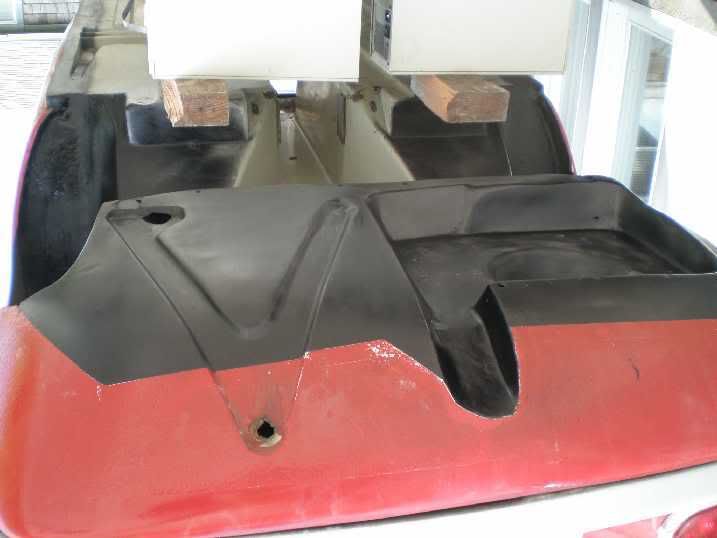
From the back the trim black paint can barely be seen at ground level, for the time and expence it came out ok. Take a look at those fancy jack stands, a pair of Digital Equipment computers and a couple of blocks, any higher and it make the boot tough to get into and work, any lower it tough to get underneth to work.

This is the repair I did on Andy's S2 last summer. It had been damaged and repaired earlier by andy and broken again. There was much grinding involved to get it to where you are now. The floor was busted up in many areas and the more I got into it the worse it seemed. I contemplating cutting the whole boot floor out and bonding in a used one but the money issue raised its head and I had already spent 2 mornings and 10 pound of sweat grinding so I continued with the repair. All of the previous sugestions are good and I will add a couple.
Simple is good and there is no need to be exact in the first stages of the repair. Get things close and bond it loosely back into shape, simmilar to tack welding. Try and get the height difference between the panels to a minimum. When glassing together areas tear the matt into small patches 4 inch by 3 inch, make lots of them. Dont cut with sizzors unless you need to butt things along an edge. When glassing begins put the patches on a piece of cardboard to wet out, wet out the patch on the cardboard and add another layer of 1 1/2 oz. matt and wet that one out too. Use your wet out brush to pick up the stack of two wetted out pieces of matt and place it on the repair area. Stipple the patch to remove the air and get the patch adheared to the piece being repaired but don't over do it. If its a large area that need to be bridged, masking tape works well, tape the back side with two inch or whatever size seems to work and use more on the other side, sticky side to sticky side but do not overlap the tape onto your freshly ground glass that is being repaired. Once you get the damaged area to hold its own shape (after the patches have gone off, you may need to grind down any high spots) then you can fill in the rest of the repair.
So you are close to being half way though, now its time to grind the other side (if you have access to it) to prepare for another layer. 2 more layers of 1 1/2 matt (4 layers will yield just under an 1/8 of an inch). this goes a lot faster as you have a solid structure that you can just apply the patches sequentually with a little overlap on each.
Grinding nearly complete, the cloth was removed after this photo was taken, it really has no place in a Elan.

The area around the spare tire holder was just one big "flap" after I removed nearly all of the previouse repair work.


This shows that most of the "flap" has 2 layers of matt applied, its pretty strong but not really up to holding a spare tire and 10 gallons of fuel plus what ever else gets tossed in.

The next 4 photos show both sides glassed and the boot finally has most of its original strength back.


Looks like a drunken sailor put the tape on, The Elan was going through a mechanical restoration for the time being and painting the shell would be done at a later time so I didn't worry what the squirles were going to think...

From the back the trim black paint can barely be seen at ground level, for the time and expence it came out ok. Take a look at those fancy jack stands, a pair of Digital Equipment computers and a couple of blocks, any higher and it make the boot tough to get into and work, any lower it tough to get underneth to work.

-

garyeanderson - Coveted Fifth Gear

- Posts: 2634
- Joined: 12 Sep 2003
Sean, Mark, Evan, Ralph, Gary and all that offered suggestions for repair, thanks. After reviewing all the methods, use aluminium bent into 3-D shape as mold, jammed in place by a prop underneath body. I used multiple coats of PVA release, dried with a hairdryer. Shape came out spot on, and the thin film of PVA peeled off the repair without any drama.
Regards
Gerry
Regards
Gerry
- gerrym
- Fourth Gear

- Posts: 882
- Joined: 25 Jun 2006
10 posts
• Page 1 of 1
Total Online:
Users browsing this forum: No registered users and 16 guests

