MT75 with Spyder gear linkage anti sizzle upgrade
12 posts
• Page 1 of 1
Dear Fellow MT75 gearbox users with Spyder linkage.
I have recently had an upgrade to my Spyder MT75 gear linkage to reduce the annoying rattling that sometimes occurs in gear and especially in 5th when cruising.
This consists of a number of poly bushes and isolation washers to prevent metal to metal contact between the bolts that connect the linkage to the gearbox and also replacement parts that would normally be metal between the selector and the gear lever. Where the gear lever bolts to the selector is also isolated with a nylon insert.
The kit of parts needed for the upgrade can be obtained from Spyder, but you will need to ream/drill some of the existing parts to fit the poly bushes and isolating washers, I'm told that ideally a pillar drill will be needed to modify the parts to accept the poly bushes.
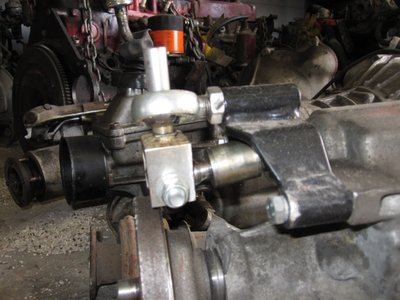
Here is a picture of a standard Spyder linkage in situ.
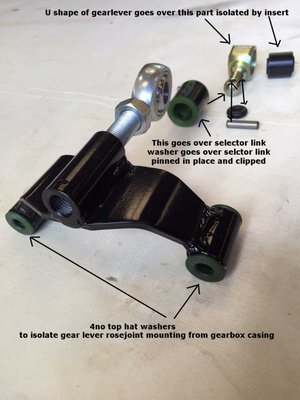
And here is a picture detailing the poly bushes and tube washers etc detailing where they fit to the assembly
The cost for the parts including VAT and postage to the UK is approximately ?100, it would be best to contact Spyder directly for postage elsewhere in the world http://www.spydercars.co.uk
My bill for fitting was 3 hours labour @ ?48 hour + VAT
I'm really pleased with the result, no more rattle or sizzle and the cabin of my +2 is an even nicer place to be than before.
Please note, I was told this upgrade is only properly effective if you have a wooden gear knob (round or pear shape) metal gear knobs are a total pain and amplify any noise as well as adding to the problem by adding extra weight to the gear lever shaft, you have been warned.....
Kindest regards
Alan Thomas
Alan Thomas
-

Spyder fan - Coveted Fifth Gear

- Posts: 2019
- Joined: 11 Jun 2009
Anyone attempted this yet?
I know Alan has had his done at Spyder.
My understanding is that some Westfield's seem to use a similar linkage and owners on their forums seem to have some success with a different mod, using top hat style washers to isolate the nut and bolt that passes through the bottom of the gear lever (see Alan's 1st PIC).
Any ideas how to access this linkage?
My tunnel trim is attached at my rear seatbelt mounts, assuming I remove those bolts will the tunnel trim just lift off or are there further fixings?
Once the tunnel trim is off, will this give the necessary access to the linkage? I assume I may then encounter a 2nd fibreglass tunnel which is part of the main body?
Thanks,
Gavin
- gavk
- Second Gear

- Posts: 103
- Joined: 23 Apr 2014
Hi Gavin,
as nobody has replied, I would suspect it's not something that has been attempted yet.
The centre console slots under the rear seat squab, so you have to lift that up a little to remove the console. Pull the handbrake on as hard as you can, raise the front of the rear squab a little, then pull the centre console back towards the rear squab (it should slide a little) then hinge it upwards from the dashboard end being careful not to snag the heater controls. You should then be able to slide the whole console forward and ease it off of the hand brake.
There is not a lot of working room, but the base of the gearlever and linkage is now exposed. I looked at this myself before chickening out and getting Spyder to do it for me, I just can't see how you can swap anything about without dropping the gearbox.
I have a theory that the noise we all experience is harmonically transmitted through the gearlever then amplified by the gear knob, the original Lotus 4 speed gear lever is isolated by a rubber bush, I can't find the exact picture, but this type 9 gearlever shows what I mean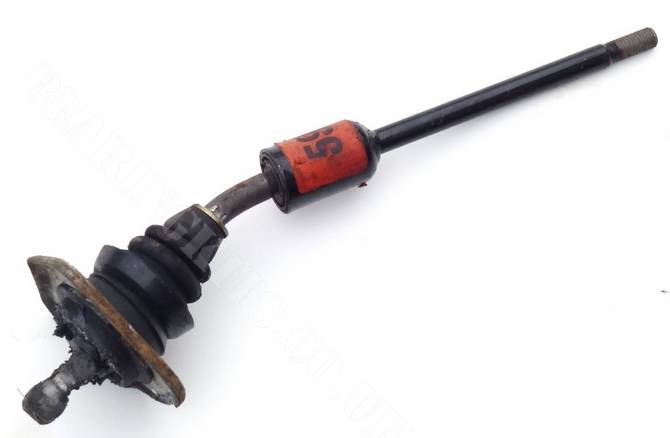
I'm not keen on cutting one of my gearlevers to test the theory, but I think it has merit and could be a lower cost solution.
as nobody has replied, I would suspect it's not something that has been attempted yet.
The centre console slots under the rear seat squab, so you have to lift that up a little to remove the console. Pull the handbrake on as hard as you can, raise the front of the rear squab a little, then pull the centre console back towards the rear squab (it should slide a little) then hinge it upwards from the dashboard end being careful not to snag the heater controls. You should then be able to slide the whole console forward and ease it off of the hand brake.
There is not a lot of working room, but the base of the gearlever and linkage is now exposed. I looked at this myself before chickening out and getting Spyder to do it for me, I just can't see how you can swap anything about without dropping the gearbox.
I have a theory that the noise we all experience is harmonically transmitted through the gearlever then amplified by the gear knob, the original Lotus 4 speed gear lever is isolated by a rubber bush, I can't find the exact picture, but this type 9 gearlever shows what I mean

I'm not keen on cutting one of my gearlevers to test the theory, but I think it has merit and could be a lower cost solution.
Kindest regards
Alan Thomas
Alan Thomas
-

Spyder fan - Coveted Fifth Gear

- Posts: 2019
- Joined: 11 Jun 2009
Thanks Alan, after writing my question I rediscovered the pm you sent me on the same topic, sorry to ask you twice.
Just not got around to it yet, and its constantly lurking at the top of my todo list.
I will certainly report back once I have investigated
Just not got around to it yet, and its constantly lurking at the top of my todo list.
I will certainly report back once I have investigated
- gavk
- Second Gear

- Posts: 103
- Joined: 23 Apr 2014
Although my Plus 2 uses a Lotus TC, it has a Spyder frame and Spyder supplied MT75.
Alan, can you provide a bit more detail on the bush configuration? Reason I mention is I already had my Spyder supplied gear lever cut and machined locally with a set of male and female threads and a grub screw. I did this to make sure I could remove the engine and gearbox with the body attached. I also found the lever too hard to cut to length and thread for the gear knob, so I was taking it in to the machinist anyway.
Maybe with a bit of ingenuity I could try out the isolation bush idea? Looks like I would need a threaded stud so I present the bush with male threads at both ends. I can't recall what threads the machinist used on my lever; does the bush have threaded ends or is it a slip-on affair to just weight the lever?
Stu
Stu
1969 Plus 2 Federal LHD
1969 Plus 2 Federal LHD
-

stugilmour - Coveted Fifth Gear

- Posts: 1942
- Joined: 03 Sep 2007
Stu
In which area are you thinking about using a threaded stud?
Good idea to get your lever chopped and modified in the way you described. I did manage to chop my lever in situ (using either jigsaw or dremel, can't remember) but it is very hard and my attempts at cutting a thread onto the lever failed.
I understand Spyders use of bushes to isolate the whole assembly from the transmission case in as many places as possible but my understanding is that the noise we experience is caused by metal to metal contact in one or two places:
Most likely is where the bolt passes through the fork at the very base of the gear lever and connects to the bush at the end of the selector. I've circled the parts in the attached pictures.
I wonder how much success can be had purely by removing the excessive play in this joint or just by preventing the metal to metal contact using a sleeve or shim around the bolt.
The only other possible source of the sound I can think of is play in the rose joint.
Alan, I followed your instructions and removed the centre console, it did give much better access but not enough I agree.
To remove the bolt I mention and be able to refit I will need to cut a hole either side of the transmission tunnel. There are holes in the backbone chassis in locations that will then allow access to the bolt from either side but I'm still deciding if this is a step I want to take or get Spyder to perform their mod.
- gavk
- Second Gear

- Posts: 103
- Joined: 23 Apr 2014
gavk wrote:Stu
In which area are you thinking about using a threaded stud?
Good idea to get your lever chopped and modified in the way you described. I did manage to chop my lever in situ (using either jigsaw or dremel, can't remember) but it is very hard and my attempts at cutting a thread onto the lever failed.
Gav, the stud I was thinking about would be to change the female threads on my gear lever to a male thread. Assuming this would present male threads to both sides of the coupling bushing.
Here is a picture looking down on the cut gear lever. The machinist drilled and tapped the hard steel lever on the portion that fits in the rose joint. The other piece was tapped to corresponding male threads. The grub screw is on the female end.
I went out to the shed yesterday and checked my stock four speed. It is the reverse, with a male thread on the gear lever stub attached to the shift mechanism. I can't find the bush and lever right now, and its bloody cold outside here right now.
20/20 hindsight I think I should of had the machinist do my MT75 in the opposite configuration, with the male thread on the stub and using the same thread as the stock shift lever. i might have been able to just thread the stock lever on to the MT75? Thinking a bit more about this mod, I am pretty sure the machinist would have used the same thread size as the shift knob, as he had to cut the lever to it's final length and thread the top end for the knob. so it would have made sense to use the same die. Perhaps the shift knob thread and the stock four speed stub thread are the same size and I 'lucked out'.
From your excellent description I think the Spyder kit would work better than the bush idea.
I imagine Spyder just unfastens the transmission mount and pivots the engine and transmission down to provide access to the rose joint and linkage? That said, still a bit of a job, and probably way easier with a proper lift.
HTH and sorry for length, but hopefully helps someone out doing a future Zetec.
Stu
- Attachments
-
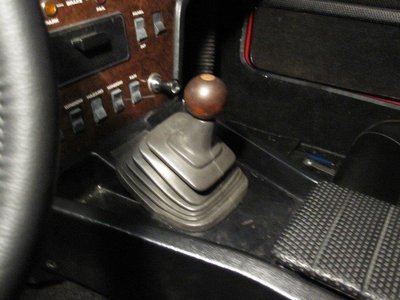
- This shows the final position of the shifter inside the car. The shift lever and after market boot is slightly back from the stock position, so I had to add a plastic filler piece to the console. I actually prefer the modified shifter position to stock, as I have moved my seat back a bit for more leg room.
-
- Spyder MT75 shift linkage from top. Shows locally machined female threads and grub screw to allow removal of shift lever. This facilitates removal of engine and transmission from the car. If the shift lever is full length the car has to be blocked too high in the air for my club available engine hoist to get the assembly out of the engine bay. I still have to do engine removal outside as my ceiling is too low for the crane.
Stu
1969 Plus 2 Federal LHD
1969 Plus 2 Federal LHD
-

stugilmour - Coveted Fifth Gear

- Posts: 1942
- Joined: 03 Sep 2007
Ahh, I'm with you now Stu, you are talking about placing a bush on the gear lever shaft, like the type 9 one Alan attached, now it all makes sense.
Should've mentioned a third potential source of the metal to metal noise could be the circlip above the rose joint, which stops the gear lever sliding through.
The slot it sits in is a little deeper than the clip itself and I wonder if reducing this play between the lever and circlip could also help.
The way I see it there are 2 issues:
1. The excitement of the whole mechanism which Spyder has attempted to reduce with their kit.
2. The sources of play in the mechanism which consequently allows a relative motion between 2 metallic parts and produces the noise we hear.
Alan, I know you talk to Spyder regularly, have they ever mentioned which part(s) of the mechanism they believe is responsible for the actual noise?
- gavk
- Second Gear

- Posts: 103
- Joined: 23 Apr 2014
I may have made a bit of progress on this topic.
As discussed previously I can see three possibilities for reducing vibration.
1.Isolate the assembly (the Spyder method). A nice solution but quite an expensive fix and, as far as I'm aware, not guaranteed to work if you have a heavy gear knob.
2.Reduce the play in the mechanism if you can identify where the play is occuring.
3.Move natural frequency of the part vibrating away from the excitation frequency
Since i have a lovely classic ferrari style solid metal gear knob (heavy) i was concerned the spyder fix might not work for me. So I have attempted option 3, I thought it may be possible to reduce the vibration by changing the resonant frequency of the gear lever or lever assembly. My initial thought was to attach a small mass to either the selector rod or the mounting bracket but due to poor access I decided to start by the adding mass to the gear lever. I bought 2 x 100g lead weights from eBay and using amalgamating tape and cable ties I attached the weights to the lower portion of the gear lever (below gear knob but above rose joint).
Voilla! Resonance has now been shifted out of the operating frequencies of the engine. WOT all the way to redline and no buzz or sizzle from the mechanism, needless to say I'm a happy boy.....and the cost...about ?1.50!
I know adding lightness is supposed to be the Lotus ethos but 200g for a sizzle free gear lever is a weight penalty I'll take any day. The mass is totally hidden away, under the leather gear lever gaitor so aesthetically there is no change.
Hope this helps someone
Gav
- gavk
- Second Gear

- Posts: 103
- Joined: 23 Apr 2014
Gav,
Well done with that solution, nicely thought out and cheap as chips!
I will give it a try on another car I know of that's getting the sizzle!
Well done with that solution, nicely thought out and cheap as chips!
I will give it a try on another car I know of that's getting the sizzle!
Kindest regards
Alan Thomas
Alan Thomas
-

Spyder fan - Coveted Fifth Gear

- Posts: 2019
- Joined: 11 Jun 2009
Cheers Alan,
I was thinking along the lines of "dynamic vibration absorbers" from my uni days, basically you attach a sprung mass so that it can vibrate and cancel out the existing vibration. I placed the amalgamating tape under the lead weights in the vain hope that it would add an appropriate sprung stiffness however its more likely that by increasing the mass of the whole assembly I've shifted the resonance.
Here are the weights anyway
http://pages.ebay.com/link/?nav=item.vi ... GB&alt=web
If this method doesn't work for your friend then there are a few other additional steps that I found helped before I added the weight.
1. Tighten bottom bolt attaching gear lever to rod (not too tight or you'll lose ability to select gears)
2. Periodically grease the rose joint (not for lubrication but to damp fast vibrations and take up slack in the joint
3.Lift the gear lever upwards to take the up/down play out of the assembly. While still lifting, attach jubilee clip around base of gear lever (above rose joint).
All 3 definitely helped me but the weights are the ones that sealed the deal
- gavk
- Second Gear

- Posts: 103
- Joined: 23 Apr 2014
I can now report that my MT75 sizzle has been cured!
Following on from my last train of thought, I believed there was some play in the linkage and the vertical play of the lever was one of my main suspect.
On my Spyder supplied lever there is a circlip at the base of the lever, just above the rose joint. The circlip prevents the lever from sliding down through the rose joint. With the circlip in place I found vertical play in the assembly. The circlip seemed to have slightly less depth than the groove it sat in.
I decided to test various sizes of shim under the circlip in order to limit the free play and voilla!
This is the size I found worked best
Flat Metric Steel Shim Washer : 0.2mm Thickness [DIN988]
Size: 13mm ID x 19mm OD x 0.2mm
https://www.ebay.co.uk/itm/Flat-Metric- ... 2749.l2649
Method
- Remove gear knob
- Remove gaiter
- Remove circlip (I made sure to cover the gaps in the transmission tunnel when doing this, the circlip has a tendancy to ping off and is easily lost into the dark tunnel below)
- Slide shim over lever and down to base
- Replace circlip so that it sits snugly on top of shim
- Replace Gear gaitor & Knob
- Merrily rev your engine to 7k+ with no more annoying sizzle
- gavk
- Second Gear

- Posts: 103
- Joined: 23 Apr 2014
12 posts
• Page 1 of 1
Total Online:
Users browsing this forum: No registered users and 16 guests

