
Can you please take me to school on painting a project
24 posts
• Page 1 of 2 • 1, 2
![]() Post by: tdskip » Sat Mar 28, 2015 12:10 pm
Post by: tdskip » Sat Mar 28, 2015 12:10 pm
Good morning, and thanks in advance for the coaching. I am looking at an Elan which would be my first fiberglass bodied car, and since it is stripped down to the gel coat she'll need a fair amount of work to be back on the road. I am OK with a MIG welder and have prepped a couple TRs for paint (driver quality) but am pretty sure welding skills won't help me on the body of an Elan (ha).
There are paint and restoration shops all around me in SoCal that are familiar with Corvettes and VW conversions, so in theory I could thrown money (once I find money to throw that is) at it but I was hoping to learn what I should be expecting as a ballpark cost to get a good (but not show) paint job done and how I can put sweat and effort of my own to make that a quality and less expensive job. My intention is to use the car for touring events up/down the West coast and she'll all the bumps and bruises that go along with that, so presentable but not to a point where I want to think twice about using her is the goal.
Thanks for suffering through a long post!
SoCal
1969 Elan DHC
1969 Elan DHC
- tdskip
- Third Gear

- Posts: 426
- Joined: 13 Sep 2012
![]() Post by: Spyder fan » Sat Mar 28, 2015 12:58 pm
Post by: Spyder fan » Sat Mar 28, 2015 12:58 pm
Welcome and good choice on your new project.
I painted my +2 Elan 8 years ago and I'm not ashamed to park it next to fresh professional painted cars. My block sanding skills are not quite as good as professional body shops, so there are ripples on some of the panels, but many in the know tell me this is more original compared with the overdone smooth restored cars. I also have an S4 Elan that I paid an excruciating amount of money to a body shop to get them to do a 1st class job, and a 1st class job it is, but I'm reluctant to park it down the shops or let it out of my sight.
The biggest enemies for repainting fibreglass cars are moisture and stress cracks, the shell needs to be thoroughly dry before applying paint and the stress cracks need to be correctly repaired. There are some pretty good guides on the web on how to correctly deal with stress cracks, but I or somebody else on here can post it up for you. I'm guessing that the climate in your part of the world will help with having a dry body shell to work on.
It sounds as though a lot of the hard work removing the paint has been done already and you can easily identify problem areas.
Preparation is the hard part, painting is relatively easy, I reccomend 2k high build primer, and base & clear coat, forget cellulose based paints they are soft and quick to deteriorate. A disposable mask can be purchased for safe use of 2k paint.
Good luck, keep us posted.
Kindest regards
Alan Thomas
Alan Thomas
-

Spyder fan - Coveted Fifth Gear

- Posts: 2028
- Joined: 11 Jun 2009

![]() Post by: tdskip » Sat Mar 28, 2015 1:19 pm
Post by: tdskip » Sat Mar 28, 2015 1:19 pm
Thank you for the fast and detailed response Alan, encouraging.
I have quite a bit of research to do still, which is part of the fun, but any tips on knowing you've repaired a stress crack properly? Getting a panel straight or smooth to some extent is a function of "just" hours invested in methodically working on it, but stress cracks are a whole new topic for me. I am used just to things just denting!
While I have huge appreciation for show quality work and the vast effort (and often sums of money involved) I want to be able to use her without thinking twice. Just my personal take, influenced by being a clumsy and having kids milling around.
SoCal
1969 Elan DHC
1969 Elan DHC
- tdskip
- Third Gear
- Posts: 426
- Joined: 13 Sep 2012
![]() Post by: Elanintheforest » Sat Mar 28, 2015 1:58 pm
Post by: Elanintheforest » Sat Mar 28, 2015 1:58 pm
This document is a good primer. Look out for a book by Miles Wilkins on fibreglass repair as well....he knows his stuff!
Mark
Mark
- Attachments
-
 Fibreglass Repair.pdf
- (485.67 KiB) Downloaded 2651 times
-

Elanintheforest - Coveted Fifth Gear
- Posts: 2489
- Joined: 04 Oct 2005

![]() Post by: Spyder fan » Sat Mar 28, 2015 2:06 pm
Post by: Spyder fan » Sat Mar 28, 2015 2:06 pm
Mark has posted the document I was thinking of on stress cracks,
See here for Miles Wilkins book http://www.amazon.co.uk/Restore-Fibregl ... 0850455561
See here for Miles Wilkins book http://www.amazon.co.uk/Restore-Fibregl ... 0850455561
Kindest regards
Alan Thomas
Alan Thomas
-
Spyder fan - Coveted Fifth Gear
- Posts: 2028
- Joined: 11 Jun 2009
![]() Post by: TroonSprint » Sat Mar 28, 2015 2:20 pm
Post by: TroonSprint » Sat Mar 28, 2015 2:20 pm
I'm with "tdskip" all the way. My ?lan shell needed repairs and repainting but had no stress cracks. There was some delamination of the gel coat and I didn't know how to deal with it. Like you I wanted a good finish, but not a top quality coat as then I wouldn't want to use it.
After some research I contacted the International boat paint people and they were incredibly helpful. They told me how to deal with the delamination and what products to use, in what order. They then suggested I paint it in International Perfection 2-pack by brush. It came out incredibly glossy but with brush marks. A few hours rubbing down and compounding had it looking marvellous.
OK it's not entirely flat smooth, but it looks great and most folk are amazed when told it was painted with a brush. The paint is remarkable. When dry it is like a plastic sheet and it is very flexible without any sign of cracking. A 1/4 inch that dried in the bottom of a mixing beaker is like a rubber disc. Of course it isn't in official Lotus colours, but since my car was red, I found their Rochelle Red was an extremely close match to the "proper" colour.
Mike
- Attachments
-
 Viewed 1688 times")
-

TroonSprint - Fourth Gear

- Posts: 507
- Joined: 24 Nov 2011

![]() Post by: archigator » Sat Mar 28, 2015 2:55 pm
Post by: archigator » Sat Mar 28, 2015 2:55 pm
Do they make a proper "gold" color for the bumpers? It looks fantastic!
Gary
'71 Sprint FHC
Miami, Florida
Gary
'71 Sprint FHC
Miami, Florida
-

archigator - Third Gear
- Posts: 446
- Joined: 15 Sep 2003

![]() Post by: jimj » Sat Mar 28, 2015 3:16 pm
Post by: jimj » Sat Mar 28, 2015 3:16 pm
I have a Sprint that`s close to 100 points perfect but I certainly am not reluctant to use it or park it, wherever. I`d rather spend money on petrol than polish, but it is nice to see it looking really good. Do spend as much time and money as you can and you won`t regret it.
Jim
Jim
- jimj
- Fourth Gear
- Posts: 876
- Joined: 25 Feb 2008
![]() Post by: Jon.ford » Sat Mar 28, 2015 4:10 pm
Post by: Jon.ford » Sat Mar 28, 2015 4:10 pm
TroonSprint wrote:I'm with "tdskip" all the way. My ?lan shell needed repairs and repainting but had no stress cracks. There was some delamination of the gel coat and I didn't know how to deal with it. Like you I wanted a good finish, but not a top quality coat as then I wouldn't want to use it.
After some research I contacted the International boat paint people and they were incredibly helpful. They told me how to deal with the delamination and what products to use, in what order. They then suggested I paint it in International Perfection 2-pack by brush. It came out incredibly glossy but with brush marks. A few hours rubbing down and compounding had it looking marvellous.
OK it's not entirely flat smooth, but it looks great and most folk are amazed when told it was painted with a brush. The paint is remarkable. When dry it is like a plastic sheet and it is very flexible without any sign of cracking. A 1/4 inch that dried in the bottom of a mixing beaker is like a rubber disc. Of course it isn't in official Lotus colours, but
since my car was red, I found their Rochelle Red was an extremely close match to the "proper" colour.
Mike
That looks like an amazing job by a brush have you any more pics and details of the process
Jon ford
You know you have a good car when your wife hates it.
-

Jon.ford - Second Gear

- Posts: 59
- Joined: 26 Sep 2011

![]() Post by: Grizzly » Sat Mar 28, 2015 4:26 pm
Post by: Grizzly » Sat Mar 28, 2015 4:26 pm
First off what colour are you doing it? i'd only recommend a direct Gloss if DIY Metallic's really need a booth.
OK, so Strip all the Old paint off the grp (if you have to use Paint stripper make sure its Water base, stop when you get to the grey primer and rinse it thoroughly!!) but i'd recommend the dull blade method, do your repairs and seal it with Epoxy high build, leave that a week (its important to leave it until fully cured and guide coat it with a contrasting colour like Black on light grey etc so you can see the Imperfections) then block it back with 240's trying not to break through anywhere then start pin hole hunting, when you have it really good add 2 coats of quality 2K high build and once dry Flat with 800's then your good for top coat.
The problem with GRP is it's Porous so needs to be sealed with a very stable sealer such as Epoxy and 2k high build is not upto the job no matter what people will tell you it just doesn't key anywhere near the same.
Last tip is Less is More, don't hammer any paint on as all it does is Trap Solvent or in the case of High build sink into the repairs (thats if there not 100%) for example 2 coats of high build and cure/flat, if it doesn't look right or you go through repeat the High build rather than applying four coats (if that makes sense). Don't try and cut corners because a good paint job is all about the prep and that's where you need to spend your time (same for masking, do a good job masking up or you will blow over spray all over bits it shouldn't be).
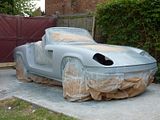
I painted mine last year at home (most of the prep and primer on the drive )
)
We used a brush 2k to do a coach must be 6 years ago now, it looked great until summer came and re-softened it but i'm not a Brush man i spray cars and have done for 30ish years so i stick with what i know.
OK, so Strip all the Old paint off the grp (if you have to use Paint stripper make sure its Water base, stop when you get to the grey primer and rinse it thoroughly!!) but i'd recommend the dull blade method, do your repairs and seal it with Epoxy high build, leave that a week (its important to leave it until fully cured and guide coat it with a contrasting colour like Black on light grey etc so you can see the Imperfections) then block it back with 240's trying not to break through anywhere then start pin hole hunting, when you have it really good add 2 coats of quality 2K high build and once dry Flat with 800's then your good for top coat.
The problem with GRP is it's Porous so needs to be sealed with a very stable sealer such as Epoxy and 2k high build is not upto the job no matter what people will tell you it just doesn't key anywhere near the same.
Last tip is Less is More, don't hammer any paint on as all it does is Trap Solvent or in the case of High build sink into the repairs (thats if there not 100%) for example 2 coats of high build and cure/flat, if it doesn't look right or you go through repeat the High build rather than applying four coats (if that makes sense). Don't try and cut corners because a good paint job is all about the prep and that's where you need to spend your time (same for masking, do a good job masking up or you will blow over spray all over bits it shouldn't be).
I painted mine last year at home (most of the prep and primer on the drive

We used a brush 2k to do a coach must be 6 years ago now, it looked great until summer came and re-softened it
Chris
-

Grizzly - Coveted Fifth Gear
- Posts: 1857
- Joined: 13 Jun 2010

![]() Post by: Tahoe » Sat Mar 28, 2015 4:55 pm
Post by: Tahoe » Sat Mar 28, 2015 4:55 pm
Interesting, I have never heard of that paint. Did a little research and some recommend a roller and only one coat. Seems to be big in the yahting world. It looks good but I'm sticking with a more conventional method.
- Tahoe
- Third Gear
- Posts: 498
- Joined: 19 Sep 2010
![]() Post by: TroonSprint » Sat Mar 28, 2015 8:03 pm
Post by: TroonSprint » Sat Mar 28, 2015 8:03 pm
For those of you who have expressed an interest, this was the procedure.
1. Strip the old paint with a water based stripper. I'm away from home at the moment and can't remember the name of the stuff I used. It took hours to act, but was pretty effective. Make sure there is no loose stuff in the damaged areas.
2. Let the body dry for ages and ages.
3. Sand smooth with 300 grit.
4. Apply two coats of International Interprotect Primer, allowing it to dry for 24 - 48 hours between coats. Sand lightly with 300 grit.
5. Repair the delamination with International Watertite 2-pack Filler. This is super stuff and makes a creamy smooth filler that's easy to apply. Allow to dry for 24 - 48 hours. International stressed not to put the filler straight on the body but to prime it first.
6. Sand lightly with 300 grit.
7. Apply two coats of Interprotect Primer as in 4. above. Sand lightly between coats with 300 grit.
8. The body now looks super smooth and matt grey.
9. Apply two coats of Perfection Undercoat. Allow to dry 24 - 48 hours between coats. Sand lightly with 300 grit.
10. Apply three coats Perfection top coat. Allow to dry 24 - 48 hours and lightly sand between coats with 300 grit. The car will now shine like glass but brush marks will be visible.
11. Cut back the brush marks with 1500 or 2000 grit. This takes a while and will make the paint look terrible.
12. Finish off with a machine polisher and Farecla G3 compound. It should now look like my photo.
As you can see it is weeks of work, but doesn't cost an arm and a leg. Drying times depend on the temperature. I live in Scotland - say no more. I used one can each of the primer and undercoat. I also only needed one can of the white for the lower half, but used three cans of the red top coat.
I still needed a decent mask as the paint gives off quite a powerful solvent smell. For brushes, buy the best you can find. The paint is applied in one direction and then laid off at 90 degrees very lightly with the brush. It is slow to dry so try to keep bugs away from it. International say it can be applied with a roller, but I didn't try that.
The finish on my car won't please the purists, partly because it isn't an official colour (although it's damned close) and, I don't want to fool you, it isn't perfect. Looking along the body it is not entirely smooth. But it's my car and I'm pleased with it. The colour is rich and the paint has a good shine.
There was no gold colour suitable for the bumpers, so they have been sprayed with an appropriate colour from a rattle can.
Thanks for all the comments.
Mike
-
TroonSprint - Fourth Gear
- Posts: 507
- Joined: 24 Nov 2011
24 posts
• Page 1 of 2 • 1, 2
Total Online:
Users browsing this forum: snowyelan and 30 guests