S3 Restoration
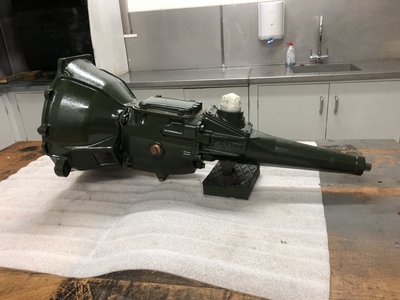
Done (apart from the selector cover bolts/breather, mount, release fork and slave cylinder).
Very happy!
Very happy!
- glennmoule
- Second Gear

- Posts: 105
- Joined: 08 Jul 2019
Hi Glen,
Looks good. Did you remember to put the bottom right hand, (looking forward) bellhousing bolt in with sealant?
I didn?t. Had to pull engine and gearbox back out of the car to rectify.
Cheers,
Colin.
uote="glennmoule"]Done (apart from the selector cover bolts/breather, mount, release fork and slave cylinder).
Very happy![/quote]
'68 S4 DHC
- fatboyoz
- Fourth Gear

- Posts: 631
- Joined: 04 Oct 2003
Hi mate, yes I most certainly did.
My only hiccup with the assembly was the counter shaft fouled on the bell housing due the the orientation of the flats on the front face. They didn?t fit in the cast recess on the housing so I had to remove the tail section again. No worries as it only took 5 minutes to correct.
What I did find on inspection was the selector forks heavily worn. I am sure the Red Line GL4 oil I am going to use will minimise this in the future but it was alarming considering that the rest of the box was in great shape.
I ended up replacing 1/2 and 3/4 selector forks, all bearings, seals and gaskets, output shaft bush and most importantly the paint.
It is now a show piece and don?t want to use it.
- glennmoule
- Second Gear

- Posts: 105
- Joined: 08 Jul 2019
Hi Glen,
I left mine in all of it?s unpainted glory. I will be ticking over 81,000 miles today, and the gearbox seems to like the Redline MTL as per Rohan?s recommendation.
Can still remember the day I fired the car up after 22 years of slumber. Now trying to make up for lost time.
Cheers,
Colin.
ote="glennmoule"]Hi mate, yes I most certainly did.
My only hiccup with the assembly was the counter shaft fouled on the bell housing due the the orientation of the flats on the front face. They didn?t fit in the cast recess on the housing so I had to remove the tail section again. No worries as it only took 5 minutes to correct.
What I did find on inspection was the selector forks heavily worn. I am sure the Red Line GL4 oil I am going to use will minimise this in the future but it was alarming considering that the rest of the box was in great shape.
I ended up replacing 1/2 and 3/4 selector forks, all bearings, seals and gaskets, output shaft bush and most importantly the paint.
It is now a show piece and don?t want to use it.[/quote]
'68 S4 DHC
- fatboyoz
- Fourth Gear

- Posts: 631
- Joined: 04 Oct 2003
My only hiccup with the assembly was the counter shaft fouled on the bell housing due the the orientation of the flats on the front face. They didn?t fit in the cast recess on the housing so I had to remove the tail section again. No worries as it only took 5 minutes to correct.
I don't think the "flats" are on the front face nor go towards the bell housing but rather toward the rear and are "captured" by a relief in the tail shaft housing along with a separate one for the reverse idler shaft.
I don't think the "flats" are on the front face nor go towards the bell housing but rather toward the rear and are "captured" by a relief in the tail shaft housing along with a separate one for the reverse idler shaft.
- joe7
- Second Gear

- Posts: 165
- Joined: 09 Oct 2013
Hi Joe7, yes you are correct. I wrote that out completely wrong.
I was supposed to mention that the shaft was pushed through too far on the bell housing side due to the flats being incorrectly positioned. That was stopping the bell housing from seating in the right place.
I was supposed to mention that the shaft was pushed through too far on the bell housing side due to the flats being incorrectly positioned. That was stopping the bell housing from seating in the right place.
- glennmoule
- Second Gear

- Posts: 105
- Joined: 08 Jul 2019
Glen,
Welcome. I'm restoring my pre-airflow FHC too. I've owned it since 1978 and drove it for 6 years back then.
The wiring diagram for the coupe is same as the S2 roadster, except the window switch/ motor circuits have been added. I'm sure you can figure that out. Wow, what a nice shop you have, so much room and looks like you will have your own in-house paint booth.
My guess for your Alpine motor was out of a Lancia, but Alpine's neat too.
Roger
'67 Elan S3 SS DHC
'67 Elan FHC pre-airflow
'67 Elan S3 SE upgrade to 26R by Original owner
'58 Eleven S2 (ex-works)
'62 20/22 FJ (ex-Yamura)
'70 Elan +2S RHD
'61 20 FJ project
'76 Modus M1 F3
'67 Elan FHC pre-airflow
'67 Elan S3 SE upgrade to 26R by Original owner
'58 Eleven S2 (ex-works)
'62 20/22 FJ (ex-Yamura)
'70 Elan +2S RHD
'61 20 FJ project
'76 Modus M1 F3
- Elan45
- Fourth Gear

- Posts: 957
- Joined: 23 Nov 2008
Hi Roger, thanks for the wiring info.
At what stage are you with your restoration? Assuming a little further than me.
The Alpine engine is out of an Alpine A220 (it is actually a Gordini motor).
At what stage are you with your restoration? Assuming a little further than me.
The Alpine engine is out of an Alpine A220 (it is actually a Gordini motor).
- glennmoule
- Second Gear

- Posts: 105
- Joined: 08 Jul 2019
And yes, I knocked up a small paint booth years ago that has proven to be the most handy tool I have.
Thankfully I don?t have a booth large enough for a car body. My hours are better spent on the rest of the car.
Thankfully I don?t have a booth large enough for a car body. My hours are better spent on the rest of the car.
- glennmoule
- Second Gear

- Posts: 105
- Joined: 08 Jul 2019
After a short break I am back on the Elan.
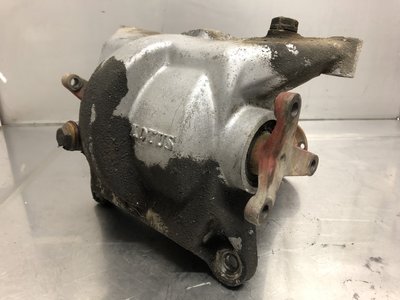
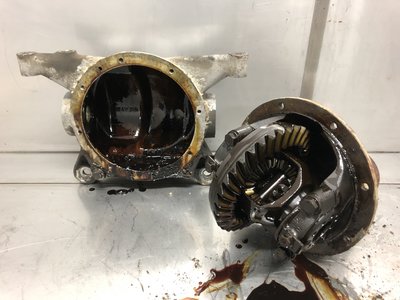
Differential opened up tonight. A right surprise with the amount of gunk inside.
More to come tomorrow.
Differential opened up tonight. A right surprise with the amount of gunk inside.
More to come tomorrow.
- glennmoule
- Second Gear

- Posts: 105
- Joined: 08 Jul 2019
Chassis numbers... can anyone help?
The number on the top of the tunnel is, I assume, the Lotus part number.
The chassis number is on the RHS front chassis rail.
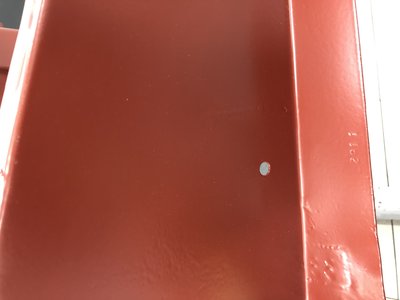
What is the number stamped on the lower section of the rail, below the chassis number? In this case it is 2911.
Help!!!!!!
The number on the top of the tunnel is, I assume, the Lotus part number.
The chassis number is on the RHS front chassis rail.
What is the number stamped on the lower section of the rail, below the chassis number? In this case it is 2911.
Help!!!!!!
- glennmoule
- Second Gear

- Posts: 105
- Joined: 08 Jul 2019
Hi Glenn
Chassis looks good - you've obviously had it cleaned and repainted after the repairs (my brother in law fitted two new turrets and repaired a few other odds and ends for Glenn). What have you painted it in = genuine red oxide or a modern coating?
Incidentally the number Glenn is referring to is on the upper face of the lower flange on the exhaust side below where the chassis number is stamped - its a four digit number 2XX1 so bears no resemblance to the chassis number or part number....
So I'm wondering what it is as well - has anyone else come across a similar stanping on their chassis?
Matt
Matthew Vale - Classic Motoring Author
1968 Plus 2 - Somewhat cosmetically and mechanically modified
1969 Plus 2S - Currently undergoing nut and bolt restoration
Visit me on matthewvale.com
1968 Plus 2 - Somewhat cosmetically and mechanically modified
1969 Plus 2S - Currently undergoing nut and bolt restoration
Visit me on matthewvale.com
-

Matt Elan - Fourth Gear

- Posts: 603
- Joined: 27 Oct 2011
My S2 had the original chassis on it when I acquired the car, all it had stamped on it was the Lotus part number, nothing else. I think my S3 may have had a chassis, but a long time ago and my Sprint is on it's original frame - at some point I will look see.
-

Mazzini - Coveted Fifth Gear

- Posts: 2061
- Joined: 11 Dec 2010
Hi Matt, yes thank you to you and your brother in law for organising the repairs to my chassis. It is now fit for another innings.
I painted it 2k RAL 3009. As much of a purist that I am, I could not and will not paint a chassis in red oxide. It takes on moisture and... well we all know what happens next.
My painter has applied this in a way that you cannot tell in appearance that it is not red lead.
Onwards and upwards from here.
With the diff nearly finished, I am close to assembling the chassis now.
- glennmoule
- Second Gear

- Posts: 105
- Joined: 08 Jul 2019
Total Online:
Users browsing this forum: No registered users and 35 guests


