Restore Log - '68 Coupe
46 posts
• Page 2 of 4 • 1, 2, 3, 4
Thanks to Old English White (Christian) I looked a bit harder into header clearance. From what I've been told only the largest bore TTR headers need a proper cutout in the chassis. Others may need the top flange bent down a bit. Sounds like all need the engine mounts loosend and taken out of the way so the engine can be scooted over if you want to try to fit them with the motor in the car. I didnt know that possible!
Here is a photo from TT of a typical notch for his big headers:
Here is a photo from TT of a typical notch for his big headers:
- mini64
- Second Gear

- Posts: 179
- Joined: 26 Aug 2005
I have to thank Gary Anderson, Oldelanman and finally Gordon Sauer for dimensions and a cardboard cutout to help me reconstruct my radiator opening. If you didnt read way above, jackrabbits had supposedly eaten away most of it when they lived in the nose while the car was in the CA desert.
link to the opening thread: lotus-chassis-f36/request-paper-template-grill-opening-t21031.html#p123956
link to the opening thread: lotus-chassis-f36/request-paper-template-grill-opening-t21031.html#p123956
Last edited by mini64 on Fri Oct 25, 2013 9:12 pm, edited 2 times in total.
- mini64
- Second Gear

- Posts: 179
- Joined: 26 Aug 2005
For some insane reason I like to build my own roll cages. Dont ask me to build one for you - I'd charge far more then the $1500+ they are listed for!
More or less copied the TTR design with door bars across the door openings. I tied the lower sill bars into the front hoop, and put cross bars across the front and rear hoops. Just below the lower portion of the front hoop I added some "pads" to act as jacking points to lift either side of the car. Reinforced the fiberglass here to help out.
I came up with something creative to allow myself to weld all around the top joints. I've seen people cut off roofs, or cut holes in the floor to drop the cage down: If you look at the lower vertical portion of the front bar in the photo you'll see what looks like a collar around it. This is indeed a larger diameter tube over a join in the vertical members. I made these vertical members on the front and rear hoops two piece so once I tacked everything together I could lift the collar, remove the lower half allowing the cage to drop about 8 inches, weld around all the upper joints. Then I put the lower pieces back in and weld around the joins, ground the weld smooth and let the pre-installed collar drop over the join and weld around the collar. Also found I had to cut some pretty big holes in the rear fenderwells to weld up the sill support tubes. Of course the TTR unit is bolt on here so you only need a small hole to slide the tube in.
some photos of others cages are here: http://race.fawcettengineering.com/coupe/cage/
Only caught the car on fire 3 times. Me - more...
Last edited by mini64 on Mon Oct 07, 2013 4:50 pm, edited 2 times in total.
- mini64
- Second Gear

- Posts: 179
- Joined: 26 Aug 2005
been another 6 months playing with the other race cars....
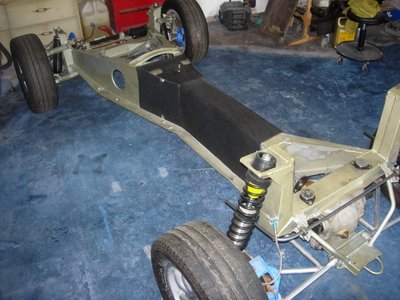
chassis awaiting its home to be finished.
the body pad is 1/2" thick closed cell PE foam from mcmaster.com - pn 93265k46. stuck on with contact adhesive
note the little tow hook welded onto the back. I put that on more for tying down the car to a trailer. May remove it as since then i've welded on a reinforcement under the chassis there to act as a jack pad and mount for a tow hook. photo when its done.
also note the beginnings of a rear anti-roll bar.
- mini64
- Second Gear

- Posts: 179
- Joined: 26 Aug 2005
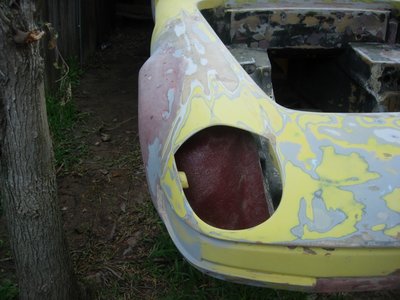
so after spending a month sanding, grinding and filling cracks, declaring the body ready to paint (no, i didnt sand it to bare glass), i decided i wanted to flare it. Mainly because i wanted more options on wide tires. I'll probably be putting 205's on it, as that's what I run on our 7 S4.
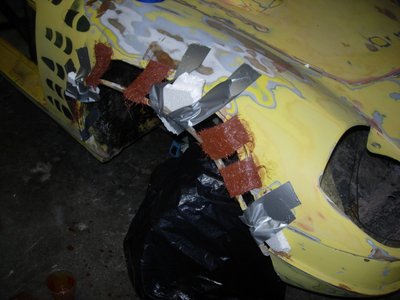
I wanted to keep a similar profile so I cut the wheel arch lip off, then cut back each opening. I then bonded on the original lip with some temporary spacers. I'm afraid i lost photos of the rest of it. But the next step was using the canned spray foam insulation to fill the gap (use the sandable type that gets a bit stiffer). cut this back with a loose hacksaw blade then sanded the profile i wanted. This turned out to be easier then I thought it would with a 6" diameter air powered random orbital sander. After this I glassed two layers over the top with some matt, ground out the foam from underneath and put another layer of matt on from the underside, then sanded for a million hours. I use resins and glass from RAKA. Put plenty of filler in the resin for the top layer of glass to make it sand easier.
Note in the photo of the front flare I also cut out the front of the wheel well and reglassed it with a slight buldge so the tires wont rub when turning. edit- best to do this early on when you have the body on the chassis and the headlight buckets handy - i had to modify my pockets as the headlights hit them!
Last edited by mini64 on Mon Oct 07, 2013 4:54 pm, edited 1 time in total.
- mini64
- Second Gear

- Posts: 179
- Joined: 26 Aug 2005
Excellent, just excellent... you can't beat doing it all yourself. If only I could do bodywork.....
cheers
Mark
cheers
Mark
-

mark030358 - Coveted Fifth Gear

- Posts: 1182
- Joined: 29 May 2004
Looks great. Glad you are having some fun working , planning, bringing back a real car that will provide you with more joy in the future. Seems like like this site has lost a lot of folks that do that kind of thing. I wish everyone could share their enthusiasm for Elans like you have.
Thanks
Gary
Thanks
Gary
-

garyeanderson - Coveted Fifth Gear

- Posts: 2626
- Joined: 12 Sep 2003
Quite nice, what is the code/name of the blue?
art
- lightwait26
- First Gear

- Posts: 28
- Joined: 05 Oct 2009
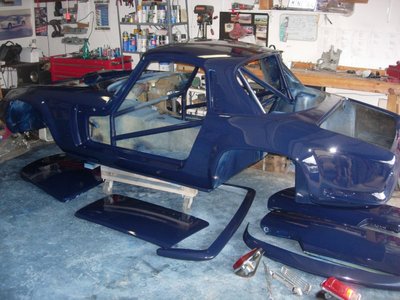
for the paint color I went down to my local TASCO paint supplier and looked through the chips for a deep blue. Picked a PPG color - codes show NA198540 and OEM EFT 64900. Its a single stage polyurethane enamel , ESSS degleet Essential. Very pretty deep blue, almost looks black in the shade.
Applied with Harbor freights best. Extra drier in line plus one on the gun. Learned you sweat a lot when painting in an enclosed Texas garage, but interestingly the sweat drips dont do much to the paint! I did have quite a bit of orange peel that I sanded and buffed out.
Applied with Harbor freights best. Extra drier in line plus one on the gun. Learned you sweat a lot when painting in an enclosed Texas garage, but interestingly the sweat drips dont do much to the paint! I did have quite a bit of orange peel that I sanded and buffed out.
- mini64
- Second Gear

- Posts: 179
- Joined: 26 Aug 2005
Once again life?s trials have gotten in the way of the restoration. Worked on it very little this past year but am now at least trying to get it street legal. This means some projects will be for later like the modern headlight lift motor, lexan rear screen and door windows, or maybe a manual lift for the door windows, etc. Those will be some day projects. Now for the progress:
Dash-
You may think it sacrilege, but I?ve never thought wood belonged in a sports car. Yes, I know it can be beautiful, but I always wanted to try something different ? ?? clear plexi painted and labeled from the backside, with the gauges mounted behind. Here is what I came up with:
Funny, I work at a place with over 30 CNC milling centers that could pop out a dash in about 5 minutes, but here I am with a dremel tool and a straight edge!
Almost finished product. The red lights are the LED strips sold everywhere these days ? they are my low oil pressure/high water temp warning indicator.
- mini64
- Second Gear

- Posts: 179
- Joined: 26 Aug 2005
The expensive bits: JE Pistons, Crower H-beam rods, steel main caps, Fidenza flywheel, crank as yet to be named incase it blows up on me!
Also making a custom oil pan. Our rules state we have to use a wet sump (although some have switched). It will be winged for a bit of extra capacity, then fully baffled with a center pocket with the hinged doors. I've played around with an accusump on the 7 motor and still run it but i swear it doesnt help in the corners. Why I dont know?! I do like the pre-charge of oil at startup though.
Also making a custom oil pan. Our rules state we have to use a wet sump (although some have switched). It will be winged for a bit of extra capacity, then fully baffled with a center pocket with the hinged doors. I've played around with an accusump on the 7 motor and still run it but i swear it doesnt help in the corners. Why I dont know?! I do like the pre-charge of oil at startup though.
- mini64
- Second Gear

- Posts: 179
- Joined: 26 Aug 2005
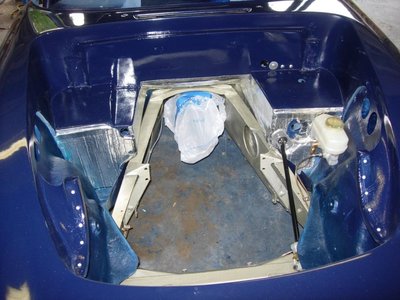
lined the tunnel either side of the engine/headers with DEI's reflect-a-cool, then on the front of the footwells some "Tru-max super insulator matt" I had from another job. here you can see my header cutout on the chassis.
Had I been super ambitious in the body work stage I may have done some modifying of the foot wells. Lower the top of the right one for carb clearance, and to allow engine lowering, and narrow the left one a bit for header clearance.
that nice new brake fluid reservior was a lucky find - it was on ebay being sold as a landrover part.
Ignore the missing bell housing. I had to steal it for another car- argh.
Last edited by mini64 on Fri Oct 25, 2013 9:05 pm, edited 1 time in total.
- mini64
- Second Gear

- Posts: 179
- Joined: 26 Aug 2005
Wow, great job on the work done so far. Looking forward to seeing the progression. Thanks for posting.
- astrotrain99
- New-tral
- Posts: 1
- Joined: 04 Jun 2009
46 posts
• Page 2 of 4 • 1, 2, 3, 4
Total Online:
Users browsing this forum: tonyabacus and 8 guests

