Rear Seat Belts
36 posts
• Page 3 of 3 • 1, 2, 3
Salut Vernon
I think the problem here is also that there are no real guidelines or tests on modified rear belts, including my own Mick Miller 3 point belts
But you just have to try something and say to yourself ...am I happy with my child in that seat belt. If the answer is yes then its OK!
Anything that is braced between the turrets will probably be OK ....mine aren't, but they are Mick Millers special bracket.
All the best
Terry
Last edited by terryp on Wed Aug 03, 2011 8:28 am, edited 1 time in total.
- terryp
- Coveted Fifth Gear

- Posts: 1264
- Joined: 29 Nov 2007
Vernon
Having a five year old son I have been through all the problems of child seats. I have had massive problems getting the correct fit in modern cars. Sports seats cause big problems (especially in Alfa Romeos). I am just about to turn my attention to the Lotus.
As this is a public forum and a very serious subject any thing I mention about fixing brackets in a Lotus is purely THEORETICAL and you must not take it as recommendation. Your childs safety is at stake.
Couple of pointers I learnt. Modern child seats are designed for using with inertia reel belts and therefore rely on the lap part and also the diagonal crossover for correct fitting. The clip/buckle part of the seat belt must not touch the seat, The manufacturers call this ?Buckle Crunch? in an accident if the buckle is in contact with the seat there is a great risk of the buckle casing shattering and belt coming loose ( or the seat cracking).
On the younger child seats they have there own built in harness so it might be possible to strap the seat in with fixed belts but you need to think where the inertia reel belt would be restraining the seat especially on the diagonal as it will help stop the seat tipping forward and try and replicate it.
One possibility I did think of is the latest seats have ?ISOFIX? mountings these are universal mountings on the bottom of the seat and clip onto two metal bars behind the seat. If you look on a car built after 2002 you should see some holes at the back of the seat these are where brackets on the bottom of the child seat push through the seat and clip on. This secures the bottom of the seat but all the ones I have seen still use the inertia reel belt to stop the seat tipping forward. I recently bought some ISOFIX brackets for my Volvo which just bolt straight onto existing mounting points on the chassis. It was just a flat plate with two metal hoops welded on. Easy enough to replicate and mount in a car, you would then just have the problem of getting the seat brackets to push through the join between the seat cushion and back cushion to mate upto the ISOFIX mountings.
Clive
1972 Elan Sprint FHC
- cliveyboy
- Fourth Gear

- Posts: 595
- Joined: 22 Sep 2003
Hi Terry
Yes, that's my why of thinking, too - and is also the reason why I would get my father-in-law to do the welding rather than me...
Hi Clive
I looked into the IsoFix system, too - all the seats I've seen, like yourself, all need an additional three-point belt, i.e. no fixed back. Doesn't seem to be any real advantage to the system. Also almost all child seats are too wide for the +2 back seat. I'm also aware of the buckle crunch problem which doesn't make things easier.
On Richard Cox's suggestion I've bought the Bubble Bum booster that fits nicely (as it's infalatable and doesn't have arm rests). It's for 3-year-olds up and is supposed to be used with a three-point belt. However I think a four-point harness would be safer for a small child. There's no buckle crunch problem with the Bubble Bum and a fixed belt system is easier in my case. I've discounted inertia reeml systems for this reason.
Thanks for the feedback, guys.
@+
Vernon
-

vernon.taylor - Fourth Gear

- Posts: 683
- Joined: 05 Nov 2010
Salut les gars
I took the hood tray off and made a mock-up of my idea - a metal tube (plastic in the picture) welded to usual rear seat belt anchor plates. The shoulder straps of the harnesses to use wrap-around ends. They would thread under the hood tray/parcel shelf and over the back of the seat. Here's a link to some photos:
https://picasaweb.google.com/1160055589 ... directlink
I'd weld the tube on two sides - the lip of the anchor plate providing a bit of extra area and mechanical strength. The tube covers two of the screw holes, so only three per plate - two small and one big - unless I drilled a couple more. Looks more solid to me than Mick Miller's bracket (the mounting plate area is really small).
The picture with the inertia reel was just to see if it would fit - seems to but a channel would need to be made for it to slide freely.
Comments invited and appreciated.
Merci et @+
Vernon
-

vernon.taylor - Fourth Gear

- Posts: 683
- Joined: 05 Nov 2010
Salut
Still waiting for the belts to arrive which gives me time to ask another question:
- could someone send me or post a picture of the cutout to the tunnel top trim, please? I don't find the service manual too clear. I haven't done the outside trim cutouts either, but this looks more straightforward as its easy to mark the hole from the outside.
Merci
Vernon
-

vernon.taylor - Fourth Gear

- Posts: 683
- Joined: 05 Nov 2010
Salut
Update: belts fitted.
Here are a couple of photos of what I've done:
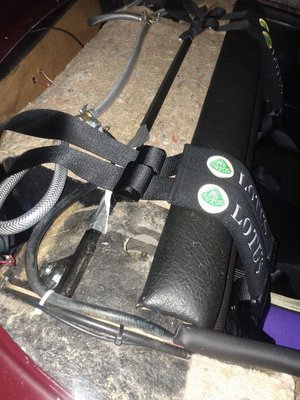
Here you can see one of the plates and the square section bar welded to it.
Above is a general view of the bar in place and a harness attached - wrap around for the shoulders.
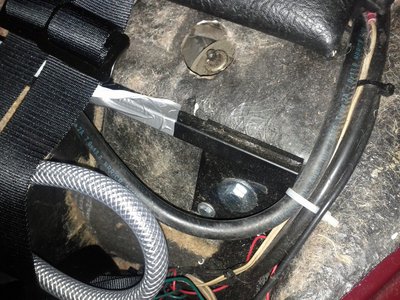
Above a detailed view. Gaffer tape used to stop the shoulder straps sliding along the tube.
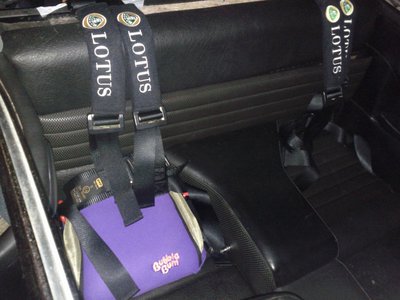
And everything back together with Bubble Bum booster:
A few comments: base plates were bought from Sue Miller. The holes were enlarged to give a bit of play because the alignment wasn't perfect and it made fitting them a lot easier. The tunnel plates are a two-man job. One side had enough room - the other I had ease in with a hammer. Exterior plates are easy enough to fit - if you enlarge all the holes a little.
The pre-cut holes in the fibreglass back of the trims are not well aligned. I used the pre-cut holes (contact glue used to make trim good) in the tunnel. With a bit of shoving they were OK, but it takes a lot of attempts to find the thread for the belt bolts. Holes in the rear-quarter trim were not in the right place.
Bolts are 7/16 UNF 1.5 inches. You'll need a spacer too for all anchor points.
What I'd do different: shorten the bar so all fixing bolts would find a flat under surface and use the standard plate back - I had to use oversize washers. Maybe use 20 mm section bar - but the 16 mm I used doesn't flex at all. A better plate could be designed rather than using a standard rear seat plate.
What I think: I think my system is stronger than the Mick Miller 3-point system, but probably not as strong as the Spyder system. However my shoulder anchors are not screwed into welded bushes which could be a weak point.
Other things I did: removed +2S rear seats for +2 seats. Without my foldable-type +2S rear seats I reckon I gained at least an inch of legroom. To do that I had to cut away the rear lip at the rear of the quarter-trim. One side had enough excess black cloth to wrap around the back, the other is a little short but doesn't really show. If I find some similar material I might tidy that up. Also changed the front seats again for more legroom.
So, all in all 'No (Lotus) job is (too) small'.
@+
Vernon
-

vernon.taylor - Fourth Gear

- Posts: 683
- Joined: 05 Nov 2010
36 posts
• Page 3 of 3 • 1, 2, 3
Total Online:
Users browsing this forum: No registered users and 10 guests


