Rotisserie
9 posts
• Page 1 of 1
I’m just planning out and trying to budget (probably shouldn’t!) my upcoming restoration. The $ figure is already looking quite serious!
Knowing that the body will need attention all over, including the underside, I feel a rotisserie will make life much easier. I have two Harbor Freight engine stands that may be worth modifying to form part of the rotisserie, I wonder if anyone has any drawings or sketches with dimensions that could help me get something built prior to the arrival of the car.
What points have people used to attach the body? I’m thinking the body attachment at the upper inner edge of the front shock tower and the diff mount at the rear. Are there other good points to mount to?
I may model the chassis in CAD and use that to create a model of the rotisserie, if I’m able to get something that works well I will create drawings to deposit on here for all to share.
I appreciate any input or suggestions.
Ian
SoCal
- Ianashdown
- Second Gear

- Posts: 215
- Joined: 14 Oct 2022
That would be handy but I never found the need to go back-and-forth on my Elan or +2 when I did them which is I suppose is the advantage of a rotisserie, and so in both cases put them upside down on cinder blocks and wooden supports and did all of the bottom work and then turned them over, cheaper too, Gordon
- Gordon Sauer
- Fourth Gear

- Posts: 679
- Joined: 20 Aug 2004
I can't tell you how much easier having a rotisserie makes life.
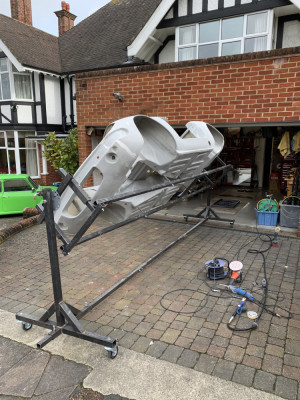
I attached mine to the underside with some long bolts and spacers to keep the supporting steel away from the shell.
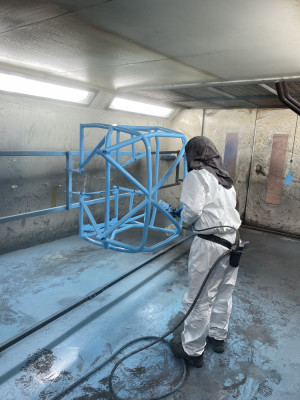
I decided on this method as it allowed for the fixing of the cage too.
But actually, it worked really well anyway and I'd probably do the same again even if I wasn't doing a cage
I attached mine to the underside with some long bolts and spacers to keep the supporting steel away from the shell.
I decided on this method as it allowed for the fixing of the cage too.
But actually, it worked really well anyway and I'd probably do the same again even if I wasn't doing a cage
Graeme
S4 SE
S2 GTS
Caterham 420R
Sold - Peterson JPS Exige
S4 SE
S2 GTS
Caterham 420R
Sold - Peterson JPS Exige
-

661 - Coveted Fifth Gear

- Posts: 1277
- Joined: 29 Mar 2012
Engine stands work just fine. I currently have one car on a home built version. The critical thing is balance where the rotation is equal no matter the position. Be sure to make the body section adjustable so you can achieve easy balanced rotation and still have clearance during the process. Will be constructing a new one around the first of the year when I start the restoration of the Elva Courier Coupe. That one will require a frame jig as well. I really like the method that Dave's Garage used in his restoration of his Mk1 Escort. The rollover part intersects with the frame jig, making a compact dual purpose unit.
Rob Walker
26-4889
50-0315N
1964 Sabra GT
1964 Elva Mk4T Coupe (awaiting restoration)
1965 Ford Falcon Ranchero, 302,AOD,9",rack and pinion,disc,etc,etc,etc
1954 Nash Healey LeMans Coupe
Owning a Lotus will get you off the couch
26-4889
50-0315N
1964 Sabra GT
1964 Elva Mk4T Coupe (awaiting restoration)
1965 Ford Falcon Ranchero, 302,AOD,9",rack and pinion,disc,etc,etc,etc
1954 Nash Healey LeMans Coupe
Owning a Lotus will get you off the couch
- prezoom
- Coveted Fifth Gear

- Posts: 1337
- Joined: 16 Mar 2009
I’ve taken a look at the two engine stands and in theory I think they might be a good basis. In practice, however, they are probably won’t work. The height of the center of rotation is too low for the body to rotate an not hit the lower center tube that would have run between the two engine stands. Too many compromises to make using them worthwhile so I’ll be starting with a new original design.
I don’t have the car here so I’m struggling to visualize the concept, but I’m thinking that the top of the tunnel is more or less the center of gravity, so my thought is that the main element would enter through the front opening, pick up the two body attachments at the top of the front shock towers, run along the top of the tunnel and pick up the upper diff mounts. From there it would duck under the boot/trunk and come back up to the center of rotation again. I’ll try to find more attachment points for safety. I’m thinking rotation lock pins every 45 degrees should be enough and I’ll find some casters that can deal with some uneven surfaces and have brakes so the whole rig will stay put!
Once I start modeling this in CAD I’ll post some screen shots, and if it works well I’ll make the full set of CAD models and drawings available to all. Any and all suggestions will be greatly appreciated!
Ian
SoCal
- Ianashdown
- Second Gear

- Posts: 215
- Joined: 14 Oct 2022
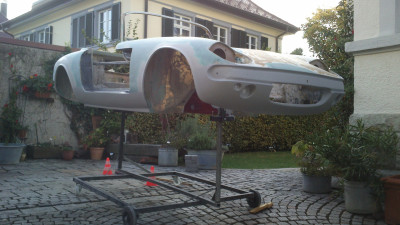
As far as attachment points on the body, I used an old rusty frame for the body to bolt to and made the rotisserie mounts to attach to the frame. The advantage is being able to mock-up suspension and play with tire clearance for too large of a wheel/tire combo. Also the rear frame-to-body shims affect door gaps, so having them in place while doing bodywork, is a benefit,
- Vic
- Second Gear

- Posts: 58
- Joined: 12 Dec 2012
Great information! Thank you.
You make a good point about the body bobbins affecting the door fit etc. I’m probably going to have to rethink my sequence of operations so that the ‘Gap and Flush’ is done on the chassis with the correct bobbins in place.
I like your single person body lift device! I’ll probably be in that situation most of the time so that would be really helpful. I’m going to setup a trailer winch in my garage, my driveway is sloped, and I think I could use that and your ideas to raise and lower the body.
Great thought provoking ideas!
Thank you.
Ian
SoCal
- Ianashdown
- Second Gear

- Posts: 215
- Joined: 14 Oct 2022
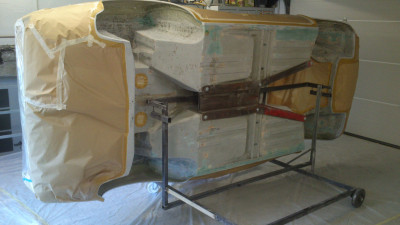
I also used an old rusty frame
When working on the underside, I used it as rotisserie.
After having the underside ready, I shortened my construction for working on the body and for save transport to paint shop.
For me this worked very well.
Regards Christian
When working on the underside, I used it as rotisserie.
After having the underside ready, I shortened my construction for working on the body and for save transport to paint shop.
For me this worked very well.
Regards Christian
- ChrisD
- First Gear

- Posts: 28
- Joined: 22 Jan 2018
9 posts
• Page 1 of 1
Total Online:
Users browsing this forum: No registered users and 8 guests


![20210616_093319[1].jpg (1.01 MiB) Viewed 6643 times 20210616_093319[1].jpg and](http://lotuselan.net/lel/78844/1/20210616_093319[1].jpg)
![20210616_093250[1].jpg (959.33 KiB) Viewed 6643 times 20210616_093250[1].jpg and](http://lotuselan.net/lel/78843/1/20210616_093250[1].jpg)
![20220923_173439[1].jpg (854.64 KiB) Viewed 6643 times 20220923_173439[1].jpg and](http://lotuselan.net/lel/78845/1/20220923_173439[1].jpg)
![20210609_103831[1].jpg (1.14 MiB) Viewed 6641 times 20210609_103831[1].jpg and](http://lotuselan.net/lel/78846/1/20210609_103831[1].jpg)

