
Possible new owner - could do with some help please!
![]() Post by: mbell » Fri Jan 31, 2020 1:51 am
Post by: mbell » Fri Jan 31, 2020 1:51 am
The screws that hold the clips to the door also hold the door skin to the window frame. You need to remove those, there just a load of 1/4" metal screws, even rusted up they shouldn't be that hard.
If you don't remember them you don't get much extra space.
If you don't remember them you don't get much extra space.
'73 +2 130/5 RHD, now on the road and very slowly rolling though a "restoration"
- mbell
- Coveted Fifth Gear

- Posts: 2708
- Joined: 07 Jun 2013
![]() Post by: danbuoy1 » Fri Jan 31, 2020 1:53 pm
Post by: danbuoy1 » Fri Jan 31, 2020 1:53 pm
Aha, so remove the clips that hold outside trim on and can gently ease the door away from window frame to give more space? That sounds promising - aiming to look at again Saturday, although could get car on trailer, it will need manouvering @home, and possibility its been left in gear - difficult to see past the cobwebs!
Great - sounds promising, I'll let you know how I get on!
Cheers
Paul
Great - sounds promising, I'll let you know how I get on!
Cheers
Paul
- danbuoy1
- Second Gear

- Posts: 111
- Joined: 26 Jan 2020
![]() Post by: billwill » Fri Jan 31, 2020 2:46 pm
Post by: billwill » Fri Jan 31, 2020 2:46 pm
Rear window can probably (as in a 2-seater) be removed from outside. Pull out the chrome strip & hope the rubber seal is still flexible enough to work it off the fibre-glass. You may need one of those double-sucker glass-lifters to be able to pull outwards as you can't get inside to push. Work the rubber seal with a non-metallic lever (plastic or wooden) to avoid metal to glass pressure, which could crack the glass. It may be easier to push the rear screen inwards rather than pull it outwards.
If the rubber seal is hardened, you might consider cutting off it's outer lip with a craft knife (after checking that you can get a replacement )
)

If the rubber seal is hardened, you might consider cutting off it's outer lip with a craft knife (after checking that you can get a replacement
Bill Williams
36/6725 S3 Coupe OGU108E Yellow over Black.
36/6725 S3 Coupe OGU108E Yellow over Black.
- billwill
- Coveted Fifth Gear
- Posts: 5062
- Joined: 19 Apr 2008
![]() Post by: danbuoy1 » Fri Jan 31, 2020 2:54 pm
Post by: danbuoy1 » Fri Jan 31, 2020 2:54 pm
Thanks Bill, I guess it will have to come out at some point but will leave to last resort. Took windscreen out my other car and broke it - then someone said cut the rubber as cheaper to replace, good point!
Cheers
Paul
Cheers
Paul
- danbuoy1
- Second Gear
- Posts: 111
- Joined: 26 Jan 2020
![]() Post by: mbell » Fri Jan 31, 2020 6:27 pm
Post by: mbell » Fri Jan 31, 2020 6:27 pm
Based on my experience many years ago try to get a screen from a scarp yard, I'd recommend removing the strip then use a Stanley knife down the strip channel to cut the seal in two, one piece in the glass, one left in the car.
'73 +2 130/5 RHD, now on the road and very slowly rolling though a "restoration"
- mbell
- Coveted Fifth Gear
- Posts: 2708
- Joined: 07 Jun 2013
![]() Post by: The Veg » Fri Jan 31, 2020 8:18 pm
Post by: The Veg » Fri Jan 31, 2020 8:18 pm
You can get a new seal, so cut the old one. I had my front and rear glass out recently and despite having never done glass before, I had no major problems. You don't even need the fancy glass-handling tool if you're not of petite stature.
1970 Elan Plus 2 (not S) 50/2036
2012 BMW R1200GS
"It just wouldn't be a complete day if I didn't forget something!" -Me
2012 BMW R1200GS
"It just wouldn't be a complete day if I didn't forget something!" -Me
-

The Veg - Coveted Fifth Gear
- Posts: 2341
- Joined: 16 Nov 2015

![]() Post by: danbuoy1 » Fri Jan 31, 2020 8:33 pm
Post by: danbuoy1 » Fri Jan 31, 2020 8:33 pm
Thanks, worth knowing, I'll tackle the door once again then see what next best is. At least no urgency to move and only 10 miles away, it just feels wrong to start hacking away at it or smashing glass! Got to say these older cars are harder to get into than you realise!
Cheers
Paul
Cheers
Paul
- danbuoy1
- Second Gear
- Posts: 111
- Joined: 26 Jan 2020
![]() Post by: danbuoy1 » Sat Feb 01, 2020 5:57 pm
Post by: danbuoy1 » Sat Feb 01, 2020 5:57 pm
Thanks for all advice guys.
Took the rusted frame screws out and squeezed a block of wood in gap to push slightly apart. Could see the 2 interior lock rods but had no idea which did what and in what direction but more by luck, hooked a wire round each rod and pulled upwards, one now looks like a coat hanger but the other was succesful - think lock itself was stiff and jammed by drooping door but at least I'm in now. Brakes were free and I was able to move it a bit, ready for my mates car trailer next week
Rather tatty inside but hey - has been sitting for 20++++ years! Was going to wind window down expecting a handle but electric - wow, not being facetious but always assumed Lotus were basic for fun.
I could do with knowledge on what to look for before mindlessly attacking it. For instance, I'm presuming the chassis will be shot but if not, no point removing body for revamp - or is it easier if separate?
Internet search found these 2 books, worth getting and any others?
https://www.amazon.co.uk/Lotus-Owners-W ... oks&sr=1-1
https://www.amazon.co.uk/Lotus-Elan-Res ... 1V2JSKWV4T
Cheers
Paul
- danbuoy1
- Second Gear
- Posts: 111
- Joined: 26 Jan 2020
![]() Post by: billwill » Sat Feb 01, 2020 6:16 pm
Post by: billwill » Sat Feb 01, 2020 6:16 pm
You can pretty much check the chassis (officially a sub-frame) weak points from underneath without actually removing the body yet, once you are able to lift the car up.
I made a beam from two 6x6" fence-posts, cutting one in half and screwing the halves tightly to the intact one, with a small gap (3" appx is enough) at the centre to accommodate the exhaust pipe. This beam can then be used under the car, near to the rear wheel arches using two jacks and axle stands. One at each end of the intact beam. I use it after driving (pushing in your case) the front wheels onto wheel ramps. The compound beam, near the centre is lifting the chassis and the outer portions are lifting the bodyshell at the rear corners in front of the rear wheels.
There's a photo somewhere I'll see if I can find it.
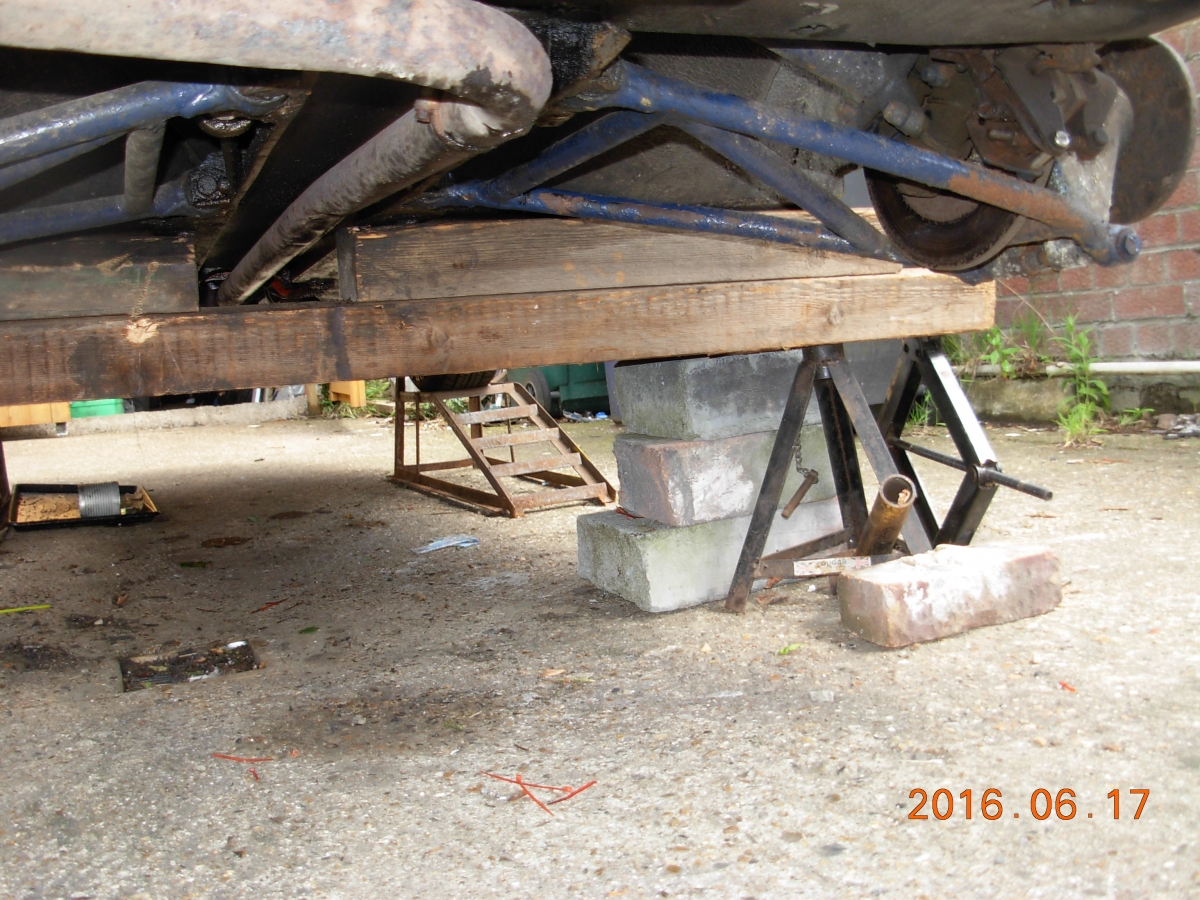
Bill Williams
36/6725 S3 Coupe OGU108E Yellow over Black.
36/6725 S3 Coupe OGU108E Yellow over Black.
- billwill
- Coveted Fifth Gear
- Posts: 5062
- Joined: 19 Apr 2008
![]() Post by: billwill » Sat Feb 01, 2020 6:32 pm
Post by: billwill » Sat Feb 01, 2020 6:32 pm
The Plus 2 chassis diagram in in the Wiki here at: https://lotuselan.net/wiki/AA_-_Chassis_%2B2
Perhaps someone with a better knowledge of Plus 2 than me can download it, mark the weak spots and upload the marked diagram for you to see.
I only really know the 2-seater, where the main weak points are the bottoms of the front turrets and the vacuum chamber crosspiece. These should be poked hard with a screwdriver because they can look intact on the outside and be rusted away from the inside leaving them actually paper-thin.
Bill Williams
36/6725 S3 Coupe OGU108E Yellow over Black.
36/6725 S3 Coupe OGU108E Yellow over Black.
- billwill
- Coveted Fifth Gear
- Posts: 5062
- Joined: 19 Apr 2008
![]() Post by: wotsisname » Sat Feb 01, 2020 7:06 pm
Post by: wotsisname » Sat Feb 01, 2020 7:06 pm
other than Bill's comment, just look for any welding or bent flanges. You will probably find shims or wedges at some of the mounting points... these are important. you don't want to pull the body down onto the chassis as it will distort. also engine cam cover can touch the bonnet.
Best to do the sill member replacement first as others have reported the body droops if not supported when off the chassis.. leads to even worse body shutlines.
best advice is.. take a lot of photos. label everything. I recommend getting a printout of the parts manual on A3.. just the pictures... not so many pages.. and write notes on these. Go to a couple of events and chat with owners. decide how near to original you want as this can affect the cost and search for parts
1968 Elan plus 2 - project
2007 Elise S2 [modified with a Hethel 70th sticker (yellow)]
2000 Elise S1 - Sold
2007 Elise S2 [modified with a Hethel 70th sticker (yellow)]
2000 Elise S1 - Sold
- wotsisname
- Third Gear

- Posts: 487
- Joined: 24 Jun 2015
![]() Post by: danbuoy1 » Sat Feb 01, 2020 7:34 pm
Post by: danbuoy1 » Sat Feb 01, 2020 7:34 pm
Good link to spaceframe picture thanks, and for the info + picture on jacking up. Also replacing sills, pretty sure shot as bits falling out. I made the mistake of totally stripping a Triumph before lots of repair and now sheds of rusty bits and a body still waiting paint so don't want to do more than nescessary. That said, if spaceframe looks ok, worth taking body off and getting it professionally treated?
I have no idea why it was taken off the road, maybe growing family but I suspect something major "for another time". Shame the engine seized as looks like he winterised it, I'll pour paraffin down spark plug holes and leave a while.
Re manuals, these worth getting? I'm not a book fanatic but I have no experience of Mr Chapman's cars and don't want to learn from damage....
Cheers
Paul
- danbuoy1
- Second Gear
- Posts: 111
- Joined: 26 Jan 2020
![]() Post by: alanr » Sat Feb 01, 2020 7:56 pm
Post by: alanr » Sat Feb 01, 2020 7:56 pm
Probably teaching you to suck eggs knowing you have played with classic cars in the past but I give you my thoughts:-
My advice would be definitely do not just rip it apart!
Take it slow and take your time finding out exactly what you have got! Get to know your way around it to eventually formulate a long term plan. So many people as i am sure you have also seen buy a tired old classic and then instantly rip it apart and then get overwhelmed by the big pile of broken and worn parts that they end up with. The car, or rather pile of bits then on so many ocassions just gets left abandoned!
If it were me I would over the next few weeeks/ even months maybe I would:-
Take the front wheels off and look and have poke around the bottom of the front suspension turrets.Any rot at all means you are going to do some hard thinking on what to do and a replacement chassis may be on the cards.
Take the rear wheels off and remove the panels that go up the front of the wheel arches to see and check the strength members that travel the length of the side of the car inside the sills. I would be very surprised if they are not rotten and definitely need to be replaced before you contemplate removing or doing anything at all with the body.
Also If it were me I think I would also try and get it running, just for the fun of it. Is it definitely seized? or is it just in gear with the clutch stuck to the flywheel giving the impression of being seized? Why not just drain the fuel tank, put some fuel in and attempt to jump start it? Doesn't matter how rough it runs at this stage but may give you some pointers on what is needed engine wise and you never know a new set of plugs and points and it will certainly put a smile on your face if it bursts into life!
Loads to do, just take you time though!...It isn't a race.
Alan.
Alan
'71 +2 S130/ 5speed Type9.
'71 +2 S130/ 5speed Type9.
- alanr
- Fourth Gear

- Posts: 920
- Joined: 14 Sep 2018
![]() Post by: mbell » Sat Feb 01, 2020 7:59 pm
Post by: mbell » Sat Feb 01, 2020 7:59 pm
Put it in your garage, securely Jack it up. Get your camera and note pad out. Carefully go through the car and figure out what needs doing, in what order before actually doing anything....
'73 +2 130/5 RHD, now on the road and very slowly rolling though a "restoration"
- mbell
- Coveted Fifth Gear
- Posts: 2708
- Joined: 07 Jun 2013
![]() Post by: danbuoy1 » Sat Feb 01, 2020 10:40 pm
Post by: danbuoy1 » Sat Feb 01, 2020 10:40 pm
Hiya, thanks for replies and definitely not suck eggs - really appreciate all the help and guidance so far. Got experience but on cars that have got to the stage where they need serious work and by then you know the pitfalls.This is my first spaceframe/fibreglass car/renovation and don't want to make silly mistakes, in fact all I have to go on is the reg and chassis plate (logbook is presumed in boxes in loft...). If I sound naive, this is only the second time I've sat in an Elan - and the first was many decades ago, so I have no idea what is right or broken, hence my approach.
Sounds like jack it up, crawl underneath and spaceframe is clearly visible, usual poke with scredriver but the suspension is the area to look at.
Re engine, a spanner on Front pulley just turns fractionally, guess the play in bearings, disapointing as seems he did try to winterise it - I'll put paraffin down plug holes and leave a while. Umm clutch plate seized, another one lurking ! [my other an auto so never have this problem ]
]
Cheers
Paul
Sounds like jack it up, crawl underneath and spaceframe is clearly visible, usual poke with scredriver but the suspension is the area to look at.
Re engine, a spanner on Front pulley just turns fractionally, guess the play in bearings, disapointing as seems he did try to winterise it - I'll put paraffin down plug holes and leave a while. Umm clutch plate seized, another one lurking ! [my other an auto so never have this problem
Cheers
Paul
- danbuoy1
- Second Gear
- Posts: 111
- Joined: 26 Jan 2020
Total Online:
Users browsing this forum: No registered users and 22 guests