Page 1 of 4

69 Plus 2S Project

PostPosted: Thu Sep 11, 2014 10:03 am
by Matt Elan
Having spent the last couple of years getting my Triumph Stag up together and re-building (or rather re-creating) my Plus 2's twink, I've just started on the restoration proper. The Body is now sitting in my drive on a pile of tyres and the old chassis with suspension still attached is in my garage ready to be stripped down (albeit with my new second hand Spider chassis on top of it). So I'll be doing regular updates(ish) as work proceeds and be asking questions as I go along!
First question is what does the panel recommend to paint the Spider chassis with. It's currently red, with a few chips and so I don't need to strip it or blast it - just tidy it up. I was thinking red Smoothite which should give good coverage and protection with minimal preparation, but I know the formulation has changed so what does the panel recommend (I'd like to keep it red but I'm not going to used red oxide primer for it :shock: ) and has anyone used the modern Smoothite formulation?
Matt

Re: 69 Plus 2S Project

PostPosted: Thu Sep 11, 2014 6:00 pm
by PeterK
I used red smoothite on mine Matt.
Spray version for most of it before adding the suspension, and then a paint brush to repair the inadvertent chips.
Peter

Re: 69 Plus 2S Project

PostPosted: Fri Sep 12, 2014 4:24 am
by alan
If you Spill or get some petrol on the Smoothite i think there can be a reaction but i'm not so sure

Re: 69 Plus 2S Project

PostPosted: Thu Jun 11, 2015 1:47 pm
by Matt Elan
Onwards and upwards - after many delays I'm back on the case with my Plus 2 resto. and am lurching forwards with it. The chassis is now all painted (red smoothite) and I'm about to rebuild the suspension. Wishbones and 'a' frames will be stove enamelled red next week and uprights will be black for a bit of contrast. I'm not getting the wishbones and 'A' frames powdercoated for a couple of reasons - they will be in the way of road debries so will get chipped and enamel is easy to touch up, and secondly I've see what can happen if you crack powder coating (for example around the bolts) and watch water wick between the coating and the metal.....
I'm also going with original style metalstic bushes rather than poly bushes - cheaper and hopefully a bit more compliant as I'm after comfort not ultimate road holding.
Hopefully I'll have some pictures in the next week or two to show progress.

Re: 69 Plus 2S Project

PostPosted: Sun Aug 02, 2015 5:02 pm
by Matt Elan
iSnce the last update, the front suspension is now fully refurbished and on the car along with new discs and callipers. After trying to fit standard bushes to the rear A frames, I've fitted polybushes - the standard ones were soooo tight I gave up and the polybushes are one heck of a lot easier to fir. Lots of lube needed to fit them onto the chassis though.
I've pulled the rear suspension down, and have got new wheel bearings, rear discs, CV drive shafts etc. to fit. I've respayed the hub carriers in a fetching shade of gloss black as well, so it'll be time to reassemble it all and fit back on. Been having some issues with getting penny washers for the diff, and have had it in and out a couple of times before reading the manual; also bought a diff brace from Kelvedon so it'll have to come out again to fit that :shock:
I'll try to post up some pictures......

Re: 69 Plus 2S Project

PostPosted: Thu Aug 06, 2015 12:32 pm
by wotsisname
It's my understanding that the diff brace can be fitted with the diff in situ (on a Spyder Chassis).

Re: 69 Plus 2S Project

PostPosted: Thu Aug 06, 2015 1:04 pm
by Peter +2
Yep, the Diff needs to be sitting loose in the chasis for the Brace to be attached. Then the Diff (with Brace attached) can be finally secured. I am happy to be proved wrong, but I have never been able to remove or replace a Diff from an unmodified chassis whilst the Brace is still attached to the Diff.

Re: 69 Plus 2S Project

PostPosted: Thu Aug 13, 2015 7:31 pm
by Matt Elan
Diff brace now on, fitted to the diff while it was sitting loose in the spyder chassis, but with the bottom attachment in place. And the diff is mow bolted in, with an excess of penny washers (don't ask...). I'm getting quite adept at taking it out and refitting it :) - must learn to RTFM and BB's book before doing stuff. But I have got a new Plus 2 in one piece to compare with the project now (see a.n.other listing).
I've also just refurbed the handbrake mechanism (white push button job) and am waiting for a new cable. As the car had suffered a carb side fire when it was taken off the road the original cable inner was plastic welded to the sheaf so had to be cut off, but the actual pull mechanism was in reasonable shape.... This weekend may result in the rear suspension being fitted assuming I can get the wheel bearings into the hub carriers without destroying my immaculate new black paint job on them.....

Re: 69 Plus 2S Project

PostPosted: Mon Oct 05, 2015 6:43 pm
by Matt Elan
Latest update - I've now got the rear suspension all on and fitted, along with the new CV drive shafts. I was a bit worried when I was working out if everything fitted that the rear callipers seemed to need spacing inwards....
Then I read the manual and realised that the disc fitted to the inside of the rear hub spider, and everything fitted fine apart from having to just ream out the holes in the discs a tad. Now I just need to fit the hubs and I'll have a rolling chassis.
Photos to follow.....

Re: 69 Plus 2S Project

PostPosted: Tue Oct 06, 2015 4:04 pm
by alan.barker
good work Matt. I'm pleased the Wheel inserts are going to a good cause
Alan

Re: 69 Plus 2S Project

PostPosted: Wed Oct 07, 2015 3:14 pm
by Matt Elan
Thanks Alan - the inserts will be used!
Here's my newly assembled rear suspension
DSC00785.JPG and
:

and the front end isn't looking too shabby either:

DSC00454.JPG and


Oddly the reds are the same in real life, but not in my camera's eye; the rear was photographed in natural light, the front under florescent tubes and flash.......

More to follow - hopefully rolling chassis this weekend (again....)

Re: 69 Plus 2S Project

PostPosted: Wed Oct 07, 2015 4:02 pm
by alan.barker
is that a Classic Bike Wheel in the second photo :wink:

Re: 69 Plus 2S Project

PostPosted: Wed Oct 07, 2015 5:09 pm
by john.p.clegg
'71 bonnie?

John

Re: 69 Plus 2S Project

PostPosted: Wed Oct 07, 2015 6:37 pm
by alan.barker
if it's 71 that's a unit construction. I think the pre-unit T120 is the original :wink:
Alan

Re: 69 Plus 2S Project

PostPosted: Thu Oct 08, 2015 11:59 am
by Matt Elan
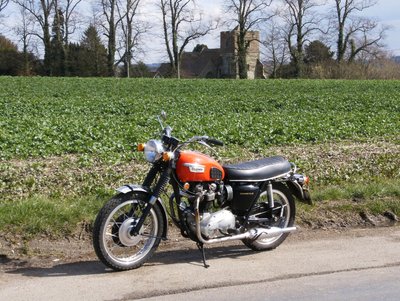
Its a 1970 T120R Bonneville - unit construction and last of the pre oil in frame ones. Basically stock, apart from the wrong horn, alloy wheel rims, stainless mudguards and paint..... Probably the best Bonnie you can get, similar model did the first 100 mph lap by a production racer at the Isle of Man TT......
The handling woes of Triumphs had been fixed by Hopwood and Tait, forks had two way damping and engine gave around 50 bhp reliably and all weighs less than 400 lb.

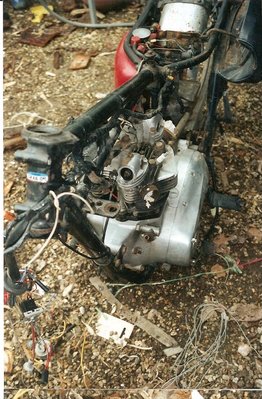
It came home from the USA in a bit of a state

scan0009 - Copy.jpg and


and I rebuilt it about 15 years ago

HPIM0056.jpg and