OMG what have I done?? (New dashboard)
71 posts
• Page 4 of 5 • 1, 2, 3, 4, 5
The bezels are held on by four tabs which are hard to pry up without distorting the bezel itself.
All gaskets need replacing. They were rotten and sticky when I took the gauges off the old dash. Fortunately, cheap.
Probably the only thing that is!


All gaskets need replacing. They were rotten and sticky when I took the gauges off the old dash. Fortunately, cheap.
Probably the only thing that is!
-

JonB - Coveted Fifth Gear

- Posts: 2358
- Joined: 14 Nov 2017
If it's like the bezels on my instruments you don't have to pry- just gently twist until the tabs line up with the notches then it pulls off.
1970 Elan Plus 2 (not S) 50/2036
2012 BMW R1200GS
"It just wouldn't be a complete day if I didn't forget something!" -Me
2012 BMW R1200GS
"It just wouldn't be a complete day if I didn't forget something!" -Me
-

The Veg - Coveted Fifth Gear

- Posts: 2188
- Joined: 16 Nov 2015
All sorted, see other thread. You're right, you can rotate the bezels; however, there are only three notches but six tabs, so some of them have to be bent up. On the big instruments there are enough notches to rotate and remove.
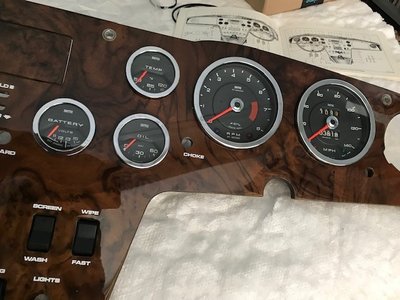
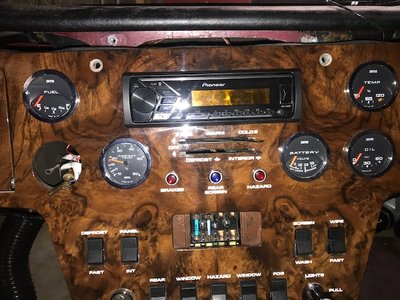
So, having rejuvenated the gauge faces (with baby oil, no less!) I've fitted some of them in the new dash.
Clock is missing as it is still poorly, and the ambient temperature gauge does not get fitted until the dash goes back in the car. Starting to look pretty spectacular... but - oh dear - I think I will need new carpets, as the new dash is going to make the tired old carpet stick out a bit.
On a side note, the gauge arrangement is as it was removed from the car, but it differs from the owner's manual. I'm trying to decide if this is important or not. Thing is, the water temperature and oil pressure gauges are slightly obscured by the steering wheel on the one hand, but on the other are too far away from the driver when sited next to the glove box (per the manual). To add to the confusion the parts manual shows the positions per my car: http://www.lotuselan.net/wiki/BHX_-_Bod ... _S130_%2B2
...although the picture is of a LHD dashboard layout. The service manual shows yet another position (ambient temperature and ammeter positions swapped).
I think it's logical to have the critical "condition of the engine" gauges next to the driver and the other ones on the passenger side. So I think I will keep it as it was removed from the car..
-

JonB - Coveted Fifth Gear

- Posts: 2358
- Joined: 14 Nov 2017
So, onwards.
I've filled the tiny hole I accidentally drilled in the dash veneer with some acrylic clear coat, which has taken days. Reason being that each time I drop some varnish on the hole, it looks great but then sinks in leaving a dimple. I'm hoping this 5th application I just did will be enough; I mean if there is any leakage due to a hole (and it has a screw in the rear side of it so I do not see why it is seeping away) I am hoping it is plugged up now.
The scratches on the glove box cover I stupidly inflicted have not really improved by much. I've rubbed them with T-cut, Autosol, furniture wax and a thinner wax but they are painfully visible if the light is at the wrong angle. I'm hoping that when installed it will be invisible. Knowing my luck, though..
-

JonB - Coveted Fifth Gear

- Posts: 2358
- Joined: 14 Nov 2017
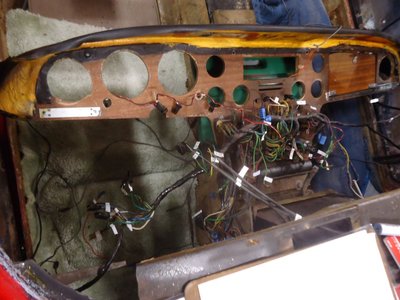
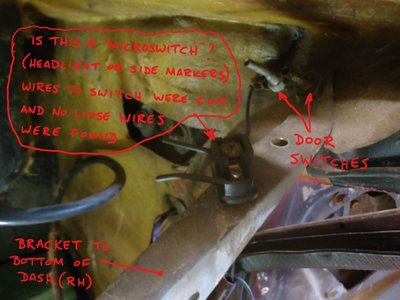
A couple of questions related to the dash on a '73 +2S 130/5 (RH drive). The dash has a securing bracket at the bottom and it has an electrical component attached with the wire connections cut. Wondering if it is a "Microswitch"? FYI all of the lights worked on this car before I started dismantling. Second question is related to the dashpad. The front edge of mine was glued to the dash making it real difficult to remove. Looks like from other dash photos on the forums here that the two pieces should be separate. How was the dash assembly fabbed at the factory?
Cheers!
Steve
Appleton, WI
Cheers!
Steve
Appleton, WI
Steve
'73 Elan +2S 130/5 Cabriolet
'73 Elan +2S 130/5 Cabriolet
-

Hethel_Haus - First Gear

- Posts: 41
- Joined: 18 Jul 2009
Hi Steve
The bracket to bottom of dash looks to be non original. There's no bracket like that on my dash, other than the angle bracket that the dash attaches to at the bottom, just in front of the gearshift.
It's not on the parts diagram, either: http://www.lotuselan.net/wiki/BBS_-_Bod ... _Late_%2B2
However, the under dash trim does get floppy with age, due to the way it is attached to the foot well trim, and I think this sort of bracket would be just the thing to help support it. I've considered adding one to my car.
As to the microswitch, I cannot advise. It's definitely not original. Is it momentary contact or not? If it's a proper switch (that is, not momentary contact), it may have been put in as an anti-theft measure, or a cooling fan override. Both seem like common mods (my car had the latter). The only use I can think of for a momentary contact switch would be to set an alarm off if the trim panel was removed (specifically, on the driver's side where the trim needs to come out to give a thief access to the starter switch).
If I were you I'd remove it.
Cheers
JonB
PS, my dash was secured to the crash pad with some sort of double sided sticky tape. Hoping not to need that with the new dash. Also, the outer support tabs on the body were both broken so I had to glass in some new ones.
-

JonB - Coveted Fifth Gear

- Posts: 2358
- Joined: 14 Nov 2017
So, progress...
First problem was the wiper switch. I?d mislabelled two of the wires, and as a result the self park and half speed didn?t work - it blew one of the fuses. Harumph. Took hours to sort that one out. Then the interior light switch (?Panel? switch, bottom position) didn?t work. Another few hours poring over the wiring diagram and poking around round the switch with a meter. Eventually realised there was a missing ground wire on the switch. Now fixed!
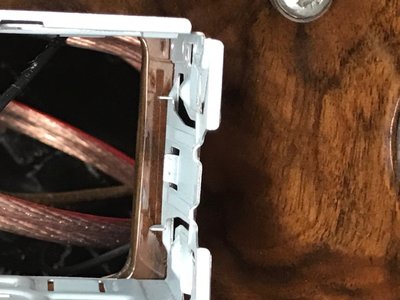
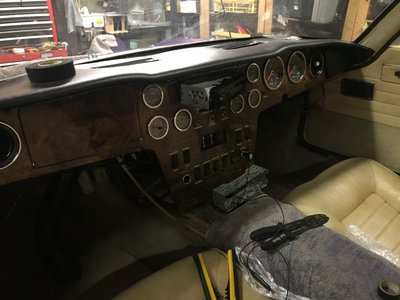
Something a bit more troublesome has reared its ugly head. I wired the stereo in but discovered it does not fit in the dash aperture! I presume this is down to the modern DIN standard size being marginally wider than the old radios like the Turnolock. Can anyone confirm this?
On the plus side the front speakers sound really good and the bass is proper hair raising. I?m very happy with them, bearing in mind they?ve been restored. So, it?s out with the Dremel to open up the radio aperture. I?ll be holding my breath as I cut through the beautiful varnish..
The crash pad seems to be secure enough without resorting to glue. The picture doesn?t do it justice, it?s a quickie taken in a dim garage. It?ll look spectacular in daylight.
-

JonB - Coveted Fifth Gear

- Posts: 2358
- Joined: 14 Nov 2017
Random thought, what about stick on Velcro between the dash and crash pad?
Will hold them together, is removable and likely avoid any squeaks from the two rubbing against each other if not glued.
Will hold them together, is removable and likely avoid any squeaks from the two rubbing against each other if not glued.
'73 +2 130/5 RHD, now on the road and very slowly rolling though a "restoration"
- mbell
- Coveted Fifth Gear

- Posts: 2643
- Joined: 07 Jun 2013
I did consider that but it?s not necessary to stick the two together on my car. To avoid squeaks I put fabric tape along the top edge, wrapped over onto the rear face. Of course, if this doesn?t work and it sounds like a bunch of mice are up to no good behind the dash as I?m driving along, I?ll have to reconsider!
-

JonB - Coveted Fifth Gear

- Posts: 2358
- Joined: 14 Nov 2017
Another update...
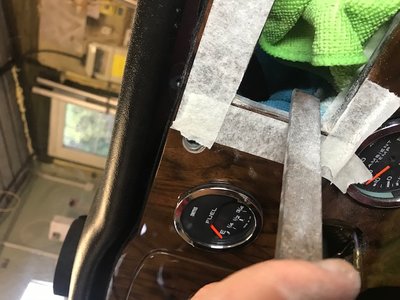
I decided to use a file on the dash rather than a Dremel, so I marked out the required cutout areas with masking tape and set to it.
Half an hour of filing and another hour to let the lacquer dry that I put on the edge of the plywood to protect it from damp and the radio is in!
Unfortunately the clock is playing up again. It's buzzing on the rewind trigger. Funny thing is, it takes 1:50 from wind to rewind, but the buzzing happens at 1:20. I suspect some loose wire floating about, or perhaps the contacts are mucky. Will have to dismantle it again. That poor chewed up bezel.
-

JonB - Coveted Fifth Gear

- Posts: 2358
- Joined: 14 Nov 2017
Hi Mark
That?s where the fuse box goes on the S130. Lotus swapped the ashtray out. The cover has a handle which looks a bit klunky so I haven?t fitted it. Instead, a small rubber suction cup will be used to pull the cover.
I hope to spend some time today on the clock...
Cheers
JonB
That?s where the fuse box goes on the S130. Lotus swapped the ashtray out. The cover has a handle which looks a bit klunky so I haven?t fitted it. Instead, a small rubber suction cup will be used to pull the cover.
I hope to spend some time today on the clock...
Cheers
JonB
-

JonB - Coveted Fifth Gear

- Posts: 2358
- Joined: 14 Nov 2017
71 posts
• Page 4 of 5 • 1, 2, 3, 4, 5
Total Online:
Users browsing this forum: No registered users and 35 guests

