Page 3 of 4

Re: Bang/clonk noise, followed by no drive

PostPosted: Wed Jan 10, 2018 9:42 am
by Rich135
Thanks for both of your tips, much appreciated. I hadn't heard of Freeze and Release, so that's worth a go.

I will get the brace bar before I re-install - many thanks.

Rich

Re: Bang/clonk noise, followed by no drive

PostPosted: Wed Jan 10, 2018 9:57 am
by alan.barker
As said be very very careful about tapping it out. Rohan's idea to drill down the center of the bolts sounds good.
Easy does it and don't rush.
I think it would be good to make a drilling plate or something to be sure you are 100% on the centerline of the bolt + use a piller/column drill
Alan

Re: Bang/clonk noise, followed by no drive

PostPosted: Wed Jan 10, 2018 10:55 am
by Rich135
Thanks Alan. I will have to construct something as unfortunately I don't have a piller/column drill. I do have a decent bench/vice so will use that to make something secure to ensure I go into the bolt, not the ear of the diff.

Then again, after a quick google, maybe it would pay to buy something like this, cheaper than a broken diff casing! https://www.machinemart.co.uk/p/clarke- ... illar-dri/

Re: Bang/clonk noise, followed by no drive

PostPosted: Wed Jan 10, 2018 10:59 am
by gjz30075
Be sure to use some sort of anti sieze on the bolt when re-assembling.

Re: Bang/clonk noise, followed by no drive

PostPosted: Wed Jan 10, 2018 11:37 am
by Craven
Always support that ear in some way, any forced used must be just against the ear itself not the case.
If you have some bits of tube try making up an arrangement using a ?G? clamp to press the bolt out, I have a 6 inch bench vice I use for many press fit items. The real secret is to get the bolt to turn.
FWIW

Re: Bang/clonk noise, followed by no drive

PostPosted: Wed Jan 10, 2018 11:39 am
by rgh0
gjz30075 wrote:Be sure to use some sort of anti sieze on the bolt when re-assembling.


+1

I use antisieze on every external bolt subject to environmental exposure. It has sure made life easier since the first time I dismantled my Elan in 1970 when almost everr bolt was siezed.

cheers
Rohan

Re: Bang/clonk noise, followed by no drive

PostPosted: Wed Jan 10, 2018 1:21 pm
by Rich135
Thanks, I have some copper grease, so will ensure I use some of that when I re-assemble, being sure to avoid the threads.

Re: Bang/clonk noise, followed by no drive

PostPosted: Wed Jan 10, 2018 4:56 pm
by jono
Rich,

That same pillar drill (exactly the same, except for livery) is currently in Aldi for ?30

Edited to say - exactly the same except the Aldi one is 500w, not 350w!

Re: Bang/clonk noise, followed by no drive

PostPosted: Wed Jan 10, 2018 5:11 pm
by prezoom
Seems I learn something new every day. Was just reading about releasing a seized piston in a bore by pouring some Coca Cola into the bore. Seems the phosphoric acid in the coke will loosen the corrosion between the alloy piston and the iron bore. Perhaps a good cleaning with some brake clean or acetone and a dam around the broken bolt, filled with some coke may be of assistance.

Re: Bang/clonk noise, followed by no drive

PostPosted: Wed Jan 10, 2018 5:17 pm
by alan.barker
That's good use of Coca Cola instead of drinking it :lol:
Alan

Re: Bang/clonk noise, followed by no drive

PostPosted: Wed Jan 10, 2018 5:23 pm
by Rich135
jono wrote:Rich,

That same pillar drill (exactly the same, except for livery) is currently in Aldi for ?30

Edited to say - exactly the same except the Aldi one is 500w, not 350w!

Thanks Jono, I have an Aldi 1 mile from my house, so will pop in on the way home! You can get some good bargain in there.

Good tip on the coke, will try that too! Obviously the full fat stuff, none of your Zero rubbish :-)

Re: Bang/clonk noise, followed by no drive

PostPosted: Wed Jan 10, 2018 7:17 pm
by mbell
If the protruding bolt is flat enough i'd be checking to see if any of my suspension ball joint splitter tools could be used to push it out. Would avoid the risk associated with hammer/drift and drilling.

Re: Bang/clonk noise, followed by no drive

PostPosted: Sun Jan 14, 2018 8:33 pm
by Rich135
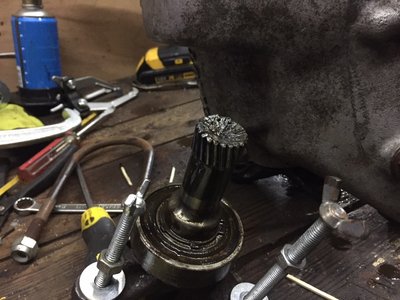
diff-3.jpg and
Broken shaft
Hi All

I managed to get the bolt out. I drilled down the centre of it and used heat and the freeze spray but it still wouldn't move, so I used a bigger diameter drill bit until I had broken through to the edge of the bolt and then it broke the resistance I could tap it out with a hammer (with the ear of the diff supported by a hollow rod in the vice).

The next problem was extracting the output shaft, which I eventually managed to do by making up a puller with some old bolts and a steel brace on the diff itself. I had tried a slide hammer and heat etc, but it did not move an inch.

Now it's out, the good news is that I have taken the broken output shaft out, the bad news is that it has not broken up the shaft near the bearing, but down on the splines themselves, which are way off being straight. Part of the shaft and splines are still in the diff, and obviously won't come out easily. From the way it's broken there are likely to be shards of steel in the diff too.

What are the recommendations for next steps? If I can get the last bit of splinned shaft out (possibly by drilling into it and getting a self tapping screw in, then pulling it out?) then can I clean out the diff without taking it apart?

Or do I need to split the case of the diff in order to give it a proper clean, so can just get the shaft out when I am in there. I am very daunted by splitting the diff open, as it looks pretty complicated. Can I just split the two housings and clean it all and put it back together without having dozens of pieces on my bench?

Thanks again for your help. Pics of the broken shaft below.

Rich

Re: Bang/clonk noise, followed by no drive

PostPosted: Sun Jan 14, 2018 10:12 pm
by gjz30075
No worries on 'splitting the case'. Simply remove all the bolts holding the aluminum housing to the cast iron
diff, split them apart, then you'll have easy access.

Re: Bang/clonk noise, followed by no drive

PostPosted: Mon Jan 15, 2018 8:19 am
by Rich135
gjz30075 wrote:No worries on 'splitting the case'. Simply remove all the bolts holding the aluminum housing to the cast iron
diff, split them apart, then you'll have easy access.

Thanks Greg. That won't result in lots of loose parts all over my workbench?