Body Crack Near Headlight Pod
33 posts
• Page 2 of 3 • 1, 2, 3
I remember reading years ago that the cracks at the corners of the light pods were caused by not lubricating the pivots enough. Wether there is any truth in this I dunno...
Robbie
Robbie
-

Robbie693 - Coveted Fifth Gear

- Posts: 1515
- Joined: 08 Oct 2003
Robbie693 wrote:I remember reading years ago that the cracks at the corners of the light pods were caused by not lubricating the pivots enough. Wether there is any truth in this I dunno...
Robbie
I would doubt that, esp. with stock bobbins in pot metal. My guess is that these kind of cracks start with careless hand pressure on the center of the front of the car, and the light openings make for a weak spot where the bridge with the bonnet opening is shortest.
S4SE 36/8198
-

nmauduit - Coveted Fifth Gear

- Posts: 2000
- Joined: 02 Sep 2013
Slowtus wrote:1969Plus2 wrote:And what was the conclusion of this great debate?!?! What does one define as being "at speed"?
I'm trying to help here.
Take the advice I passed on - or don't.
Apologies, I was just asking with enthusiastic curiosity! Please don't take it the wrong way.
- 1969Plus2
- First Gear

- Posts: 41
- Joined: 04 Jun 2019
Imho it is a bad design.
For repairs i use only resin and matt, then finish with tissue. No p40 or fillers.
Alan
For repairs i use only resin and matt, then finish with tissue. No p40 or fillers.
Alan
Alan.b Brittany 1972 elan sprint fhc Lagoon Blue 0460E
- alan.barker
- Coveted Fifth Gear

- Posts: 3756
- Joined: 06 Dec 2008
1969Plus2 wrote:Slowtus wrote:1969Plus2 wrote:And what was the conclusion of this great debate?!?! What does one define as being "at speed"?
I'm trying to help here.
Take the advice I passed on - or don't.
Apologies, I was just asking with enthusiastic curiosity! Please don't take it the wrong way.
All good.
- Slowtus
- Third Gear

- Posts: 371
- Joined: 22 Sep 2017
I slowed down the rate at which the light pods go up and down by restricting the flow of air into and out of the vacuum pod. I only have one pod on my +2.
I fitted a home made clamp out of two nuts and bolts and two strips of steel to a rubber section I let into the air line. I then adjusted the clamp to give a 3 second rise and fall.
No more cracks - at least from headlamp pod impact!
Dave Chapman.
I fitted a home made clamp out of two nuts and bolts and two strips of steel to a rubber section I let into the air line. I then adjusted the clamp to give a 3 second rise and fall.
No more cracks - at least from headlamp pod impact!
Dave Chapman.
- david.g.chapman
- Fourth Gear

- Posts: 780
- Joined: 26 Nov 2003
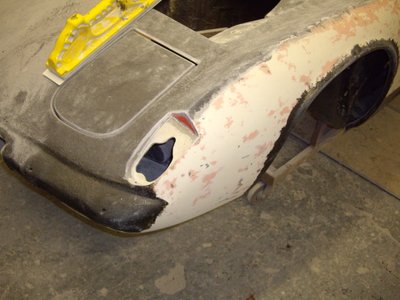
This is a common stress crack area and really needs to be reinforced. When the bodywork on my +2 was refurbed, this and several other areas were reinforced. No cracks to date - 10 years & 40k miles on. Cracks have appeared elswhere, door quarterlight area, rear window lower corner and a couple of others  .
.
I also use Landrover Defender headlamps which are made of plastic and weigh a fraction of the glass ones, so less stress. Beam pattern is brilliant (reflector has the beam pattern, not the lens front)
Jeremy
PS not sure the slow ascent of my headlamps can be called 'snapping open'!
I also use Landrover Defender headlamps which are made of plastic and weigh a fraction of the glass ones, so less stress. Beam pattern is brilliant (reflector has the beam pattern, not the lens front)
Jeremy
PS not sure the slow ascent of my headlamps can be called 'snapping open'!
-

JJDraper - Fourth Gear

- Posts: 923
- Joined: 17 Oct 2004
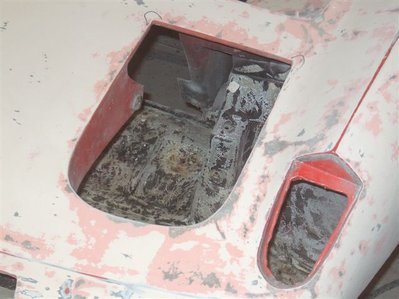
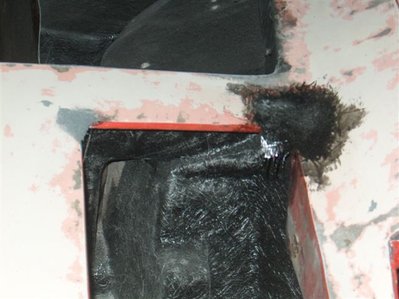
Mine cracked very similar. I removed the pod and cleaned the back of the body in the area then built up the inside with fibre Matt and resin. I effectively extended the side flange of the pod opening back to the vertical flange of the bonnet opening, thus reinforcing the area. That was many years ago and it has stood the test of time well. I?ve since fitted an electric motor to operate the pods, this stops the pod opening with a bang at speed as it is positively controlled over its full range of movement, unlike the vacuum system that can be overcome by wind pressure and hit the stops hard
Change is inevitable, except from a vending machine!
- Bigbaldybloke
- Fourth Gear

- Posts: 889
- Joined: 16 May 2017
Interesting discussion here, and I am thinking about my pod openings now, which are crack free at the moment. Good idea to reinforce the underside (I'll add it to the list!), but how about modifying the stop (wherever that is, I've not looked) for a softer landing?
I suppose there are problems around the pivot bolts also.
I suppose there are problems around the pivot bolts also.
-

JonB - Coveted Fifth Gear

- Posts: 2358
- Joined: 14 Nov 2017
For the Stops there should be Rubber Buffers that fit over the set screw heads 
Like the Rubber Buffers for the rear of the Boot Lid.
Alan
Like the Rubber Buffers for the rear of the Boot Lid.
Alan
Alan.b Brittany 1972 elan sprint fhc Lagoon Blue 0460E
- alan.barker
- Coveted Fifth Gear

- Posts: 3756
- Joined: 06 Dec 2008
Yes available from the usual UK suppliers, here is an example link:-
https://www.sjsportscars.com/parts-and- ... B6113Z.htm
https://www.sjsportscars.com/parts-and- ... B6113Z.htm
Trevor
1968 Elan +2 50/0173
1968 Elan +2 50/0173
-

TeeJay - Fourth Gear

- Posts: 540
- Joined: 30 May 2007
I've got the same problem on my Sprint.
Is there any trick to get the mat to stick to the underside of the horizontal surface?
Is there any trick to get the mat to stick to the underside of the horizontal surface?
Steve Lyle
1972 Elan Sprint 0248k @ https://www.mgexp.com/registry/1972-Lot ... 48K.30245/
1972 MGB Roadster @ https://www.mgexp.com/registry/1972-MG- ... 842G.4498/
2007 BMW 335i Coupe
1972 Elan Sprint 0248k @ https://www.mgexp.com/registry/1972-Lot ... 48K.30245/
1972 MGB Roadster @ https://www.mgexp.com/registry/1972-MG- ... 842G.4498/
2007 BMW 335i Coupe
-

steve lyle - Fourth Gear

- Posts: 510
- Joined: 15 Jun 2015
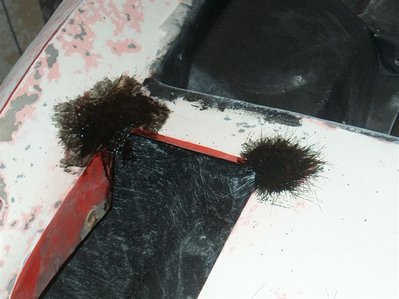
If you don?t have an anti-gravity machine it?s messy but cover up everything else in the area with plastic sheet and put on one layer at a time. Just keep stippling the resin into the fibreglass mat until it starts to go off.
Change is inevitable, except from a vending machine!
- Bigbaldybloke
- Fourth Gear

- Posts: 889
- Joined: 16 May 2017
Ensure the surface has no paint or oil etc.
Rough up the area with course sandpaper.
Wipe the area with a clean rag lightly dampened with some Acetone. Be very careful with Acetone it will destroy paint surface and read the H&S data. You can use the Acetone to clean your brushes and mixing container afterwards.
Cut 2 or 3 ?Patches? of fibreglass chopped strand mat. The patches need to be progressively smaller so the second patch applied is smaller than the first.
Then apply the mixed resin to the car surface and fibreglass patches and position the first patch.
Stipple the patch with the brush adding more resin in needed to soak the patch. Do the same with the other patch/s.
Note: - If doing the upper surface, use less patches of chopped strand and finish with 1 or 2 patches of fibreglass Tissue. This leaves an improved surface.
And as noted above by Bigbaldbloke, cover up everything with plastic sheeting and stipple if necessary until resin is starting to go off.
I purchased my products from East Coast Fibre Glass supplies. They also have some video guides.
I have no association, just a satisfied customer.
https://www.ecfibreglasssupplies.co.uk/
Trevor
1968 Elan +2 50/0173
1968 Elan +2 50/0173
-

TeeJay - Fourth Gear

- Posts: 540
- Joined: 30 May 2007
33 posts
• Page 2 of 3 • 1, 2, 3


