Page 2 of 2

Re: 1967 Elan S3 SE Restoration

PostPosted: Wed Dec 18, 2019 12:54 pm
by Tmac897
I appreciate all the suggestions on new heads. I?ve contacted SAS and a couple of others. All good options, albeit expensive ones. Because I have some time right now, I?ve been trying to find a used one. I found a used Stromberg head with a Weber conversion. Anyone have any experience with that route? What might be the performance expectations?

The new heads with big valves and hot street cams can easily produce 150bhp+. But $850 for a head (no cams) from a reputable source does have a certain appeal, and I?d be remiss if I didn?t at least explore. Any thoughts?
Re: 1967 Elan S3 SE Restoration

PostPosted: Thu Dec 19, 2019 4:44 pm
by My72Sprint
During past research I found UK head suppliers Qed, SAS etc to do not include valve stem seals.
A poor old school practice, Replies " We have never do this is 40 years" Ok it's been wrong for 40 years.

Every modern engine is equipped with seals for oil control.,Any builder can machine valve guides for seals.

I have a Twin Cam arriving next week 194hp@6600, 161trq@5600 10.5 street CR, With valve stem seals.
Tim

Re: 1967 Elan S3 SE Restoration

PostPosted: Thu Jun 04, 2020 9:07 pm
by Tmac897
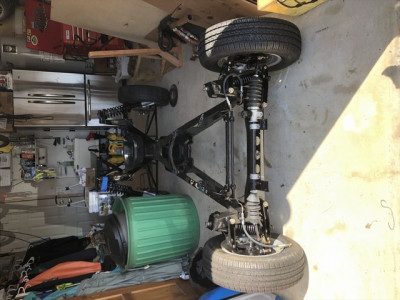
So I’m happy to say that I’ve once again got a rolling chassis! It was a little bit of a struggle with the rear carriers, bearings, and hubs; but with some timely help from the members here, we got through all that.

I replaced the front seal on the differential, polished the back, repainted the front, and got it reinstalled successfully. That part went pretty smoothly. The drive shaft is also reinstalled. When I get the body back on I’ll reinstall the couplings and complete the running gear.

The block is ready to be reassembled. I bought a set of JE forged pistons. Hoping to get to that in the next week.

I did decide to go with a new head, based on seeing what’s out there on the used market. It was probably $1500 extra, but I think that will make everything else easier. I purchased from DBE, as well as the valve train and 150hp cams. They’ve been extremely helpful to me. That’s now out at the machine shop getting assembled.

The transmission was cleaned up and painted. It’s in good shape so just a reinstall when the engine is complete. The clutch slave cylinder was rebuilt, too.

It feels like things are finally coming together!

77EB483D-6BAB-4BF7-BF1F-B92F22E8A676.jpeg and

Re: 1967 Elan S3 SE Restoration

PostPosted: Fri Jun 05, 2020 11:15 am
by gino1
You could try Tony Ingram he's in Santa Barbara.
Go and look at his FB page...

Gino

Re: 1967 Elan S3 SE Restoration

PostPosted: Fri Jun 05, 2020 1:53 pm
by Tmac897
gino1 wrote:You could try Tony Ingram he's in Santa Barbara.
Go and look at his FB page...

Gino


For a head? I was able to get one from DBE... Otherwise not sure what you mean.

Tony

Re: 1967 Elan S3 SE Restoration

PostPosted: Thu Jun 25, 2020 2:54 am
by Tmac897
Since we last spoke,,,

I've spent a fair amount of time getting some miscellaneous parts to finish off some of the sub assemblies. For example, I had a hard time getting the small diameter hardened nuts and bolts required for the hand brake pad assembly. Mine were stripped in the middle. I finally got them from Aircraft Spruce here in the US. Reasonable prices and fast service. They ship out of CA for Western US, and GA for Eastern. Glad to have that out of the way.

I also took care of the potential side to side play of the steering rack, due to the smaller width of the new alloy u-channels. I bought a couple of poly bushings for a Spitfire off of eBay for $15. I cut them to the necessary width using a thin kerf pull (dovetail) saw. They are one piece, with a split to allow them to be installed on the rack. To hold them in, I drilled a 1/8" hole through the split side, and I countersunk a small nut at the bottom. So they're now "bolted in." That was actually kind of fuin to do. I'll attach some pictures when I get a chance.

I disassembled the carburetors (didn't remove the butterflies, etc.) and cleaned out the body and all of the jetting. Installed new gaskets, o-rings, etc., and reassembled. I was somewhat intimidated, at first, but I had the shop manual and just followed the procedures carefully. It wasn't really all that hard. One carb was actually pretty clean inside, and didn't really need much. The other was pretty gunked up, so I'm glad I took this step.

Getting ready to build the block. Have all the parts, and just need to set aside the time to work on this.

I'm also going to start cleaning up the body, and start to remove the interior and "upholstery." As that's in another location, I'll have to schedule a "road trip."

That's all for now.